
Raising healthy chickens starts with providing the right environment from day one. A well-set-up brooder is crucial to ensure your chicks grow into strong, disease-free birds. But setting up a perfect brooder can be overwhelming, especially for first-time chicken owners. That’s why we’re here to help you get it right! In this article, we’ll walk you through the essential elements of a great brooder setup, including temperature control and ventilation systems that will keep your chicks safe and comfortable. We’ll also cover feeding systems that promote healthy growth and development. By following our simple tips and guidelines, you can create a perfect brooder environment for your chicks to thrive in. Let’s get started on setting up the best possible home for your new feathered friends!
Choosing the Right Location and Size
When choosing a location for your brooder, consider factors such as accessibility, ventilation, and proximity to your home. The ideal size will also depend on your chick’s needs at various stages of growth.
Factors to Consider When Selecting a Location
When choosing a location for your brooder, there are several key factors to consider. First and foremost, think about ventilation. A well-ventilated area is crucial for maintaining good air quality and preventing the buildup of ammonia from droppings. Look for a spot with natural airflow or consider installing a ventilation system if necessary.
Another important consideration is accessibility. You’ll want to be able to easily monitor your chicks’ progress and make adjustments as needed, so choose a location that’s convenient for you. A spot near a door or window can also help with temperature regulation and sunlight exposure.
In terms of sunlight, it’s essential to provide some direct sunlight for your chicks, but be careful not to place the brooder in a spot where they’ll be exposed to extreme temperatures or drafts. Proximity to water sources is also crucial – you’ll want to be able to easily access water without having to go far.
When selecting a location, consider the temperature range in your area and choose a spot that’s protected from harsh weather conditions. A basement or covered porch can be an excellent option, but make sure it’s well-ventilated and accessible.
Measuring Up: Determining the Perfect Brooder Size
When it comes to setting up your brooder, determining the perfect size is crucial for your chicks’ comfort, safety, and health. A general rule of thumb is to provide at least 1-2 square feet of space per chick in the first few weeks after hatching. However, this can vary depending on the breed and expected growth rate.
For example, if you’re raising Leghorns or other lightweight breeds, they may need more space as they grow rapidly. On the other hand, slower-growing breeds like Orpingtons or Brahmas may require less space.
To calculate the ideal brooder size for your chicks, consider their projected adult weight and growth rate. A good starting point is to plan for 2-3 square feet of space per chick by the time they reach 8-10 weeks old. You can also use a rough estimate of 1/4 to 1/2 square foot per chick for every pound of expected adult weight.
Remember, overcrowding can lead to health issues and stress in your chicks. By providing enough space, you’ll ensure they have room to move around comfortably and reduce the risk of disease transmission.
Setting Up the Brooder Environment
When it comes to setting up a brooder for your new chicks, creating a safe and healthy environment is crucial. Let’s dive into the essential steps to prepare their home.
Temperature Control: A Critical Aspect of Brooder Setup
Temperature control is a critical aspect of setting up a brooder, as it plays a significant role in regulating the chicks’ metabolism, growth rate, and overall health. Chicks need to be kept warm for their first few weeks of life, especially if they’re raised indoors.
When choosing heat lamps or other heating sources, consider the size of your brooder and the number of chicks you’ll be raising. A general rule of thumb is to provide 1-2 watts of heat per chick. For example, a brooder with 10 chicks would require a heat lamp rated at 20-40 watts.
To set up heat lamps safely and effectively:
* Position the heat lamp at least 12 inches off the ground to avoid burns
* Ensure good air circulation around the heat source to prevent overheating
* Monitor temperature using a thermometer, aiming for a range of 90°F to 100°F (32°C to 38°C)
* Gradually decrease heat as chicks grow and develop feathers
By maintaining optimal temperatures and providing adequate ventilation, you can create a healthy environment for your chicks to thrive in.
Ventilation Systems for Healthy Air Quality
Adequate ventilation is essential for maintaining healthy air quality within the brooder. When setting up the environment for your chicks, it’s crucial to ensure that there is a steady flow of fresh air circulating through the space. This not only helps prevent respiratory issues but also keeps the environment clean and free from ammonia buildup.
There are several options for ventilation systems, including window vents, exhaust fans, and automatic ventilation controllers. Window vents can be installed in windows or walls, allowing for natural airflow to enter the brooder. Exhaust fans, on the other hand, help remove stale air from the space. Automatic ventilation controllers can be programmed to regulate temperature and humidity levels, ensuring that the environment remains optimal for your chicks.
When selecting a ventilation system, consider the size of your brooder and the number of chicks you’re raising. A general rule of thumb is to provide at least one square foot of ventilation space per 10 square feet of floor area. This can be achieved by installing a combination of window vents and exhaust fans. Regular maintenance is also essential to ensure that your ventilation system operates efficiently.
Brooder Bedding: Choosing the Right Materials
Choosing the right brooder bedding is crucial for your chicks’ comfort and health. Let’s explore some top picks for safe, easy-to-clean options that will keep your little ones happy and thriving.
Understanding the Benefits and Drawbacks of Different Beddings
When it comes to choosing the right brooder bedding for your chicks, you have several options available. Each type of bedding has its unique set of benefits and drawbacks that you should consider before making a decision.
Pine shavings are a popular choice among chicken keepers due to their effectiveness in absorbing moisture and odor. They’re also relatively inexpensive compared to other materials. However, pine shavings can be a respiratory hazard for chicks if they ingest too much of them. To minimize this risk, it’s essential to use a shallow layer (about 1-2 inches deep) and keep the brooder clean.
Straw is another alternative that can provide good insulation and help regulate temperature in the brooder. It’s also biodegradable and compostable. Nevertheless, straw can be more expensive than pine shavings, and it may not absorb moisture as efficiently. Additionally, some breeds of chickens might find straw unappealing to forage on.
Recycled paper products, such as Carefresh or similar alternatives, are another option worth considering. They’re highly absorbent, gentle on chicks’ lungs, and can help reduce odors in the brooder. However, these products may be more expensive than other materials, and some chicken keepers have reported issues with mold growth if they get too damp.
Ultimately, the best bedding for your brooder will depend on your specific needs and preferences as a chicken keeper. It’s crucial to weigh the pros and cons of each material carefully before making an informed decision that prioritizes both your chicks’ health and your own convenience.
Tips for Maintaining Cleanliness with Brooder Bedding
Maintaining cleanliness is crucial for healthy chicks and a stress-free brooder environment. When it comes to different bedding materials, each has its own unique characteristics that can impact cleaning routines.
Wood shavings, for instance, are easy to clean up but may absorb moisture, making them prone to mold growth. On the other hand, pine or cedar shavings have natural oils that repel insects and reduce odors, but they can be messy when wet. Consider using paper-based products like straw or hay as they wick away moisture, reducing the risk of ammonia buildup.
To minimize odors and keep your brooder clean:
* Remove soiled bedding daily to prevent bacterial growth
* Change out bedding completely every 7-10 days, depending on the material’s absorbency and the number of chicks
* Add a layer of new bedding before introducing more droppings from the previous day to ensure even distribution of moisture
* Keep your brooder well-ventilated to reduce ammonia buildup
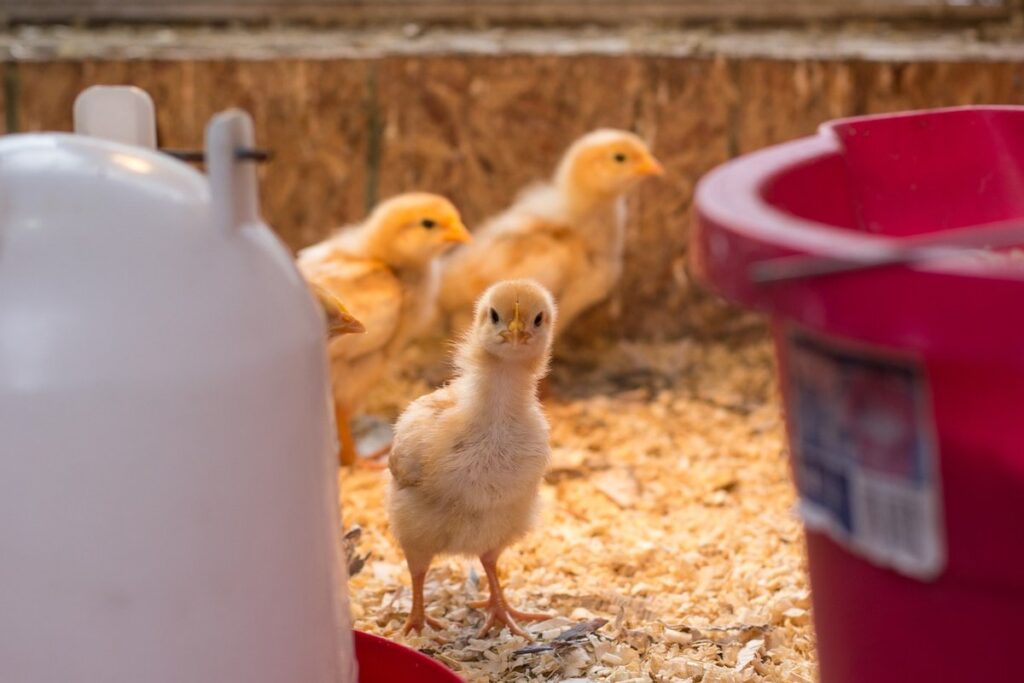
Feeding and Watering Systems in the Brooder
When it comes to keeping your chicks healthy and happy, having a reliable feeding and watering system is crucial. This setup should be easy for them to access at all times.
Designing an Efficient Feeding System for Chicks
When it comes to designing an efficient feeding system for chicks, it’s essential to consider their unique needs and your own level of comfort with maintenance. Automatic feeders are a great option for busy breeders, as they can dispense the correct amount of feed at regular intervals, minimizing waste and ensuring the chicks always have access to food.
When selecting an automatic feeder, look for one that’s specifically designed for chicks and has adjustable settings to accommodate different ages and growth rates. Some popular options include gravity-fed systems and those with built-in timers. These can be especially helpful if you’re raising a large number of chicks or have limited time to tend to them.
In terms of feed itself, it’s best to stick with a high-quality chick starter feed that provides the necessary nutrients for optimal growth. Consider supplementing with fresh fruits and veggies once your chicks are around three weeks old, but be sure to introduce these new foods gradually to avoid digestive issues.
Setting Up Hydration Stations for Optimal Health
Providing clean water at all times is crucial for optimal health and development of chicks. A well-designed watering system can help prevent contamination and ensure that your birds have access to fresh water whenever they need it.
When setting up hydration stations, consider the following tips:
• Place them at a comfortable height for the chicks to easily access.
• Use a watering system with multiple outlets to prevent overcrowding and reduce the risk of competition.
• Install a float valve or sensor to automatically refill the water when the level drops below a certain point.
Maintaining cleanliness is also essential. Change the water frequently, ideally every 2-3 hours, and clean the hydration stations daily using mild soap and warm water. This will help prevent bacterial growth and keep your chicks safe from potential health risks associated with contaminated water.
Remember to monitor the water level regularly, especially during peak usage times, and adjust as needed to ensure that your chicks always have access to fresh drinking water.
Monitoring and Maintaining Your Brooder
Once you’ve got your brooder set up, it’s time to focus on keeping those little fluffballs happy and healthy. In this critical next phase, regular monitoring and maintenance are key.
Keeping Track of Chicks’ Growth: Monitoring and Record-Keeping
Monitoring your chicks’ growth and development is crucial to ensure they stay healthy and thrive. To do this effectively, it’s essential to keep track of their weight gain, feather development, and overall health.
Start by weighing your chicks regularly, ideally once a week, using a digital baby scale or a postal scale. Record the weights in a notebook or spreadsheet, noting any significant changes or fluctuations. This will help you identify if there are any underlying issues that need to be addressed. For example, if you notice a sudden drop in weight, it could indicate a health problem.
In addition to tracking weight gain, also monitor your chicks’ feather development. Check for proper growth, coloration, and coverage of feathers on their bodies. If you notice any abnormalities or uneven development, research the potential causes online or consult with a veterinarian for guidance.
Lastly, maintain a record-keeping system that includes notes on feeding schedules, water quality, temperature control, and any health issues that arise. This will enable you to identify patterns and make adjustments as needed, ensuring your chicks receive optimal care throughout their growth stages.
Troubleshooting Common Issues in the Brooder
Troubleshooting common issues in your brooder is crucial to ensuring your chicks stay healthy and thrive. Respiratory problems are one of the most common issues you may encounter. These can be caused by factors such as poor ventilation, overcrowding, or high humidity levels.
Check that your brooder has adequate airflow to prevent moisture buildup. You can do this by ensuring the windows or vents are not blocked, and that the air exchange rate is sufficient for the number of chicks you’re raising. A good rule of thumb is to provide at least 1 square foot of space per chick.
Another common issue is escapes. To prevent this, make sure the brooder’s enclosure is secure and escape-proof. Consider adding a lip around the edges or using hardware cloth to cover any gaps. Regularly inspect your brooder for signs of wear and tear, such as broken wires or loose panels, which can provide an entry point for predators.
Regular monitoring and maintenance are key to preventing these common issues from arising in the first place.
Conclusion: Tips for Success with Your New Chicks
As you bring your new chicks home, it’s essential to remember that proper care and attention are crucial for their growth and development. Make sure to maintain a clean brooder by changing the bedding frequently, disinfecting surfaces regularly, and monitoring temperature and humidity levels closely. A well-planned routine will help keep your chicks happy and healthy, so set aside time each day to check on them, provide fresh water and food, and ensure they have enough space to move around.
Remember that every chick is different, so stay vigilant for any signs of illness or stress. With proper care and attention, you can create a safe and nurturing environment for your new chicks to thrive in.
Frequently Asked Questions
How do I know if my brooder is adequately ventilated for the chicks’ growth stages?
Ventilation needs to increase as your chicks grow. Ensure you have a ventilation system that can be adjusted to accommodate their changing needs. Consider a brooder with windows or install vents that can be opened gradually as the chicks get older.
What are some signs of inadequate temperature control in my brooder, and how can I correct them?
Signs of improper temperature include lethargic behavior, huddling, or panting. Check your thermometer regularly to ensure it’s accurate, and adjust your heat source accordingly. Also, make sure the brooder is well-insulated to retain warmth.
How often should I change the brooder bedding, especially when using a deep litter method?
For optimal health, change the brooder bedding every 1-2 weeks for small batches of chicks. Deep litter methods can be more convenient but require closer monitoring to prevent ammonia buildup and ensure cleanliness.
Can I use a metal or plastic tub as a makeshift brooder, or are these materials better avoided?
While they might seem like cost-effective options, metal or plastic tubs aren’t ideal brooders due to their inability to regulate temperature and provide adequate ventilation. Instead, opt for a durable, easy-to-clean material that can accommodate your chicks’ needs.
How do I balance providing enough space in the brooder with keeping it compact and efficient?
Measure your available space carefully and ensure the brooder fits comfortably without overcrowding. Consider using vertical space by adding shelves or racks to maximize room usage while keeping the area clean and well-ventilated.