
Are you an avid backyard chicken keeper or passionate about conservation efforts? If so, understanding how to calculate and optimize duck egg hatching days is crucial for successful breeding and conservation programs. Not only does it ensure a healthy clutch of ducklings, but it also plays a vital role in the sustainability of waterfowl populations. With various factors influencing incubation periods, such as temperature, humidity, and breed-specific differences, pinpointing the ideal hatching day can be challenging.
This article delves into the intricacies of calculating duck egg hatching days, including the importance of fertility testing to ensure optimal breeding success. We’ll explore how to balance temperature and humidity levels for a smooth incubation process, taking into account distinct breed requirements. By mastering these essential techniques, you’ll be well-equipped to optimize your duck egg hatching days and contribute significantly to waterfowl conservation efforts.
Introduction to Duck Egg Incubation
Welcome to the world of duck egg incubation! Here, we’ll cover the essential steps and considerations for successfully hatching your duck eggs at home.
What are Duck Eggs and How Do They Hatch?
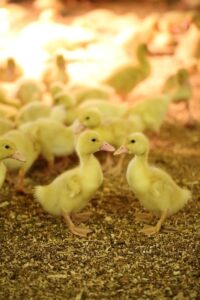
Duck eggs are a popular choice for backyard chicken keepers and egg enthusiasts alike. These large, brown or blue-green eggs are laid by domesticated ducks and have several characteristics that set them apart from chicken eggs. One of the most notable differences is their larger size – duck eggs can weigh up to 2 ounces more than chicken eggs, making them perfect for baking, cooking, and decorating.
But what makes a duck egg special isn’t just its size; it’s also the process of incubation that brings life to these eggs. Incubation is the process of maintaining a consistent temperature between 99°F and 100°F (37°C to 38°C) for 28 days to allow the embryo inside the egg to develop and hatch. During this time, the duck mother would naturally sit on her nest to keep the eggs warm and safe.
To replicate this natural process at home, you’ll need a suitable incubator or a broody hen that can provide the necessary warmth and care for your duck eggs. With proper attention and care, your duck eggs will begin to pip (break through their shells) after 28 days of incubation, followed by a few more hours of drying out before they emerge as fully formed ducklings.
Importance of Knowing Duck Egg Hatching Days
Understanding duck egg hatching days is crucial for anyone involved in breeding, conservation, and education efforts. Knowing when eggs will hatch allows breeders to plan and prepare for the arrival of new ducklings, ensuring a smooth and successful process.
For breeders, understanding hatching days is essential for planning breeding programs, managing resources, and minimizing losses. With accurate information on hatching days, you can schedule feedings, cleanings, and other essential tasks around the expected hatch date. This also enables you to make informed decisions about egg handling, incubation temperatures, and turning frequencies.
Conservation efforts rely heavily on precise timing for breeding programs. By knowing when eggs will hatch, conservationists can monitor progress, identify trends, and adjust strategies accordingly. For example, if a particular species has an unusually long incubation period or high mortality rate, conservationists can develop targeted interventions to address these issues.
For educators, understanding hatching days provides valuable teaching opportunities. By incorporating this knowledge into educational programs, you can engage students with hands-on activities, promote STEM learning, and inspire the next generation of wildlife enthusiasts.
Factors Affecting Duck Egg Hatching Days
When it comes to raising healthy ducklings, knowing how long your eggs take to hatch is crucial. Let’s explore the key factors that influence duck egg hatching days.
Temperature and Humidity in Incubation
Temperature and humidity levels play a crucial role in the incubation process. For duck eggs specifically, maintaining optimal temperature and humidity is essential to ensure successful hatching.
The ideal temperature range for incubating duck eggs is between 99°F (37°C) and 100°F (38°C). Temperatures that stray too far from this range can result in delayed or failed hatchings. A commonly cited example is a study where temperatures were kept at 96°F (35.5°C), resulting in a 20% failure rate.
Maintaining the correct humidity level is equally important. The ideal relative humidity for duck eggs during incubation is between 50-60%. This helps prevent water loss through evaporation, ensuring the embryo receives enough moisture to develop properly. On the other hand, extremely low or high humidity can lead to issues such as egg desiccation or fungal growth.
To achieve optimal temperature and humidity levels, it’s essential to invest in a reliable incubator. Ensure you monitor the incubator regularly to avoid any potential issues. By maintaining precise control over these factors, you’ll significantly improve your chances of successful hatching.
Breed-Specific Differences in Hatching Days
When it comes to duck egg hatching days, breed-specific differences can play a significant role. Different breeds have unique characteristics that affect their reproductive cycles, which in turn influence the length of incubation periods.
Some popular duck breeds, like Khaki Campbells and Welsh Harlequins, are known for their consistent laying patterns and relatively shorter hatching times, typically ranging from 28 to 30 days. On the other hand, breeds with a larger body size or those originating from colder climates, such as Muscovy ducks, tend to have longer incubation periods of around 35-40 days.
Breeders can use this information to their advantage by selecting breeds that match their specific needs and goals. For example, if you’re raising ducks for meat production, a breed with a shorter hatching time like the Khaki Campbell may be more suitable. However, if you’re interested in breeding or raising ducks for eggs, a breed with longer incubation periods might be preferred.
It’s also worth noting that individual duck characteristics can affect hatching times even within breeds. For instance, a duck’s age, nutrition, and health status all play crucial roles in determining the fertility of its eggs and the likelihood of successful hatching.
Calculating Duck Egg Hatching Days
To determine when your duck eggs will hatch, you’ll need to calculate the exact number of days until hatching based on the incubation period. Let’s dive into the math behind it all.
Using Hatchery Records to Determine Incubation Period
When it comes to calculating duck egg hatching days, hatchery records can be an invaluable resource. Many breeders and farmers keep meticulous records of incubation periods for specific breeds, which can help you estimate the ideal time frame for hatching.
To access these records, reach out to reputable hatcheries or breed associations that specialize in your desired breed. They may provide you with historical data on average incubation periods, based on factors such as egg size, weight, and breed characteristics. For example, if you’re raising Pekin ducks, a common breed, you can look for records showing an average incubation period of 28-30 days.
Keep in mind that these records are often averages, so it’s essential to consider individual variables when determining your own incubation period. Climate, nutrition, and overall health of the duck flock can all impact the length of time required for eggs to hatch. Use this data as a starting point, but be prepared to adjust based on your specific situation.
It’s also worth noting that some breeders may have more extensive records than others, so don’t be afraid to ask questions or request additional information. By leveraging these resources and fine-tuning your approach, you can increase the chances of successful hatching and raise healthy, robust ducklings.
The Role of Fertility Testing in Predicting Hatching Success
When it comes to calculating duck egg hatching days, fertility testing plays a crucial role in predicting success and duration. Fertility testing is essential for evaluating the quality of eggs before incubation begins. This process involves checking the embryo’s development at various stages, usually around 7-10 days after breeding.
A reliable fertility test can help you identify potential issues with egg viability, allowing you to take corrective measures and adjust your breeding schedule accordingly. For instance, if you notice a high percentage of infertile eggs or low hatch rates, it may indicate that your ducks are not in optimal breeding condition or that the breeder is experiencing health problems.
To perform fertility testing, you can use various methods such as candling (examining eggs under bright light) or checking for embryonic development using specialized equipment. Regular fertility testing helps breeders refine their breeding programs and make informed decisions about which ducks to breed together in future seasons.
It’s also worth noting that fertility testing can help reduce waste by identifying low-quality eggs early on, rather than investing time and resources into incubating them. By incorporating fertility testing into your routine, you’ll be better equipped to predict hatching success and duration, ultimately leading to healthier and more successful ducklings.
Tips for Successful Duck Egg Hatching Days
To ensure a successful duck egg hatching day, it’s essential to understand what factors contribute to optimal incubation conditions and how to troubleshoot common issues. We’ll share our expert tips on creating an ideal environment for your eggs.
Maintaining a Clean and Controlled Environment
Maintaining proper sanitation and environmental conditions is crucial for successful incubation. You want to create an ideal environment that promotes healthy hatching, so let’s dive into the details. Firstly, it’s essential to keep the area around the incubator clean and free from dust and debris. Regularly wipe down surfaces with a disinfectant solution, paying attention to areas where eggs are handled or placed.
Maintaining a consistent temperature between 99°F and 100°F (37°C – 38°C) is also vital. Avoid placing the incubator near heating vents, radiators, or drafty windows, as this can cause fluctuations in temperature. Use a thermometer to monitor and adjust the temperature as needed. Additionally, ensure good air circulation around the incubator to prevent moisture buildup.
To further control the environment, consider investing in a hygrometer to monitor humidity levels between 50% and 60%. This will help you maintain optimal conditions for hatching. By following these guidelines, you’ll be able to provide your duck eggs with an ideal environment that promotes successful hatching. Remember, a clean and controlled environment sets the stage for healthy growth and development during incubation.
Monitoring Embryo Development and Health
Monitoring embryo development is crucial to ensure successful hatching. One way to do this is by candling, which involves shining a bright light through the egg to observe the embryo’s growth. Start monitoring around day 7-10 of incubation, and continue to check on the embryos every few days until hatching.
Observe the embryo’s size, movement, and blood vessel formation through the air sac. A healthy embryo should have a clear heartbeat, visible limbs, and a developed beak by around day 14. Note any unusual patterns or growths that may indicate health issues.
Another technique is to use an egg candler with built-in thermometer to monitor temperature fluctuations inside the incubator. Keep in mind that duck eggs typically require temperatures between 99-100°F (37-38°C) during incubation.
Regular candling and monitoring can also help identify potential problems early on, allowing for prompt action to be taken to ensure a healthy hatch.
Common Issues Affecting Duck Egg Hatching Days
When it comes to duck egg hatching days, unexpected issues can arise, and being aware of these common problems will help you better prepare for a successful hatch. Let’s take a look at some of the most frequent concerns.
Causes of Delayed or Failed Hatch
Delayed or failed hatching can be a stressful and disappointing experience for duck keepers. One of the most common causes is temperature fluctuations, which can affect the development of the embryo. Ideally, the incubator should maintain a consistent temperature between 99°F to 100°F (37°C to 38°C). However, even slight deviations from this range can impact hatch rates.
Humidity issues are another common problem. The ideal humidity level for duck eggs is around 50-60%. If it’s too high, the eggs may become waterlogged and increase the risk of bacterial growth. Conversely, if it’s too low, the embryo may not develop properly due to dehydration. Maintaining a consistent humidity level requires careful monitoring and adjustments.
Improper care can also lead to delayed or failed hatch. For example, turning the eggs excessively or not enough can cause the embryo to become disoriented or stuck to the shell membrane. Similarly, not cleaning the incubator regularly can lead to bacterial contamination, which can be fatal for the developing embryo. Regular checks and proper maintenance are essential to ensure a successful hatch.
Strategies for Troubleshooting and Problem-Solving
Identifying and addressing potential problems during the incubation process is crucial to ensure successful hatching. When unexpected issues arise, remain calm and methodically troubleshoot the situation.
Firstly, monitor temperature fluctuations, as even slight variations can significantly impact hatch rates. Regular checks of the thermostat and thermometer will help you identify any discrepancies. If the issue persists, consider investing in a digital temperature controller for more precise temperature control.
Additionally, maintain optimal humidity levels (around 50-60%) to prevent dehydration and promote healthy egg development. Check for signs of excessive moisture or dryness, such as mold growth or cracked eggs.
Regularly inspect the incubator’s air circulation system to ensure proper airflow and prevent the buildup of bacteria. This can be achieved by cleaning the vents and fans regularly.
Finally, consider implementing a backup plan in case of an emergency. Store eggs at 65-70°F (18-21°C) if you’re experiencing issues with your main incubation setup.
Conclusion: Nurturing Success with Duck Egg Hatching Days
Now that you’ve made it through the entire process, let’s summarize what we’ve learned and provide some final tips for nurturing success with your duck egg hatching days.
Recap of Key Takeaways
As we conclude our exploration of duck egg hatching days, let’s recap the key takeaways that will help you nurture success in this fascinating process.
You’ve learned about the importance of proper incubation techniques, including maintaining a consistent temperature between 99-100°F and ensuring adequate humidity levels. It’s crucial to monitor your eggs regularly for any signs of trouble, such as unusual odors or cracks. By doing so, you can take prompt action to prevent embryo loss.
We also discussed the significance of egg handling and storage, emphasizing the need to handle eggs gently and store them in a cool, dry place. This will help preserve the viability of your duck embryos.
To ensure successful hatching, it’s essential to provide a suitable environment for your ducklings once they emerge from their shells. This includes providing a clean, draft-free area with adequate ventilation, as well as a nutritious diet and proper care.
Remember, every duck egg hatching day is unique, so be prepared for any unexpected challenges that may arise. By following these key takeaways and staying vigilant, you’ll be well on your way to enjoying the rewarding experience of raising your very own ducklings.
Final Thoughts and Recommendations
As you’ve reached the end of our journey through duck egg hatching days, we hope you’re feeling more confident and prepared to tackle this exciting aspect of breeding ducks. Remember, successful breeding efforts require patience, dedication, and a willingness to learn from each experience.
One crucial takeaway is that every duck egg hatching day is unique, so be prepared for the unexpected. Don’t get discouraged by setbacks or losses – use them as opportunities to refine your techniques and improve your chances of success in future hatchings.
To ensure a smooth process, make sure you’re adequately equipped with the right tools and supplies. This includes a reliable incubator, a clean and safe brooder area, and essential feeding equipment. Don’t forget to monitor temperature fluctuations and humidity levels closely – these can significantly impact hatching rates.
As you embark on your duck breeding journey, remember that practice makes perfect. Continuously evaluate and refine your methods based on the results of each hatch. By doing so, you’ll develop a deeper understanding of what works best for your flock, ultimately leading to healthier, more resilient offspring. With persistence and dedication, you’ll be well on your way to achieving success in duck breeding.
Frequently Asked Questions
Can I use hatchery records from different breeds to determine incubation periods for my own flock?
While hatchery records can provide valuable insights, it’s essential to remember that each breed has unique characteristics that may affect incubation periods. For optimal results, consult breed-specific data or conduct your own fertility testing to ensure accuracy.
What are some common mistakes I should avoid when monitoring embryo development and health during incubation?
Common pitfalls include failing to maintain consistent temperature and humidity levels, neglecting to rotate eggs, and not being vigilant about detecting potential issues such as fungal infections. Regularly checking on the flock and staying informed can help prevent these problems.
How often should I conduct fertility testing for my duck breeding program?
Fertility testing is a crucial aspect of any successful breeding program. It’s recommended to test at least once a month, but ideally every 2-3 weeks, to ensure you’re getting the best possible hatch rates. This frequency will also help you identify potential issues early on.
What’s the ideal incubation period for duck eggs from various breeds?
While breed-specific requirements can vary significantly, some popular breeds like Khaki Campbells and Muscovy ducks typically take around 28-30 days to hatch. However, it’s essential to consult specific guidelines for your chosen breed or conduct your own research to ensure accuracy.
Can I still achieve a successful hatch if I’ve experienced delayed or failed hatches in the past?
While past issues can be frustrating, they don’t necessarily dictate future success. By identifying and addressing any underlying causes (such as temperature fluctuations, humidity imbalances, or poor fertility), you can take steps to correct these problems and improve your chances of a successful hatch.