
Are you ready to take on one of the most rewarding experiences in poultry keeping? Hatching goose eggs can be a thrilling adventure, but it requires patience, dedication, and knowledge. As a beginner or seasoned breeder, choosing the right breed is crucial for successful hatching. With so many breeds to choose from, selecting the perfect goslings can be overwhelming. But don’t worry, we’ve got you covered. In this expert guide, we’ll walk you through the process of preparing goose eggs for incubation, including choosing the right eggs and equipment. We’ll also cover various incubation methods, from traditional egg turning to modern technology. By the end of this article, you’ll be confident in your ability to hatch healthy goslings. Let’s get started on this journey together!
Choosing the Right Goose Breed
When it comes to hatching goose eggs, selecting the right breed is crucial for success. Let’s explore the factors that’ll help you choose a goose breed that fits your needs and preferences.
Characteristics of Suitable Breeds
When selecting a goose breed for egg hatching, it’s essential to consider their temperature tolerance. Some breeds are better suited for colder climates and can withstand temperatures as low as 20°F (-7°C), while others may struggle in such conditions. For instance, the Toulouse and Embden breeds are known for their hardiness and can thrive in cold weather. On the other hand, breeds like the Chinese and African geese are more sensitive to temperature fluctuations.
Another crucial characteristic is broodiness – some breeds are naturally inclined to sit on eggs, while others may not be as eager to incubate. For example, the Embden breed is known for its strong maternal instincts and will readily take to sitting on eggs. In contrast, the Chinese goose may require more encouragement to become broody.
Fertility is also an important factor when choosing a breed for egg hatching. Some breeds are naturally more fertile than others, with some laying up to 200 eggs per year. The Toulouse breed, for instance, is known for its high fertility and can produce multiple clutches throughout the year.
Factors Influencing Fertility Rates
When choosing a goose breed for hatching eggs, it’s essential to consider the factors that influence fertility rates. Age is one of the primary factors affecting fertility in geese. Geese typically reach their peak reproductive age between 2-5 years old. If you’re selecting a breeder or purchasing eggs from an older bird, the fertility rate may be lower.
Nutrition also plays a crucial role in maintaining high fertility rates in geese. A well-balanced diet rich in nutrients is vital for overall health and reproductive fitness. Geese need access to fresh water, adequate grassland, and quality feed to support their reproductive cycles.
Health conditions can significantly impact fertility rates in geese. Common health issues like respiratory infections or parasites can decrease fertility. Regular veterinary check-ups, proper sanitation, and a healthy living environment are essential for maintaining the reproductive health of your geese.
It’s also worth noting that some breeds tend to have naturally higher fertility rates than others. Researching and selecting a breed known for its high fertility rate can increase your chances of successful hatching.
Preparing Goose Eggs for Incubation
Before starting your hatching journey, it’s essential to prepare your goose eggs properly for incubation. This involves a series of crucial steps to ensure optimal chances of successful hatching.
Cleaning and Handling Eggs
When handling and cleaning goose eggs for incubation, it’s crucial to take extra precautions to prevent damage or contamination. Start by gently washing your hands with soap and water before touching the eggs.
To clean the eggs, you can use a mild detergent specifically designed for egg cleaning, mixed with warm water in a shallow dish. Gently submerge each egg into the solution, making sure not to let them sit too long as excessive moisture can seep into the pores of the shell. Rinse the eggs thoroughly under running water to remove any soap residue.
Next, dry the eggs with a clean towel or let them air-dry on their ventral (belly) side. This will help prevent bacterial growth and keep the eggs free from debris. Always handle eggs by their equator, rather than the pointed end, as this can cause breakage.
Remember to inspect your eggs regularly for any visible cracks or damage during handling. Even tiny cracks can provide entry points for bacteria and reduce chances of successful hatching.
Candling and Grading Eggs
Candling and grading eggs are crucial steps before incubation to ensure you’re working with healthy, fertile eggs. To start, you’ll need a candle or a specialized egg candling lamp. This tool emits a bright light that allows you to inspect the egg’s interior.
When using a candle or a lamp, position it so the light shines through the large end of the egg. Hold the egg at an angle, allowing the light to illuminate any air cells within the egg. If the egg is fertile and healthy, you should see a pinkish-brown color around the embryo, which will appear as a dark spot or “eye” in the middle of the egg.
To check for visible cracks, hold the egg up against a white background. Any cracks will be visible as a shadow or dark line on the egg’s surface. When grading eggs, consider size, shape, and quality. Larger eggs are often preferred for breeding purposes, while smaller eggs can still produce healthy goslings. The most ideal goose eggs should have a well-formed air cell at one end and no visible cracks.
Setting Up an Incubator
Now that you have chosen a suitable incubation method, it’s time to set up your incubator correctly to ensure optimal conditions for successful hatching. This crucial step will be covered in the next few paragraphs.
Choosing the Right Incubation Method
Choosing the right incubation method is crucial for successful hatching. With various options available, it’s essential to consider factors like budget, space, and ease of use when making a decision.
Traditional incubators are a popular choice among backyard growers. These machines offer precise temperature control, humidity management, and automatic egg turning. However, they can be expensive, with prices ranging from $200 to over $1,000. If you’re on a tight budget or prefer a more hands-on approach, consider hatcher-style incubators. These units are designed specifically for the hatching process and typically cost between $50 to $300.
For those who want a low-cost, DIY solution, building your own incubator is an option. This requires some creativity and basic skills but can be a fun and rewarding project. You’ll need to consider factors like insulation, ventilation, and temperature control when designing your homemade incubator. Keep in mind that DIY incubators may not offer the same level of precision as commercial units.
Ultimately, choose an incubation method that suits your needs and experience level. If you’re new to hatching goose eggs, a traditional or hatcher-style incubator might be the best choice. As you gain more confidence and knowledge, consider building your own incubator for a cost-effective solution.
Configuring the Incubator for Goose Eggs
When setting up an incubator for goose eggs, it’s essential to consider their specific needs. Goose eggs require a slightly different temperature and humidity profile compared to chicken eggs.
For the temperature, most incubators are set between 99°F to 100°F (37°C to 38°C). However, goose eggs can tolerate temperatures as high as 101°F (39°C) for short periods. To be on the safe side, we recommend keeping it at 100°F (38°C).
Humidity levels also play a crucial role in incubation. Goose eggs prefer a slightly higher humidity level than chicken eggs, ranging from 50% to 60%. Aim for around 55% relative humidity.
Turning is also vital for even development of the embryo. Geese typically need more frequent turning than chickens due to their larger size and shape. Set your incubator to turn at least 3-4 times per hour, or adjust the speed according to the manufacturer’s guidelines.
Keep in mind that different incubators may have varying settings and features. Always consult the user manual for specific instructions on configuring your unit for goose eggs.
Hatching Process
Now that you have your eggs incubated, let’s dive into the exciting process of hatching, where life bursts forth from those tiny, developing embryos inside. We’ll explore every step of this miracle in detail.
Monitoring Embryonic Development
As you wait for your goose eggs to hatch, it’s essential to monitor their development closely. This will help you identify any potential issues early on and ensure a smooth hatching process. One of the most effective ways to do this is through candling, a technique that involves shining a light through the egg to see the embryo.
Candling should be done regularly, ideally every 7-10 days, starting from day 21 of incubation. This allows you to track the development of your goslings and make adjustments as needed. Look for the following milestones: at around day 28, the air sac should be visible; by day 30, the embryo’s eyes, legs, and beak should be distinct.
To candling correctly, use a candlelight or an LED light with a magnifying glass attachment. Hold the egg up to the light source and observe the shadow of the embryo on the shell. Be aware that some eggs may not show clear shadows, so it’s crucial to know what you’re looking for. Keep in mind that candling can be affected by the egg’s size and shape.
It’s also vital to track other milestones during incubation, such as pip-and-pull at around day 28-30, where the goslings start to break through the shell, and hatching at day 35 or so. Keeping a record of these developments will help you identify any potential issues and ensure that your goslings hatch successfully.
Make sure to keep an eye on temperature fluctuations during candling, as sudden changes can be detrimental to the embryo’s health. A consistent temperature range between 99°F and 100°F is essential for healthy development.
Recognizing Signs of Hatching
As you wait patiently for your goose eggs to hatch, it’s essential to recognize the subtle signs that indicate a new life is about to emerge. Keep a close eye on your eggs, as the hatching process can be both exciting and unpredictable.
One of the earliest signs of hatching is the appearance of pip marks or tiny holes in the eggshell. These usually start around the large end of the egg, where the embryo’s beak has begun to make its way through the shell. Be patient; it may take a while for these initial cracks to expand into larger openings.
Another indicator that your goose eggs are nearing hatching is increased droppings or “pip mess” around the nest. This can be an unsettling sight, but rest assured it’s a natural part of the process. As the egg develops and the embryo moves more actively, you’ll notice more frequent droppings.
Increased activity around the nest is also a telltale sign that hatching is imminent. Listen for soft chirping or peeping sounds from inside the egg. These gentle murmurs indicate that your goslings are getting ready to make their grand entrance into the world.
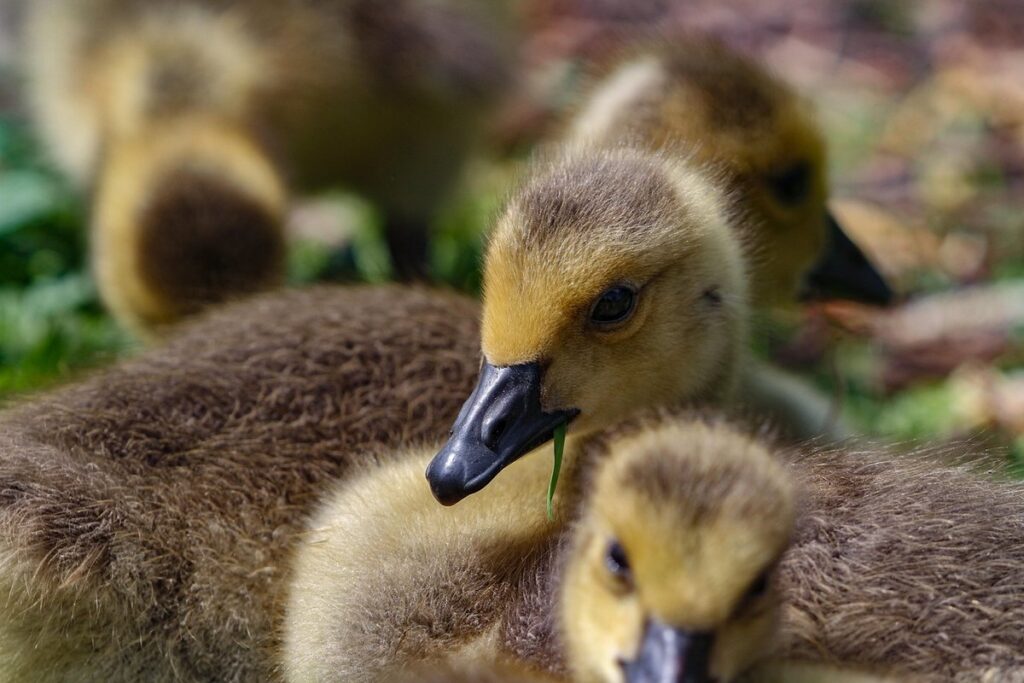
Raising Goslings
Now that you have successfully hatched your goose eggs, it’s time to introduce your adorable goslings to their new home and start teaching them essential skills. Learn how to care for these fragile little balls of fluff.
Providing Adequate Nutrition and Care
Providing adequate nutrition and care is crucial for goslings to grow strong and healthy. Goslings have high energy requirements due to their rapid growth rate, so it’s essential to provide them with a nutrient-rich diet. A good quality starter feed or a commercial gosling feed should be provided from the first day of life. This feed should contain around 20-25% protein to support their muscle development.
In addition to feed, ensure access to fresh water at all times. Change the water frequently to prevent bacterial growth and contamination. A shallow dish of water is ideal for young goslings as they can easily drown in deep water.
Proper housing is also vital for gosling health. Keep them in a draft-free area with adequate ventilation to maintain a comfortable temperature range. The enclosure should be escape-proof, as goslings are naturally curious and love to explore. A clean, dry brooder or a section of the main coop can be used as a temporary home.
Socialization is also important for young goslings. Introduce them to other geese at around 2-3 weeks old to help develop their social skills. Be sure to supervise interactions between the goslings and adult geese, especially if they are not familiar with each other. Regular handling and interaction can also help tame your goslings, making them easier to manage as they grow older.
Common Health Issues in Young Geese
As you care for your newly hatched goslings, it’s essential to be aware of common health issues that can affect them. One of the most significant concerns is Marek’s disease, a viral infection that can cause anemia, weight loss, and even death. This disease is highly contagious and often spreads through contact with infected droppings or contaminated feed.
To prevent Marek’s disease, make sure to maintain good hygiene practices, such as regularly cleaning their enclosure, feeding area, and water sources. You should also ensure that your goslings have access to fresh air, sunlight, and adequate space to exercise. Vaccination is another crucial step in preventing the spread of this disease.
Another common health issue affecting young geese is coccidiosis, a parasite infection that can cause diarrhea, weight loss, and lethargy. To prevent coccidiosis, provide your goslings with a balanced diet rich in fiber, ensure their enclosure is free from moisture and ammonia buildup, and use an anti-coccidial supplement or vaccine if necessary.
Regular veterinary check-ups are vital to detect any health issues early on. Keep a close eye on your goslings’ behavior and physical condition, looking for signs of illness such as labored breathing, lethargy, or changes in droppings. If you suspect something is amiss, consult with a veterinarian immediately to prevent the spread of disease and ensure the best possible care for your young geese.
Troubleshooting Hatching Issues
If you’re experiencing trouble hatching your goose eggs, don’t worry – we’ve got you covered. This guide will walk you through common issues and solutions to help you get back on track.
Causes of Failed Hatch Rates
When hatching goose eggs, it’s not uncommon to encounter failed hatch rates. Identifying the underlying causes is crucial to making adjustments and improving subsequent hatch attempts.
Temperature fluctuations are a significant contributor to failed hatch rates. Geese require a specific temperature range for successful incubation – between 99°F and 100°F (37°C to 38°C) during the first three weeks, then slightly reduced as hatching approaches. Even minor deviations can stress the embryo, leading to poor development or even death.
Egg handling mistakes are another common reason for failed hatch rates. Jarring or sudden movements while transferring eggs from one location to another can cause damage to the delicate developing embryo inside. Similarly, failing to keep eggs in a clean, dry environment with consistent humidity levels can contribute to contamination and reduced fertility.
Embryonic abnormalities can also be a factor in failed hatch rates. These may arise due to genetic issues or environmental stressors during incubation. Some common abnormalities include missing or deformed limbs, internal organs, or brain tissue malformations. By recognizing these potential causes, you can take proactive measures to mitigate the risk of failed hatch rates and ensure a higher success rate with your goose egg hatching endeavors.
Strategies for Improving Hatch Success
Optimizing incubation conditions is crucial for successful hatching. Ensure that the temperature and humidity levels are precise, as goose eggs require a slightly higher temperature than chicken eggs. Aim for a temperature range of 99-100°F (37-38°C) and maintain optimal humidity around 50-60%. You can use an automatic egg turner to minimize manual handling errors.
Handling practices also play a significant role in hatching success. Handle the eggs gently, as goose eggs are more delicate than chicken eggs. Avoid sudden movements or jarring, which can cause damage to the embryo. Also, ensure that the eggs are stored in a safe place away from direct sunlight and drafts.
To increase fertility rates, choose fertile goose eggs from reputable breeders. Freshness is also essential; use eggs within 7-10 days of laying for optimal hatching success. Regularly clean and disinfect your incubator to prevent bacterial growth. Finally, monitor the eggs’ progress closely during incubation, looking for signs of normal development such as candling and pip.
Frequently Asked Questions
How do I care for goslings once they’ve hatched?
Caring for newly hatched goslings requires a commitment to providing a safe and healthy environment. Start by placing them in a warm, draft-free area with adequate ventilation. Ensure access to fresh water and a nutritious starter feed. Monitor their temperature needs closely, as young geese are sensitive to extreme temperatures.
What are some common health issues I should be aware of when raising goslings?
Common health issues in young geese include respiratory problems, parasites, and nutritional deficiencies. Be prepared to recognize signs of illness, such as lethargy, labored breathing, or changes in droppings. Consult with a veterinarian experienced in poultry care for advice on prevention and treatment.
How do I prevent cross-contamination when handling eggs?
To minimize the risk of contamination, wash your hands thoroughly before handling eggs. Handle eggs gently to avoid cracking, which can introduce bacteria into the egg. Store eggs in a clean, dry area away from drafts and direct sunlight. Always use clean equipment for candling and grading.
Can I use an incubator with multiple trays or separate incubators for individual eggs?
Both options are viable, but consider factors like space, budget, and your specific needs when deciding between them. Multiple-tray incubators can be more efficient, but may require more frequent cleaning and monitoring. Separate incubators offer greater control over each egg’s environment.
How long does it typically take to see signs of hatching after the goslings have piped?
After pipping (when the chick breaks through its shell), goslings usually hatch within 24-48 hours, depending on factors like temperature, humidity, and breed characteristics. Monitor their progress closely, as this period is crucial for a successful hatch.