
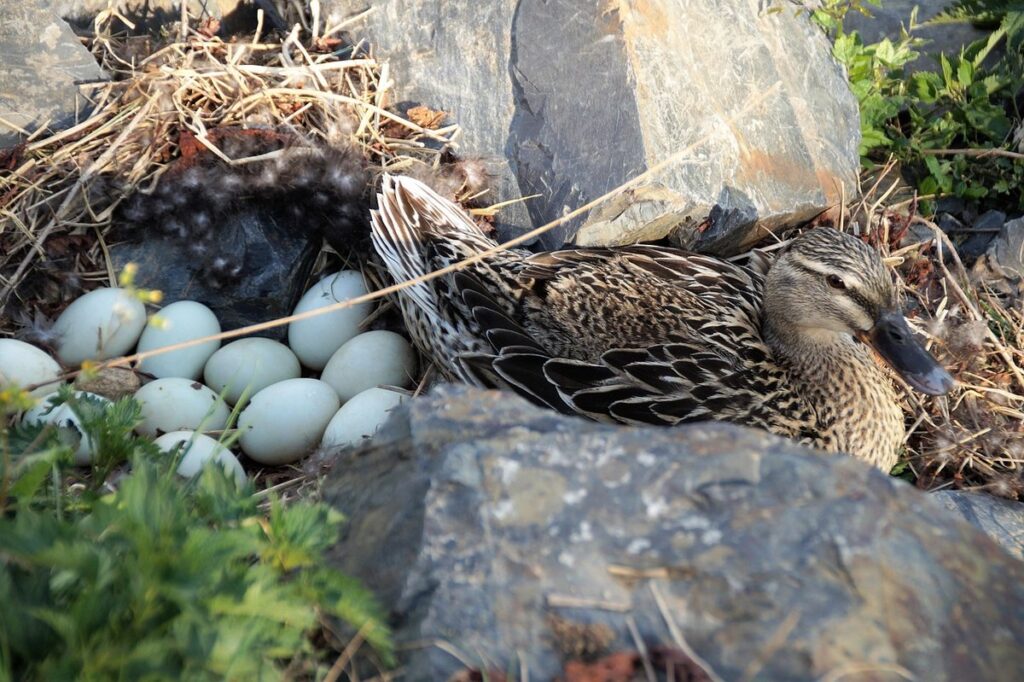
Duck egg incubation time can be a mystery for many backyard farmers, breeders, and even experienced poultry keepers. But understanding how long duck eggs take to hatch is crucial for successful breeding and raising healthy ducks. If you’re wondering when to expect those precious ducklings to pip out of their shells, this guide has got you covered. We’ll delve into the fascinating stages of duck egg development, from fertilization to hatching, as well as explore the key factors that can affect incubation time. Whether you’re a seasoned pro or just starting your journey with ducks, our expert tips and advice will help you navigate the process with confidence. In this comprehensive guide, we’ll break down everything you need to know about duck egg development and provide valuable insights for successful hatching.
The Basics of Duck Egg Incubation
Before we dive into the specifics, let’s cover some essential information on duck egg incubation basics to ensure you’re well-prepared for hatching. This includes key factors like temperature and humidity control.
Understanding Duck Egg Development Stages
Understanding duck egg development stages is crucial for successful incubation. From fertilization to hatching, each stage plays a vital role in the overall process. The entire journey typically takes around 28 days, but it’s essential to break down these stages to better grasp what’s happening inside the egg.
Fertilization occurs within 24-48 hours of laying, marking the beginning of duck egg development. During this stage, the sperm from the rooster penetrates the egg yolk and fertilizes it. This process is critical as it determines the sex and viability of the embryo. If fertilization fails, the embryo will not develop.
The next stage is cleavage (1-5 days), where the zygote starts dividing into multiple cells. By day 7, the blastoderm begins to form, marking the start of organogenesis. This stage is essential for proper development and growth. Factors like temperature, humidity, and egg quality can affect these stages, making precise incubation conditions crucial.
As you approach the end of the incubation period (days 21-28), the embryo undergoes rapid growth and preparation for hatching. Understanding each development stage helps you identify potential issues early on, ensuring a healthy hatch rate. By knowing what to expect at each stage, you can make informed decisions to optimize your duck egg incubation process.
Factors Affecting Incubation Time
When it comes to duck egg incubation, several factors can impact the length of time it takes for them to hatch. One key factor is temperature – ducks typically require a slightly cooler environment than chickens, with an ideal range of 99-100°F (37-38°C) during the first 24 days and 100-101°F (38-39°C) in the last few days.
Humidity also plays a crucial role, as it needs to be around 50-60% for the first 21 days. However, it’s essential to maintain higher humidity levels towards the end of incubation, ideally between 70-80%. Egg size is another variable that can influence incubation time – larger eggs may take longer to hatch.
Genetic factors also come into play, as different breeds of ducks have varying incubation periods. Some popular duck breeds, like Khaki Campbells and Welsh Harlequins, typically take around 28 days to hatch. In contrast, Muscovy ducks tend to incubate for a shorter period of about 27 days.
It’s also worth noting that egg size can affect the incubation time – larger eggs may take longer to hatch than smaller ones.
Calculating the Incubation Period
Now that you have a rough idea of duck egg incubation periods, let’s dive into calculating the exact time it takes for your eggs to hatch. We’ll break down the factors at play.
Using Fertility Charts to Predict Hatching Time
Using fertility charts can be a valuable tool for estimating the expected hatching date of duck eggs. By tracking breed, size, and age of the eggs, you can gain a better understanding of their developmental stage.
A fertile chart typically consists of four stages: White, Light Brown, Dark Brown, and Black. Each stage corresponds to a specific number of days post-fertilization. For example, a white fertile chart may indicate 2-3 days of embryonic development, while a dark brown chart could signify 8-10 days.
To create an accurate fertility chart, it’s essential to have precise records of the eggs’ breed, size, and age. This information will help you identify potential hatching time ranges based on averages for each breed. For instance, Muscovy duck eggs tend to take around 28-30 days to hatch, while Khaki Campbell eggs typically take 30-32 days.
When using fertility charts to predict hatching time, remember that every egg is unique and may develop at a slightly different pace. By tracking these charts and considering individual factors like breed and size, you can make more informed decisions for incubation planning.
Considering External Factors in Calculations
When calculating the incubation period for duck eggs, it’s essential to consider external factors that can significantly impact hatchability rates. Temperature fluctuations, egg handling, and transportation are all critical considerations that can either help or hinder the hatching process.
Temperature is a crucial factor in incubation, and sudden changes can shock the embryo. A consistent temperature range of 99-100°F (37-38°C) for duck eggs is ideal, but even slight deviations can affect hatchability. For example, if you’re using an electric incubator, ensure it’s calibrated correctly, and avoid placing it near drafty windows or doors.
Proper egg handling is also vital. Eggs should be stored in a protected area, away from direct sunlight, and turned regularly to prevent the yolk from adhering to the shell membrane. When transporting eggs, use a specialized egg carton or container that maintains humidity levels, and avoid exposure to extreme temperatures or vibrations.
Keep in mind that these external factors can affect hatchability rates, so it’s crucial to prioritize proper incubation conditions. By controlling temperature, handling, and transportation, you’ll increase the chances of successful hatching.
The Importance of Incubation Temperature
When it comes to successfully hatching your duck eggs, incubation temperature plays a crucial role in determining their viability and overall health. Let’s dive into the importance of getting this just right.
Optimal Temperatures for Different Breeds
When it comes to incubating duck eggs, understanding the optimal temperature settings for different breeds is crucial. Not all duck breeds require the same temperature, and using a generic temperature setting can lead to subpar hatching results.
For example, Muscovy ducks thrive at an incubation temperature of 99-100°F (37.2-37.8°C), while Khaki Campbells prefer a slightly lower temperature range of 98-99°F (36.7-37.2°C). Meanwhile, Wood Ducks require a warmer temperature of 101-102°F (38.3-39°C).
Here are some recommended temperature settings for popular duck breeds:
* Pekin and White Call ducks: 99-100°F (37.2-37.8°C)
* Cayuga and Golden 300 Hybrid ducks: 98-99°F (36.7-37.2°C)
* Silver Appleyard and Welsh Harlequin ducks: 99-100°F (37.2-37.8°C)
It’s essential to research the specific temperature requirements for your duck breed, as some breeds may have unique needs. By providing the optimal temperature setting for your flock, you can significantly improve hatching success rates and reduce stress on your birds during incubation.
Maintaining a Stable Environment
Maintaining stable temperatures is crucial during incubation, as even slight variations can affect embryo development. To ensure a consistent environment, it’s essential to monitor the temperature regularly using a reliable thermometer. Digital thermometers are often preferred for their accuracy and ease of use.
Heaters should be positioned carefully to distribute heat evenly throughout the incubator. Avoid placing them directly above or below the eggs, as this can cause hotspots. Instead, place them on opposite sides to create a gentle warmth that circulates around the eggs. Additionally, consider using insulation materials like foam or straw to maintain temperature stability.
A stable temperature range of 99-100°F (37-38°C) is ideal for duck egg incubation. If your thermostat isn’t precise enough, you can use a humidifier to maintain humidity levels between 50-60%. This will help regulate the temperature and create a conducive environment for embryo growth. Keep in mind that it’s better to err on the side of caution – even a 1°F (0.5°C) deviation from the ideal range can impact hatching success.
Egg Handling and Storage
To ensure your duck eggs hatch safely, it’s crucial to handle them gently and store them properly until incubation begins. Proper care during this time is vital for successful hatching.
Proper Handling Techniques
When handling duck eggs, it’s essential to take extra care to prevent damage and contamination. This is crucial when trying to incubate them successfully, as even slight imperfections can affect the hatch rate.
To start, gently pick up the egg with the large end facing down, making sure not to touch the pointed end where the embryo meets the shell membrane. Hold it at an angle to avoid applying pressure on the air sac, which is located at the large end. Always handle eggs by the equator or a small area of the surface, minimizing contact with the shell.
Before incubation, store duck eggs in a cool, dry place away from direct sunlight and heat sources. The ideal storage temperature is between 40°F to 50°F (4°C to 10°C). You can also store them in a refrigerator at a consistent temperature below 40°F (4°C), but be sure to maintain proper humidity levels to prevent moisture buildup.
When transporting eggs, make sure they’re kept upright and secure to prevent any impact that might crack the shell. This is especially important if you’re moving the eggs from one location to another before starting incubation. By following these simple handling and storage techniques, you can minimize the risk of damage and ensure your duck eggs are ready for a successful hatch.
Factors Affecting Egg Quality and Viability
When it comes to hatching duck eggs, maintaining optimal egg quality and viability is crucial. However, several factors can impact the health and fertility of these eggs.
Storage duration plays a significant role in egg quality. Generally, fresh duck eggs should not be stored for more than 7-10 days before incubation. If you’re unable to hatch them immediately, it’s best to store them at room temperature (around 70°F) with moderate humidity (50-60%). Avoid refrigerating duck eggs, as the cold temperature can cause moisture loss and affect fertility.
Temperature is another critical factor affecting egg quality. A consistent temperature between 65°F and 75°F (18°C and 24°C) is ideal for storing duck eggs. Extreme temperatures can lead to reduced fertility or even embryonic death. Maintaining a clean environment, free from dust and bacteria, also contributes significantly to egg viability. This includes washing your hands thoroughly before handling the eggs.
If you’re planning to store duck eggs for an extended period, consider using a dedicated egg storage container or tray with ventilation holes to maintain air circulation and humidity control.
Monitoring Progress During Incubation
As you wait patiently for those duck eggs to hatch, it’s natural to wonder how you can track their progress and know when they’re ready to emerge from their shells. Monitoring incubator temperature and turning the eggs regularly is crucial during this time.
Checking for Fertility and Embryonic Development
Candling is an essential tool for monitoring the development of duck eggs during incubation. To check for fertility and embryonic development, you’ll need a flashlight or candle specifically designed for candling eggs. Shine the light through the large end of the egg, and observe the contents through the shell.
At about 7-10 days after laying, you should start to see the embryo’s heart beating if it’s fertile. This is an exciting moment, as it indicates that the sperm has fertilized the egg successfully. Look for a dark spot or a cluster of blood vessels forming near the center of the egg. This is usually the first sign of embryonic development.
As you continue candling throughout incubation, pay attention to any changes in the embryo’s size, movement, and overall health. Keep track of your observations to ensure that everything is progressing as it should. If you notice any unusual signs or concerns, consult with an experienced breeder or poultry expert for guidance. Regular monitoring will help you identify potential issues before they become major problems, increasing the chances of successful hatching.
Responding to Issues or Complications
As you monitor the progress of your duck eggs during incubation, it’s essential to be prepared for potential issues that may arise. Temperature fluctuations can be particularly problematic, as they can slow down or even stop development. To address this, ensure that your incubator is calibrated correctly and placed in a stable environment. If you notice any temperature changes, adjust the settings promptly to maintain a consistent temperature between 99°F and 100°F.
Humidity issues are another common complication. Proper humidity levels are crucial for embryonic growth and can be affected by temperature fluctuations or equipment malfunctions. Check your incubator’s hygrometer regularly and ensure it’s set to the recommended level (50-60% relative humidity). Additionally, inspect your eggs daily for any signs of moisture condensation on the shell, which can indicate humidity imbalances.
Embryonic abnormalities can also occur during incubation. If you notice any unusual development or malformation, remove the egg from the incubator immediately to prevent further damage. Keep a close eye on temperature and humidity levels, and be prepared to address any issues promptly to minimize the risk of complications affecting your duckling’s growth.
Tips for Successful Duck Egg Hatching
To ensure a smooth and successful hatching process, here are some essential tips to keep in mind when incubating duck eggs. With these expert suggestions, you’ll be well on your way to raising healthy ducklings.
Understanding and Mitigating Risks
As you embark on the journey of hatching duck eggs, it’s essential to understand and mitigate the risks associated with this process. One of the most significant concerns is incubation failure, which can be caused by a range of factors including temperature fluctuations, humidity imbalances, or incorrect egg handling.
According to the USDA, stillbirth rates for ducklings average around 10-15%, while hatch failure rates can reach up to 30% or more. To minimize these risks, it’s crucial to maintain a consistent and optimal incubation environment. This means ensuring that your incubator is calibrated correctly, maintaining a temperature range of 99-100°F (37-38°C) and humidity levels between 50-60%.
In addition to environmental factors, proper egg handling is also vital for successful hatching. Make sure to handle eggs gently and keep them in an upright position to prevent oil from accumulating on the large end. This can help reduce the risk of stillbirths and hatch failures.
By being aware of these potential risks and taking proactive steps to mitigate them, you can significantly increase your chances of success when hatching duck eggs.
Optimizing Hatch Rates and Outcomes
To maximize your chances of successful duck egg hatching, it’s essential to optimize incubation conditions. This involves creating an environment that closely mimics the natural conditions in which ducks would lay their eggs.
A crucial factor is temperature control. Most commercial incubators have a single temperature setting, but some high-end models offer adjustable settings for specific stages of development. For example, you can program your incubator to maintain 99-100°F (37-38°C) during the first 7-8 days when embryo growth accelerates rapidly.
Additionally, maintaining precise temperature consistency is vital. A temperature difference of just 1-2 degrees can significantly impact hatch rates and outcomes. To ensure this consistency, consider investing in a digital thermometer or an incubator with built-in temperature control features.
By fine-tuning your incubation conditions, you can enhance the chances of successful hatching.
Additional Considerations for Commercial and Backyard Duck Farmers
If you’re planning to breed ducks commercially or raise them in your backyard, there are some extra considerations that can affect incubation timing. Let’s explore these unique factors together.
Scaling Up Incubation Processes
As you scale up your incubation processes for commercial duck farming, it’s essential to balance efficiency with consistency. This is particularly true when managing large-scale egg production. To maintain a high hatch rate, consider implementing a rotation system where eggs are incubated in batches of 100-150. This allows for easier monitoring and adjustment of temperature, humidity, and turning schedules.
When using an automated incubator, program the system to adjust temperature and humidity levels according to the stage of development. For example, between days 7-14, maintain a consistent temperature of around 99°F (37°C) with high humidity levels. Monitor your egg production schedule closely and adjust as needed to ensure even incubation periods.
Regularly inspect and maintain your equipment to prevent mechanical failures or inconsistent readings. This includes calibrating thermometers and monitoring the water level in the humidifier. By streamlining your process and maintaining a clean, controlled environment, you can minimize the risk of embryo mortality and maximize your hatch rate.
Managing Resources and Budgets for Small-Scale Breeders
As a small-scale breeder, managing limited resources and budgets can be challenging when it comes to hatching duck eggs. However, with some careful planning and strategy, you can achieve successful hatching outcomes even on a tight budget.
Firstly, prioritize your spending by investing in the essential equipment such as a good quality incubator, egg turner, and a thermometer. These will ensure that your eggs are being incubated at the right temperature and humidity levels, increasing the chances of successful hatching. Consider purchasing second-hand or refurbished equipment to save costs.
Next, optimize your resource usage by keeping accurate records of your breeding program, including egg production, hatch rates, and chick mortality. This data will help you identify areas for improvement and make informed decisions about your breeding strategy. Additionally, consider implementing a rotation system where eggs are incubated in batches, allowing for more efficient use of resources.
To further reduce costs, consider sharing resources with fellow backyard duck farmers or joining a local poultry cooperative. This can provide access to shared equipment, expertise, and knowledge, helping you stay up-to-date with best practices while minimizing expenses. By being mindful of your resource usage and budget constraints, you can achieve successful hatching outcomes even on a limited scale.
Frequently Asked Questions
How do I know if my duck eggs are fertile?
Fertile duck eggs typically have a clear or lighter-colored egg white, while infertile eggs may appear cloudy or watery. However, the only way to confirm fertility is through candling or using a fertility chart. If you’re still unsure, consult with an experienced breeder or poultry expert for guidance.
Can I use a digital incubator to hatch duck eggs?
Yes, many backyard farmers and breeders successfully use digital incubators for hatching duck eggs. These devices often feature precise temperature control, humidity monitoring, and automated egg turning, which can simplify the incubation process. However, ensure you choose an incubator specifically designed for waterfowl or poultry, as they may have different requirements than chicken hatchers.
How do I handle any issues during incubation?
If you encounter problems like a sudden drop in temperature or humidity fluctuations, remain calm and take corrective action promptly. Check your incubator’s settings and adjust as needed. For more severe issues, refer to the manufacturer’s guidelines or seek advice from an experienced breeder. Remember that swift response can significantly impact hatch rates.
Can I use duck eggs for meat production?
While many backyard farmers prioritize egg-laying breeds, some duck breeds are specifically raised for their meat. These birds typically have faster growth rates and may require different incubation temperatures and management strategies. Research the specific needs of your chosen breed to ensure optimal results.
Are there any tips for maintaining accurate records during incubation?
Yes, it’s crucial to keep detailed records throughout the incubation process, including temperature logs, humidity readings, egg candling dates, and hatch rates. Use a dedicated logbook or spreadsheet to track progress, and consider investing in automated record-keeping devices to streamline the process. Accurate records will help you refine your techniques for future breeding cycles.