
Are you about to welcome new life into your backyard? Raising baby chicks can be a thrilling experience, but it requires careful planning and attention to detail. Many would-be chicken enthusiasts are deterred by the uncertainty of successful hatching, but with the right knowledge, anyone can increase their chances of success. In this article, we’ll dive into the world of chick incubation, covering essential tips on egg handling, ventilation, and post-hatch care. You’ll learn expert advice on creating a conducive environment for your chicks to thrive, from maintaining optimal temperatures to providing adequate humidity levels. Whether you’re a seasoned chicken farmer or just starting out, this guide is designed to help you overcome common challenges and bring home healthy, happy chicks. Let’s get started!
Understanding the Incubation Process
Now that we’ve talked about preparing your eggs for hatching, it’s time to understand how incubation works and what happens inside the egg during these crucial 21 days. Let’s break down this amazing process together!
Factors Affecting Hatch Rate
When it comes to successful chick hatching, several key factors can make all the difference. One crucial aspect is egg quality. Fresh and clean eggs from healthy breeding stock are essential for optimal hatch rates. Check for visible cracks or damage on the shell, as these can compromise embryo development.
Temperature control is another vital factor. The ideal temperature range for incubation varies between breeds, but most require a consistent 99-100°F (37-38°C). Failure to maintain this temperature can lead to slow development, reduced hatch rates, or even embryonic death.
Humidity levels also play a critical role in the hatching process. A relative humidity of around 50-60% is recommended for the first 18 days of incubation. After day 18, the humidity should be gradually increased to encourage pip and hatching. Proper temperature control and humidity management can significantly boost hatch rates.
In addition to these factors, egg turning, ventilation, and handling practices also impact the success of chick hatching. Regularly check the incubator’s temperature, humidity, and ventilation systems to ensure they’re functioning correctly.
Importance of Proper Egg Handling
Proper egg handling is a critical aspect of incubation that often gets overlooked. As an incubator owner, you must handle eggs with care to prevent breakage and contamination, which can lead to failed hatch rates.
When collecting eggs from the nesting box, make sure they are clean and dry. Gently pick up each egg by the large end, avoiding the small end where the air cell is located. This will help prevent accidental rolling or tilting of the egg, which can cause breakage.
To store eggs, place them in a carton or tray with the pointed end facing down to prevent moisture from seeping into the air cell. Keep the storage area cool, dry, and dark, away from drafts. It’s also essential to handle eggs by the large end when transferring them to the incubator.
Remember, egg handling is an art that requires patience and gentle care. Take your time, and always prioritize the safety of the eggs to ensure a successful hatch.
The Role of Ventilation in Incubation
Proper ventilation is often overlooked as an essential factor in incubation, but it plays a critical role in maintaining a healthy environment for developing embryos. A well-ventilated incubator helps to remove moisture, carbon dioxide, and other gases that can be toxic to the chicks. Without adequate airflow, these gases can build up and cause respiratory problems or even death.
A good rule of thumb is to ensure that there are at least 10-15 air changes per hour in your incubator. You can achieve this by adjusting the vents or using a circulation fan. It’s also essential to monitor the temperature and humidity levels, as these will impact ventilation requirements. Aim for a temperature range of 99-100°F (37-38°C) and maintain a relative humidity level between 50-60%.
Inadequate ventilation can lead to mold growth, which is a common issue in incubators. To prevent this, ensure that the air exchange rate is sufficient and maintain a clean environment within the incubator. Regularly inspect the vents and ensure they are free from blockages or debris. By prioritizing proper ventilation, you’ll create an optimal environment for your chicks to develop and hatch successfully.
Stages of Embryonic Development
From fertilization to hatching, a chick’s journey is a complex and fascinating process. Let’s dive into the stages of embryonic development that lead to this miraculous moment.
Fertilization and Cleavage (0-2 Days)
As we delve into the fascinating world of chick development, let’s start at the very beginning – fertilization and cleavage. This is where it all begins for our feathered friends.
Fertilization occurs when a rooster’s sperm meets an egg yolk released by a hen. The chances of successful fertilization are around 50-60% in natural breeding settings. Once the sperm has penetrated the outer layer of the egg, genetic material is exchanged, and a unique combination of traits is created.
During cleavage (0-2 days post-fertilization), the embryo undergoes rapid cell division. The fertilized egg yolk splits into smaller cells, called blastomeres, which multiply at an incredible rate. This process is crucial for the development of the chick’s internal organs and tissues. By day 1.5, the embryo has undergone four to eight cleavage divisions, resulting in a cluster of around 8-16 cells.
To give you an idea of just how fast this process happens, consider that by the end of day 2, the embryo will have divided into approximately 32-64 cells, marking a significant milestone on its journey to becoming a chick. This is the perfect moment for hens to move to a quiet environment where they can focus on incubating their eggs without distraction.
Gastrulation and Organogenesis (2-4 Days)
As we continue to follow the miraculous process of chick development, we arrive at the critical stages of gastrulation and organogenesis. Between 2-4 days post-fertilization, the embryo undergoes a series of complex transformations that lay the foundation for its future growth.
During gastrulation, cells from the blastoderm begin to migrate inward, forming three primary germ layers: ectoderm, endoderm, and mesoderm. These layers will eventually give rise to all tissues and organs in the chick embryo. For instance, the ectoderm will form the skin, nervous system, and eyes, while the endoderm will develop into the internal organs such as the liver, pancreas, and lungs.
As gastrulation completes, the chick embryo enters the stage of organogenesis, where major organs begin to take shape. The heart starts beating around 4 days post-fertilization, pumping blood through a network of vessels that are rapidly forming. Meanwhile, the lungs start producing surfactant, a vital substance that helps them expand and contract during breathing.
By day 3-4, key organ systems like the digestive tract, circulatory system, and nervous system have started to form. These initial stages set the stage for the chick’s remarkable growth and development in the coming days.
Neurulation and Sensory Development (4-6 Days)
As the fertilized egg continues to develop, it reaches the 4-6 day mark, marking the beginning of neurulation and sensory development. During this critical period, the neural tissue starts to form into three primary layers: ectoderm, endoderm, and mesoderm. These layers will eventually give rise to the brain, spinal cord, and peripheral nervous system that control the chick’s movements and responses.
The sensory organs also begin to develop during this time. The eyes start forming as two small pits on either side of the head, which will eventually become the lenses and retinas. The ears begin to take shape, with the auditory nerve connecting to the brain and preparing for sound detection. Meanwhile, the beak starts to form from a small lump of tissue at the tip of the embryo.
This period is crucial in setting the foundation for the chick’s sensory abilities and nervous system development. As you observe your own incubation process, keep an eye on the chick’s growth, especially around this critical 4-6 day mark. If you notice any issues or abnormalities during this time, it may affect the chick’s overall health and hatching success later on.
Signs of Imminent Hatching
As you eagerly await the arrival of your new chicks, it’s essential to recognize the signs that indicate hatching is imminent. Look out for these subtle yet significant changes in your incubating eggs.
The Pecking Process
As the big day approaches, you’ll start to notice your chick embryos engaging in a crucial behavior – pecking at their shells. This is often referred to as the “pecking process,” and it’s a vital step in the hatching process.
At around 48-72 hours before hatching, chicks will begin to use their beaks to gently tap on the shell. They may appear to be just randomly poking or prodding at the shell, but this is actually a critical behavior that helps them determine the strength and softness of the shell. The pecking process allows the chick to assess whether it’s ready to break free from its eggshell prison.
As the pecking intensifies, you’ll start to notice more frequent and vigorous tapping. This is a sign that your chicks are preparing for emergence. Keep in mind that this is not always an easy or straightforward process – some chicks may struggle more than others to crack open their shells. But with patience and proper incubation conditions, most chicks will successfully hatch after around 24 hours of pecking.
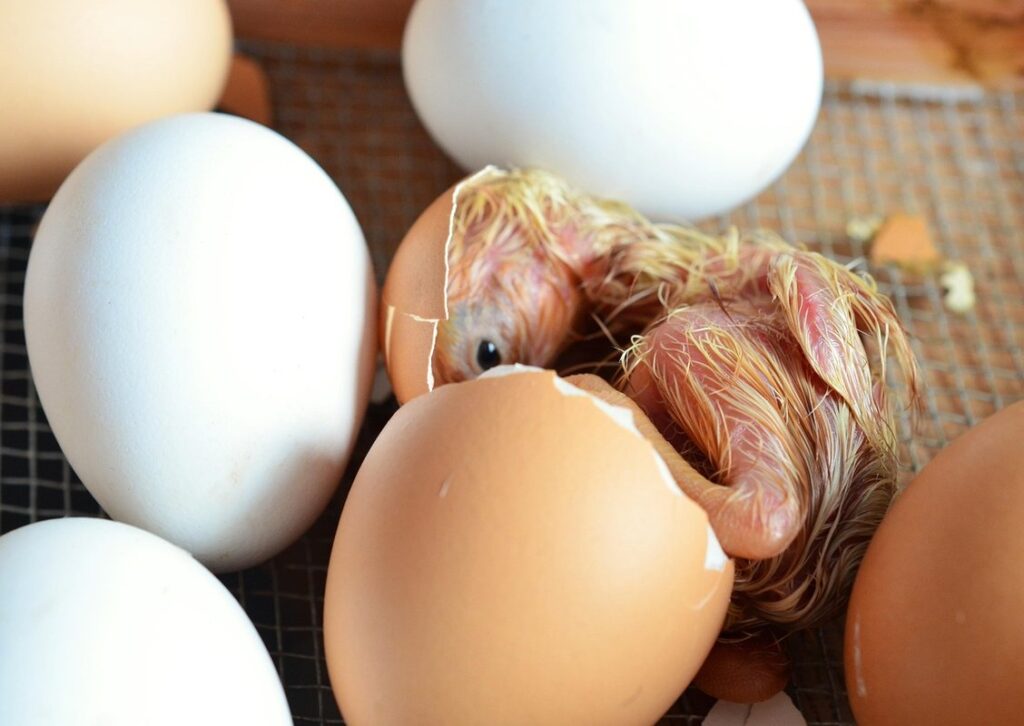
Pip-Lining and Cracking the Shell
As the hatching process reaches its climax, you’ll start to notice the chick’s attempt to free itself from its shell. This is a critical and often intense period, known as pip-lining and cracking. The chick will begin to make small holes, or pips, in the shell, usually around the air sac. These initial pips may be tiny and almost imperceptible, but they’re a sign that the chick is preparing for its grand entrance.
As the chick continues to pip-line, it will start to crack the shell more aggressively. You’ll see the egg begin to rock back and forth as the chick pecks at it with its beak. This can be both exciting and worrying – after all, you want your eggs to hatch safely! But rest assured that this is a normal part of the process. Keep an eye on the temperature in the incubator or brooder, as fluctuations can affect the hatching process. The chick will eventually break free from its shell, wet but alive – and that’s when the real miracle begins.
Emergence: The Final Stage
As you watch the chick break through the remaining shell fragments, it’s almost like witnessing a miracle unfold right before your eyes. This is the final stage of hatching, where the chick will make its way into the outside world.
At this point, the chick is fully formed and ready to emerge from the egg. You’ll notice that it’s starting to move its head and shoulders, trying to free itself from the remaining shell fragments. Be patient, as this process can take anywhere from a few minutes to up to an hour.
To ensure the safe emergence of your chick, make sure the incubator or brooder is at a comfortable temperature and humidity level. A well-ventilated area will also help prevent any respiratory issues. Once the chick has fully emerged, gently pick it up and place it in its new environment. It’s essential to handle the chick carefully during this sensitive period, as it will be fragile and vulnerable to stress.
Remember, every chick is different, and the emergence process may vary slightly from one to another. But with proper care and attention, your chick will be ready to take on the world in no time!
Caring for Newly Hatched Chicks
Now that your chicks have hatched, it’s essential to provide them with a safe and nurturing environment. This includes keeping their brooder clean, monitoring temperature, and introducing food and water carefully.
Providing a Safe Environment
Creating a safe environment for newly hatched chicks is crucial to ensure their survival and growth. Right from the moment they pip out of their shells, these tiny creatures are vulnerable to various threats, including temperature fluctuations, drafts, and predators.
To provide a warm and cozy space, you’ll need to invest in an adequate heat source. A good rule of thumb is to maintain a temperature of around 90-100°F (32-38°C) for the first week after hatching. You can use a heat lamp or a heat mat, but ensure they’re placed safely out of reach to avoid burns.
Lighting is also essential, as chicks need UVB light to synthesize vitamin D and develop strong bones. However, direct sunlight can be harsh, so it’s best to provide supplemental lighting during the day.
In terms of shelter, you’ll want to create a quiet and draft-free area where your chicks can relax and sleep. A brooder or a chick enclosure with a secure top will help prevent escape attempts and keep predators out. Line the floor with soft bedding like wood shavings or straw to provide comfort and cushioning for their little legs.
Nutrition and Hydration
Providing essential nutrients and hydration to newly hatched chicks is crucial during their critical early stages of growth. These tiny birds need a balanced diet that includes the right amount of protein, fat, carbohydrates, vitamins, and minerals to develop strong immunity and support rapid growth.
A good starting point is to offer starter feed specifically formulated for young chickens within 24 hours of hatching. This feed should contain around 18-20% protein to meet their high energy needs. It’s also essential to provide a shallow dish of fresh water at all times, changing it frequently to prevent bacterial contamination.
In addition to starter feed and water, consider adding some nutritious treats like chopped hard-boiled eggs or mealworms to their diet. These treats will not only provide extra protein but also help stimulate their appetite. However, be sure to introduce these treats gradually and in moderation to avoid overfeeding.
As the chicks grow, they’ll start to transition from starter feed to grower feed, which has a slightly lower protein content. Always check the recommended feeding schedule on your chosen chick starter or grower feed package for guidance.
Monitoring Health and Behavior
Monitoring the health and behavior of newly hatched chicks is crucial for their survival. As soon as they emerge from their shells, they’re vulnerable to stress, infections, and other hazards. To ensure a healthy start, keep a close eye on them.
Look for signs of distress such as labored breathing, lethargy, or unusual droppings. Check if the chicks are huddled together, this could be a sign that they’re cold or not getting enough food and water. Make sure their environment is well-ventilated, at a comfortable temperature (around 90°F), and has adequate lighting.
Be aware of potential problems like brooder malnutrition, where chicks don’t get the right balance of nutrients. Monitor their weight, appetite, and stool quality to catch any issues early on. Keep an eye out for signs of disease, such as runny eyes, sneezing, or ruffled feathers.
Daily inspections will help you identify potential problems before they escalate into major health issues. Make sure to provide a clean environment by regularly cleaning the brooder and changing bedding material.
Common Challenges and Solutions
As you embark on the magical journey of watching your chicks hatch, it’s essential to be aware of the common challenges that may arise. Here, we’ll tackle these hurdles head-on and share practical solutions to ensure a smooth hatching process.
Egg Yolking (Yolk Sac Retention)
Egg yolk sac retention is a common issue that can significantly impact hatch rates. It occurs when the yolk sac fails to be absorbed by the chick after hatching, leaving it attached to the umbilical area. This condition can lead to infection, dehydration, and even death.
Causes of egg yolk sac retention include improper incubation temperature, humidity levels, or turning. These factors can slow down or hinder the normal process of yolk sac absorption. Genetics also play a role, as some breeds are more prone to this issue than others.
To identify if your chicks have retained their yolk sacs, look for a visible, pulsing sac attached to the chick’s belly. If you notice any signs of infection or distress, it’s essential to take action quickly. To prevent egg yolk sac retention, ensure that your incubator is set correctly and maintain optimal temperatures (around 99-100°F) and humidity levels.
Monitor your chicks closely after hatching, and gently trim the umbilical cord if you notice any retained yolk sacs. This can help promote healing and reduce the risk of infection.
Unfertilized Eggs or Poor Embryonic Development
One of the most disheartening experiences for backyard chicken enthusiasts is cracking open an egg to find it unfertilized or an embryo that’s not developing properly. This can be due to various reasons, including incorrect incubation temperature, humidity levels, or even the health of the breeding rooster.
To minimize the risk of poor embryonic development, it’s essential to maintain a consistent and precise temperature range within your incubator. Most chickens require a temperature of 99-100°F (37-38°C) during the first 18 days of incubation. Inadequate heat can cause developmental delays or even lead to embryo death.
Another critical factor is proper humidity levels. Chicks need a humid environment, typically around 50-60%, to facilitate proper development. Ensure you’re using an accurate hygrometer and maintain the recommended moisture levels throughout the incubation period.
If you’ve noticed repeated instances of poor embryonic development or unfertilized eggs, it may be worth re-examining your breeding rooster’s health and fertility. Consult with a poultry expert or veterinarian for guidance on how to improve the quality of your chicks.
Dealing with Hatching Failure
Dealing with hatching failure can be disheartening, especially after weeks of anticipation and care. It’s essential to understand that it’s not uncommon for even experienced breeders to encounter issues during the hatching process. In fact, the average hatch rate for backyard chicken keepers is around 50-60%. To improve your chances of success, let’s analyze some potential causes of hatching failure.
Poor incubation conditions, such as incorrect temperature or humidity levels, can significantly impact hatch rates. Make sure to maintain a consistent temperature between 99-100°F (37-38°C) and maintain a relative humidity level of 50-60%. Another common issue is contaminated eggs, which can be avoided by storing them in a clean, dry area away from drafts.
If you do experience hatching failure, don’t be discouraged. Instead, review your process and make adjustments accordingly. Consider factors such as egg quality, storage conditions, and incubation temperature. With practice and patience, you’ll increase your chances of successful hatchings. For example, some breeders have reported improved hatch rates by switching to a different type of thermometer or adjusting their ventilation system.
Conclusion: Tips for Successful Chicks Hatching
As you’ve reached the end of this comprehensive guide on chicks hatching, it’s essential to recap some crucial tips to ensure a successful incubation process. First and foremost, maintain a clean and well-ventilated brooder environment to prevent disease and promote healthy growth. Monitor temperature and humidity levels closely, making adjustments as needed to mimic the natural conditions that your chicks would experience in their eggshell.
Additionally, be sure to handle the eggs gently and place them in an egg turner or tray with care. And don’t forget to candle the eggs regularly to check for embryo development and detect any potential issues early on. By following these simple yet crucial tips, you’ll set yourself up for a successful hatching experience that will bring joy and wonder to your family.
Frequently Asked Questions
What happens if I notice a sudden drop in hatch rate despite maintaining optimal temperatures?
Temperature fluctuations can significantly impact chick development. Monitor your temperature closely, ensuring it remains within the recommended range (99-100°F for the first 18 days). Consider investing in a thermometer with alarm features to alert you of any deviations.
Can I use a homemade incubator or do I need a commercial one?
A well-designed homemade incubator can be just as effective as a commercial one. Focus on providing consistent temperature, humidity, and ventilation control. Use materials like foam insulation, a water bath, and a humidifier to create a stable environment.
How do I know if an egg is truly unfertilized or if it’s experiencing poor embryonic development?
Inspect the egg for visible cracks or damage on the shell. For fertilization issues, look for signs of development during candling (around 7-10 days). If you notice no movement, and the embryo appears undeveloped, it may be unfertilized or suffering from poor embryonic development.
What are some common mistakes people make when caring for newly hatched chicks?
Inadequate ventilation, suboptimal temperature control, and inadequate nutrition can all contribute to early mortality. Ensure a safe environment by providing adequate space (at least 2-3 sq ft per bird), proper lighting, and a balanced diet with calcium supplements.
How often should I monitor humidity levels in the incubator?
Maintain humidity levels between 50-60% during incubation. Monitor your setup regularly, increasing humidity when needed to prevent dryness or extreme moisture buildup. This balance ensures optimal chick development and minimizes the risk of disease.