
Have you ever wondered when your adorable ducklings will finally emerge from their shells? The incubation period for duck eggs is a crucial aspect of raising healthy, happy ducks. But how long does it take for a duck egg to hatch? The answer varies depending on several factors, including the breed, environmental conditions, and proper care. Some duck breeds can take as little as 28 days to hatch, while others may take up to 35 days or more. In this article, we’ll dive into the average incubation period of duck eggs and explore how different factors can affect hatching success. We’ll also provide tips on how to ensure a healthy hatch rate and what you can do to support your ducks during this critical time. By the end of this article, you’ll be well-equipped to care for your feathered friends and anticipate the arrival of their precious ducklings.
Understanding Duck Egg Incubation Period
When it comes to incubating duck eggs, one of the most important factors is understanding how long the hatching process will take. In this section, we’ll explore the typical incubation periods for duck eggs.
Factors Affecting Incubation Period
The incubation period of duck eggs can be influenced by several factors. When it comes to determining how long it takes for a duck egg to hatch, breed is one such factor that plays a significant role. Different breeds of ducks have varying incubation periods. For instance, Muscovy ducks have an incubation period of approximately 28 days, while Khaki Campbells take around 32 days.
Temperature and humidity levels also significantly impact the incubation period. A stable temperature between 99°F to 100°F (37°C to 38°C) is ideal for duck egg incubation, with a slight drop in temperature at night. As for humidity, maintaining it between 50% to 60% ensures optimal embryo development. On the other hand, excessive or inadequate humidity can lead to issues like embryonic mortality.
Handling the eggs is another factor that should be kept in mind. Gently turning and handling the eggs daily is essential, but avoid over-handling as it can cause damage to the delicate embryo.
Normal Incubation Period for Ducks
The normal incubation period for ducks varies depending on several factors, including breed and climate. Generally speaking, most duck breeds take around 28-30 days to hatch eggs from the time they are laid. However, some popular varieties can have slightly shorter or longer incubation periods.
For example, Khaki Campbells typically take about 27-29 days to hatch, while Muscovy ducks usually take a bit longer at 31-33 days. Pekin and Silver Appleyard ducks tend to fall within the average range of 28-30 days.
It’s essential to note that factors such as temperature, humidity, and egg handling can affect incubation times. A consistent temperature between 99°F (37°C) and 100°F (38°C), with a moderate level of humidity, is crucial for successful hatching.
If you’re keeping ducks for eggs, it’s helpful to keep track of their individual incubation periods to ensure the best possible hatch rates. This can be achieved by recording egg laying dates and monitoring temperature and humidity levels in your incubator or brooder.
Why Timing is Crucial in Duck Egg Hatching
When it comes to duck egg hatching, timing plays a vital role in determining the success of the process and ensuring healthy chicks. Let’s dive into why this is so crucial for duck parents-to-be.
Importance of Timely Breeding and Mating
When it comes to raising ducks for eggs, timing is crucial, especially when it comes to breeding and mating. If you want to maximize egg production and ensure healthy chicks, you need to breed your ducks at the right time.
First and foremost, fertility plays a significant role in successful breeding. A duck’s fertility cycle typically lasts around 12-14 days, but this can vary depending on factors like age, nutrition, and overall health. To increase the chances of conception, it’s essential to synchronize your drake’s (male) and duck’s fertile periods.
Another critical factor is egg production. Breeding ducks at the right time ensures that they have enough energy reserves to support their own needs and those of their developing eggs. Aim for breeding when your ducks are around 6-8 months old, as this allows them to reach optimal fertility and egg-laying potential.
Lastly, consider broodiness – a natural instinct in many duck breeds where they stop laying eggs and focus on incubating their eggs instead. By controlling breeding times, you can prevent unnecessary broodiness and encourage more consistent egg production.
Impact of Environmental Factors on Hatch Rate
Environmental factors play a significant role in determining hatch rates and overall incubation success. Temperature fluctuations can be particularly detrimental to duck embryos, causing uneven development and potentially resulting in stillbirths. Temperatures above 100°F (38°C) or below 90°F (32°C) can lead to malformation and mortality. On the other hand, stable temperatures between 99-100°F (37-37.8°C) promote optimal growth.
Humidity levels also impact incubation success, with a range of 45-55% ideal for duck eggs. Inadequate humidity can cause egg shells to crack or eggs to dry out prematurely, while excessive moisture can lead to fungal and bacterial growth. Air quality is another crucial aspect, as pollutants in the air can pass through the shell membranes and affect embryo development.
To minimize environmental impact, ensure your incubation environment maintains stable temperatures and humidity levels within the recommended range. Regularly clean and ventilate the space to maintain optimal air quality. Monitor temperature fluctuations closely and take corrective measures if necessary. By controlling these environmental factors, you can significantly improve hatch rates and increase overall incubation success.
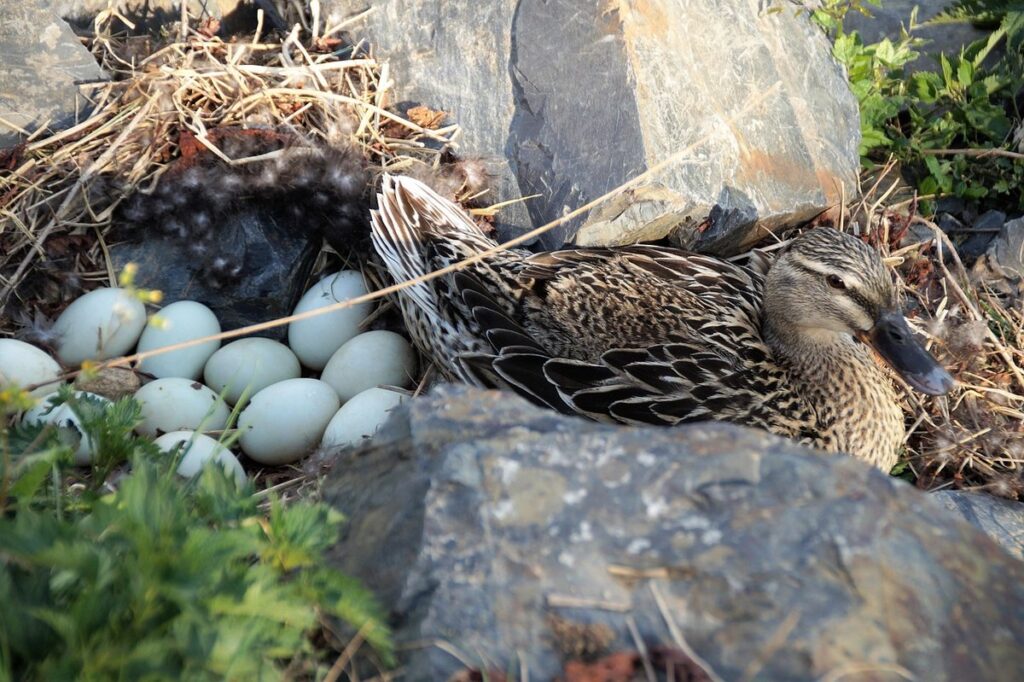
The Egg-Laying Process in Ducks
To understand how long it takes for a duck egg to hatch, let’s take a closer look at the egg-laying process and what happens inside the nesting box.
Anatomy of the Ovary and Oviduct
Ducks have a complex reproductive system that enables them to lay eggs. The anatomy of the ovary and oviduct plays a crucial role in this process. The ovaries are paired organs located in the abdominal cavity, just above the kidneys. They produce yolks, which are released into the oviduct, a muscular tube that connects the ovary to the vent (the duck’s reproductive opening).
The oviduct is divided into four regions: the infundibulum, where fertilization occurs; the magnum, where egg white production takes place; the isthmus, where the shell membrane forms; and the uterus or shell gland, which secretes the calcium carbonate layer that makes up the shell. The shell gland is responsible for adding thickness to the shell, ensuring its durability.
In order to lay an egg, a duck must have both a healthy ovary and oviduct. If either of these organs is damaged, it can affect the quality and quantity of eggs produced. Knowing how the reproductive system works in ducks helps breeders understand what factors might be impacting their hens’ ability to hatch eggs successfully. By understanding this anatomy, you can identify potential issues and take steps to optimize your duck’s reproductive health.
Understanding Fertilization and Egg Formation
For successful hatching, it’s essential to understand the fertilization process and egg formation in ducks. Fertilization occurs when a male duck’s sperm meets an egg yolk in the oviduct of the female duck. This usually happens just before or after ovulation, resulting in fertile eggs that contain genetic material from both parents.
The egg itself forms over several hours through a complex process involving multiple layers of secretions and membranes. The yolk, which provides nutrients to the developing embryo, is surrounded by two clear membranes: the vitelline membrane and the inner albumen. The outer layer consists of shell membranes and a thick calcium carbonate-based shell.
Factors such as breed quality, nutrition, age, and health can significantly impact fertilization rates and egg formation. For instance, ducks that are well-fed on nutrient-rich feed tend to produce more fertile eggs than those with inadequate diets. Similarly, older or ill birds may have lower fertilization success due to declining reproductive capabilities.
By understanding the intricacies of fertilization and egg formation, duck breeders can take steps to optimize their breeding programs and increase the chances of successful hatching.
Incubation Process: How It Works
Now that we’ve covered the basics of duck egg incubation, let’s dive into the nitty-gritty of how it actually works in this next section. We’ll explore each stage of development.
Setting Up a Proper Brooder Environment
When setting up a brooder environment for your newly hatched ducklings, it’s essential to create an ideal space that mimics their natural surroundings. This will help them grow and develop properly. A good brooder should have temperature control, humidity levels, and adequate ventilation.
Temperature is crucial in the first few weeks of life, especially for ducklings. They require a warm environment, with temperatures ranging from 90-100°F (32-38°C) during the first week. You can use a heat lamp or heat mat specifically designed for poultry to maintain this temperature. However, be cautious not to overheat, as this can lead to health issues.
Maintaining humidity levels is also vital. A humid environment helps keep your ducklings’ delicate skin moist and healthy. Aim for a relative humidity of 50-60%. You can increase the humidity by placing a wet sponge or towel in the brooder or using a humidifier.
Proper ventilation is essential to prevent the buildup of ammonia from their droppings. This can be achieved with windows, vents, or a fan. Ensure that there’s adequate airflow to keep your ducklings healthy and happy. By providing an ideal environment, you’ll set your ducklings up for success and help them grow into strong, healthy birds.
Monitoring and Turning Eggs
Monitoring and turning eggs are crucial aspects of the incubation process that can make all the difference in successful hatching. As a duck breeder, you need to ensure that you’re checking on your eggs regularly to prevent any problems.
Firstly, it’s essential to maintain proper temperature during incubation. Ducks typically require an egg turning and rotation every hour or so to prevent the yolk from sticking to one side of the shell. You can use a turner or manually rotate the eggs yourself. For example, you could set up a timer to remind you to turn the eggs at regular intervals.
Regular hygiene practices are also vital during incubation. Ensure that your incubator is clean and free from bacteria, as this can cause contamination and lead to hatching failure. Wash your hands thoroughly before handling eggs, and keep all equipment sanitized regularly.
To monitor temperature accurately, invest in a good quality thermometer that can be placed within the incubator. Aim for a consistent temperature range of 99-100°F (37.2-37.8°C) for optimal duck egg development.
Signs of Incubation Progress
As you wait for your duck eggs to hatch, it’s natural to wonder if incubation is progressing as expected. This section will help you identify the key signs that indicate healthy development inside the egg.
Early Stages of Embryonic Development
As the fertile egg begins its remarkable journey, it’s essential to understand the early stages of embryonic development. This critical period sets the stage for the duckling’s growth and development. From fertilization to gastrulation, a series of intricate processes unfold.
After fertilization, the sperm penetrates the outer layer of the egg, releasing its genetic material. The resulting zygote begins to divide rapidly, forming a cluster of cells called the morula. As this mass of cells multiplies, it undergoes compaction, ultimately transforming into a blastocyst by around 30 hours post-fertilization.
Around 72-96 hours later, gastrulation commences. During this stage, the embryoblast (inner cell mass) begins to differentiate into three primary germ layers: ectoderm, mesoderm, and endoderm. These layers will eventually give rise to various tissues and organs within the developing duckling. As you observe your incubator’s progress, keep in mind that these early stages are crucial for the embryo’s proper development. A controlled environment with optimal temperature, humidity, and turning can significantly influence the hatching process, ensuring a healthy and robust chick at hatch.
Late-Stage Embryonic Development and Hatching
As we approach the end of incubation, the embryo undergoes significant development to prepare for hatching. Around 24-26 days into incubation, you’ll notice a remarkable transformation. The beak starts to take shape, and the embryo will begin to pip, or break through, the eggshell. This is a crucial stage, as the duckling’s beak will help it breathe and eat after hatching.
Feather growth accelerates during this period, with most ducks having their feathers fully developed by 28 days of incubation. The embryo will also start to move around inside the egg, practicing its wing flapping and kicking movements. This preparation is essential for a successful hatch, as the duckling needs to be mobile and strong enough to break free from the shell.
Keep in mind that temperature fluctuations can affect embryonic development, so maintaining a consistent incubation temperature is crucial during this critical stage. By day 28, the embryo will be fully formed, and hatching should occur within the next 24-48 hours. If you’re observing your duck eggs closely, look for signs of pipping or movement inside the egg – these are surefire indicators that hatching is imminent!
Supporting Ducklings After Hatching
Now that you know how long it takes for a duck to hatch eggs, let’s talk about what happens next: caring for your new ducklings after they emerge from their shells.
Initial Care and Nutrition
When your ducklings emerge from their shells, it’s essential to provide them with proper care and nutrition. This is a critical period for their growth and development. For the first few days, ducklings will rely on the yolk sac attached to their belly for sustenance. However, as they begin to forage for food, you’ll need to ensure they have access to nutritious feed and fresh water.
A good quality starter crumble or pellet specifically formulated for young waterfowl is ideal. You can also offer live mealworms or hard-boiled eggs as a treat. Make sure the brooder’s temperature remains between 90-100°F (32-38°C) for the first week, gradually decreasing it by 5-10°F (3-6°C) each day thereafter.
Hydration is equally important – ducklings need access to fresh water at all times. Change the water frequently to prevent bacterial growth and ensure it’s not too deep for them to reach comfortably. With proper care and attention, your new additions will thrive under your care.
Health Considerations and Vaccination Schedule
As you care for your newly hatched ducklings, it’s essential to be aware of common health issues that may arise. Ducklings are prone to respiratory problems, such as pneumonia and bronchitis, which can spread quickly through a brooder due to their close proximity. Runny eyes, nasal discharge, and lethargy are also common symptoms. To prevent the spread of disease, it’s crucial to maintain a clean and well-ventilated environment.
A vaccination schedule for ducklings typically starts at one week old with a respiratory vaccine. Booster shots should be administered at 2-3 weeks and again at 6-8 weeks. Consult with a veterinarian or poultry expert to determine the best vaccination plan for your flock. In addition to vaccinations, ensure that your waterer is clean and easily accessible to prevent bacterial growth.
To maintain a healthy flock, prioritize hygiene by disinfecting equipment regularly and separating sick ducklings from the rest of the brood. Keep an eye out for signs of illness, such as labored breathing or loss of appetite, and take action promptly to prevent further spread. Regular check-ups with a veterinarian will also help detect any underlying health issues early on.
Frequently Asked Questions
How can I determine if my duck eggs are fertile?
Before incubating, it’s essential to check the fertility of your duck eggs. You can do this by using an egg candling tool or taking the eggs to a reputable hatchery for testing. Fertile eggs will have a more defined pattern and a reddish-brown color around the air sac.
What if I notice irregularities in my ducks’ incubation period?
If you’re experiencing difficulties with your duck’s incubation period, it could be due to various factors such as temperature fluctuations, humidity levels, or even egg handling. Check for proper ventilation, maintain a consistent temperature between 99°F and 100°F (37°C – 38°C), and ensure the eggs are not being handled excessively.
Can I use an automatic turner in place of manual turning?
While automatic turners can be convenient, they may not provide the same level of care as manual turning. It’s recommended to supplement with occasional manual turning to ensure the eggs receive proper aeration and prevent potential health issues. Research the specific needs for your duck breed.
How do I handle incubation setbacks or failures?
In some cases, despite ideal conditions, incubation may not be successful. If you experience multiple failed hatchings, consider revisiting your egg storage, handling, and environmental setup. Consult with a poultry expert to identify potential issues and adjust your strategies accordingly.
What should I expect in the first few days after hatching?
After successfully hatching ducklings, it’s crucial to provide them with an optimal environment for growth. Ensure the brooder has adequate ventilation, maintain a consistent temperature around 90°F (32°C), and ensure access to clean water and nutritious starter feed. Monitor their behavior, appetite, and health closely during this critical period.