
Duck hatching is a fascinating process that involves more than just waiting for eggs to crack open. From fertilization to hatching day, it’s a magical journey that requires careful attention to detail and a conducive breeding environment. If you’re an avid duck breeder or simply a backyard enthusiast looking to raise healthy ducklings, understanding the intricacies of duck hatching is crucial. A successful hatch can be a game-changer for your flock, providing you with a steady supply of high-quality eggs and young birds. In this article, we’ll guide you through the process of creating a breeding environment that fosters successful hatching, from selecting healthy breeding stock to monitoring the incubation period. We’ll share expert tips on how to ensure your ducklings hatch strong and healthy, and thrive in their new surroundings.
Understanding Duck Embryology
Let’s dive into the fascinating world of duck embryology, where we’ll explore how a tiny egg transforms into a fully formed duckling. You’ll learn the essential stages of development inside the egg.
Stage 1: Fertilization and Cleavage (0-24 hours)
At this point, you’re probably wondering what happens when a duck egg is first laid. Let’s dive into the fascinating world of duck embryology and explore the initial stages of development.
Fertilization occurs when the male duck’s sperm meets the female duck‘s egg yolk in the oviduct. This usually happens within 24 hours after mating, resulting in a fertilized egg. The next step is cleavage, where the fertilized cell divides into two, then four, and eventually eight identical cells.
As the embryo develops, these cells continue to divide and differentiate, forming a cluster of cells called a morula. This stage typically occurs within 24 hours after fertilization. It’s essential to note that during this period, the duck embryo is highly vulnerable and susceptible to environmental factors like temperature fluctuations and humidity changes.
To increase your chances of successful hatching, make sure to maintain a consistent environment with proper ventilation and a stable temperature between 99°F to 100°F (37°C to 38°C). This will help create an optimal incubation condition for the developing duck embryo.
Stage 2: Gastrulation and Organogenesis (24-48 hours)
As we delve deeper into the duck embryology process, we arrive at Stage 2: Gastrulation and Organogenesis. This is a critical period, spanning from 24 to 48 hours after fertilization, where the embryo undergoes significant transformations. The blastula, which was formed in the previous stage, begins to invaginate and fold inward. This process is known as gastrulation.
During gastrulation, the cells of the blastula start to rearrange themselves, giving rise to three primary germ layers: ectoderm, endoderm, and mesoderm. These layers will eventually develop into various tissues and organs in the embryo. For instance, the ectoderm will form the skin, hair, and nervous system, while the endoderm will give rise to the digestive system and respiratory tract.
As the gastrula forms, organogenesis begins to take place. This is a complex process where the germ layers start to differentiate and organize themselves into specific organs and tissues. The heart starts beating, and the major body cavities begin to develop. At this stage, the embryo’s overall shape becomes more defined, with distinct head, tail, and limb buds emerging.
Importance of Temperature in Embryonic Development
Temperature plays a crucial role in the development of duck embryos. It’s essential to understand that embryos develop at different rates depending on temperature, which can significantly impact hatching success. A 1°C increase in temperature can result in an embryo developing one day faster than its counterpart.
The ideal incubation temperature for duck eggs is between 99.5°F and 100.5°F (37.7°C to 38°C). This narrow temperature range requires precise control, as variations can lead to developmental issues or even embryonic mortality. For instance, temperatures above 102°F (39°C) can cause embryo malformations, while temperatures below 98.5°F (36.9°C) may delay development.
Maintaining a consistent temperature is critical during the first 24 hours of incubation, as this period sets the stage for subsequent growth. After that, it’s essential to monitor and adjust the temperature accordingly to ensure optimal development. You can achieve this by using an accurate thermometer or digital egg turner with built-in temperature control. By doing so, you’ll be well on your way to successful duck hatching.
Choosing the Right Breeding Program
When selecting a breeding program, it’s essential to consider factors such as breed quality, health records, and experience of the breeder. This helps ensure healthy, high-quality ducklings for your hatchery.
Selecting Healthy Duck Breeders
When selecting healthy duck breeders for your breeding program, it’s essential to consider several factors to ensure you’re getting high-quality ducks. First, research the breeder’s reputation and experience with duck hatching. Look for breeders who specialize in the specific breed or cross you’re interested in, as they’ll have a better understanding of the breed’s characteristics and needs.
Check if the breeder has a good track record of producing healthy, well-adjusted ducks. Ask for references from previous customers to get an idea of their success rate. Also, ensure that the breeder follows proper health protocols, such as vaccinations and regular veterinary check-ups, to minimize the risk of disease in your flock.
When visiting the breeder’s farm or facility, observe the conditions and care given to the ducks. Healthy breeders should have clean living areas, adequate space for exercise, and a balanced diet. You can also ask about their breeding philosophy, such as selection criteria for parents, feeding practices, and record-keeping methods.
Lastly, don’t be afraid to ask questions – good breeders will welcome your curiosity and provide detailed information about the ducks you’re interested in buying. By doing your due diligence and selecting a reputable breeder, you’ll set yourself up for success with your duck hatching program.
Factors Influencing Egg Quality
When it comes to choosing the right breeding program for duck hatching, understanding the factors that influence egg quality is crucial. This not only ensures healthy hatchlings but also contributes to the overall success of your breeding program.
First and foremost, nutrition plays a significant role in egg quality. A balanced diet rich in essential nutrients such as protein, calcium, and vitamins is vital for producing high-quality eggs. For example, a study by the American Poultry Association found that duck breeds fed with a diet supplemented with omega-3 fatty acids had improved fertility rates and healthier offspring.
Genetics also significantly impact egg quality. Selecting breeding stock from reputable sources and focusing on genetic traits such as fertility, hatchability, and eggshell strength are essential. Research has shown that certain breeds, like the Khaki Campbell, excel in these areas due to their robust genetics.
Environmental conditions, including temperature, humidity, and light exposure, also affect egg quality. Proper housing and management practices, such as maintaining a clean and dry coop with adequate ventilation, can help mitigate these factors.
Understanding Heritability in Ducks
When you’re selecting a breeding program for your ducks, it’s essential to understand the concept of heritability. Heritability refers to the degree to which a trait is influenced by genetics rather than environmental factors. In duck breeding programs, heritability can impact everything from eggshell quality to temperament.
For example, let’s say you’re interested in raising a specific breed of duck known for its exceptional egg-laying abilities. If this breed has a high heritability score for egg production, it means that the ducks’ genetic makeup is more likely to determine their ability to lay eggs rather than environmental factors such as diet or living conditions.
To gauge the heritability of a particular trait in your duck breeding program, you can look at data from reputable breed associations. These organizations often provide statistics on the heritability of different traits within specific breeds. You can also consult with experienced breeders who have worked with the breed you’re interested in.
Keep in mind that heritability is just one factor to consider when selecting a breeding program. It’s essential to research and evaluate other aspects, such as the breeder’s reputation, health clearances, and customer support, before making a decision.
Caring for Duck Eggs
Now that you’ve successfully incubated your duck eggs, it’s time to learn how to care for them properly until they’re ready to hatch. Proper care is crucial at this stage.
Creating a Suitable Incubation Environment
To create an optimal incubation environment for duck eggs, you’ll need to focus on three essential elements: temperature, humidity, and ventilation. The ideal temperature range for incubating duck eggs is between 99°F (37°C) and 100°F (38°C), with a slight drop in temperature overnight. Maintaining this consistent temperature is crucial, as even minor fluctuations can affect the embryo’s development.
Humidity levels should be kept at around 50-60%, but it’s essential to maintain a slightly higher humidity level during the first 24 days of incubation. You can achieve this by misting the eggs or using a water pan in the incubator. Proper ventilation is also vital, as excessive moisture can lead to mold and bacterial growth. Ensure good airflow by placing the incubator away from walls and keeping it at least 6 inches (15 cm) off the floor.
When setting up your incubation environment, consider investing in an incubator with automatic temperature control and a hygrometer for monitoring humidity levels. This will help you maintain the perfect balance of conditions for successful duck hatching.
Monitoring Egg Temperature and Humidity Levels
Monitoring egg temperature and humidity levels is crucial for successful duck hatching. To ensure proper incubation conditions, you’ll need to invest in a good quality egg incubator that can maintain consistent temperatures between 99-100°F (37-38°C) during the first 24 days of incubation. For the remaining 3 days, the temperature should drop to around 98-99°F (36-37°C).
It’s also essential to monitor humidity levels. A humid environment helps to prevent embryo dehydration and promotes healthy growth. Aim for a relative humidity level between 50-60% during the first 24 days of incubation. You can use a hygrometer to measure the humidity levels in your incubator.
To take it a step further, consider using an automatic egg turner that also monitors temperature and humidity levels. These devices will alert you if there’s any fluctuation or deviation from the ideal settings. This way, you’ll be able to make adjustments promptly, ensuring optimal conditions for your duck eggs to hatch successfully. Remember, accurate monitoring is key to a successful hatching process!
Handling and Turning Eggs
When handling duck eggs, it’s essential to do so with care to prevent breakage and promote healthy development. Duck eggs are more fragile than chicken eggs due to their thicker shells, making them prone to cracking during handling.
To minimize the risk of breakage, it’s crucial to handle the eggs by their air cells or “bumps” rather than their pointed ends. This gentle approach helps distribute the weight evenly and reduces the likelihood of damage. When turning the eggs, use a clock-wise motion to rotate each egg 90 degrees every 24 hours. This ensures that the embryo is not stuck to one side and allows for even development.
For example, if you have a set of 12 eggs, turn them at 6 am, then again at 6 pm. Consistency is key when it comes to turning duck eggs. It’s also vital to keep the eggs in a clean, dry environment with consistent temperatures between 40°F and 50°F (4°C and 10°C). By following these simple steps, you’ll be well on your way to raising healthy, happy ducklings.
Recognizing Signs of Fertility and Viability
As you await the arrival of your new ducklings, it’s essential to recognize the signs that indicate your eggs are fertile and viable, setting you up for a successful hatching experience.
Indicators of Healthy Embryos
When checking for healthy embryos, it’s essential to observe specific signs during incubation. A key indicator of a developing embryo is its reliance on the yolk sac for nourishment and development. Typically, you’ll start noticing a slight darkening around the air cell at 6-7 days into incubation. As the embryo grows, the yolk sac will begin to take on a more pronounced appearance.
Between 7-9 days, the yolk sac should be visible as a small, translucent oval-shaped structure attached to the underside of the egg. A well-developed yolk sac is crucial for providing nutrients and energy to the embryo during its initial growth stages. Observe your duck embryos closely around this period; if you notice any abnormalities in the yolk sac or surrounding areas, it may be an indication of a developing issue.
By carefully monitoring these signs, you can gain valuable insights into the health and viability of your duck eggs.
Identifying Potential Issues in Duck Embryos
Identifying potential issues in duck embryos is crucial to ensure a healthy and successful hatching process. As a responsible breeder, it’s essential to monitor the development of your duck eggs closely for any signs of abnormalities. One common issue that can arise during embryonic development is twinning, where two embryos develop within the same egg. This can be caused by a variety of factors, including genetic predisposition or poor egg quality.
Abnormal morphology is another potential issue that can impact hatching success. This refers to unusual or irregular shapes and structures in the developing embryo. For example, an embryo may exhibit twisted or bent limbs, or an uneven yolk sac. In such cases, it’s essential to carefully inspect the egg and make a decision about whether to continue incubation.
To identify potential issues, keep a close eye on your eggs during incubation, checking for any signs of abnormal development, such as unusual movement patterns or inconsistent temperature readings. If you do encounter an issue, don’t hesitate to seek advice from a seasoned breeder or veterinarian. Remember, early detection and intervention are key to minimizing the impact of potential problems and ensuring a successful hatching outcome.
The Role of Sex Determination in Ducks
Sex determination is an essential aspect of breeding ducks, as it helps you understand the reproductive capabilities and potential egg-laying abilities of your birds. In ducks, sex is determined by a complex interplay of genetic and hormonal factors.
Ducks have a ZW/ZZ sex-determination system, meaning that females (hens) have two sex chromosomes (ZW), while males (cocks) have two identical sex chromosomes (ZZ). However, determining the sex of a duckling can be challenging due to the overlapping range of sex characteristics. Breeders often rely on physical examination, but this method is not foolproof.
To determine the sex of your ducks accurately, you’ll need to develop skills and experience through hands-on practice. One way to do this is by observing the behavior and plumage patterns of your birds as they mature. Hens will generally exhibit more vibrant feather colors and a more rounded tail shape compared to cocks. By paying attention to these subtle differences and combining them with other methods, such as vent sexing (examinining the reproductive organs), you’ll become proficient in identifying the sex of your ducks.
Developing accurate sex determination skills is crucial for successful breeding programs. It allows you to match males and females based on their genetic profiles, optimize egg production, and make informed decisions about your flock’s management.
Preparing for Hatching Day
As you await the arrival of your ducklings, it’s essential to ensure you’re ready for hatching day by having all necessary supplies and a clean brooder in place. This crucial step will set your ducks up for a healthy start.
Establishing a Safe Hatching Environment
Creating a safe hatching environment is crucial for the successful emergence of your ducklings. This requires careful consideration of several key factors to ensure that both you and the ducks are protected from potential hazards.
Adequate space is essential, as a cramped environment can lead to stress on both the mother duck and the developing embryos. A general rule of thumb is to provide at least 2-3 square feet of floor space per bird inside the brooder. This will give them room to move around comfortably without feeling confined or trapped.
Proper ventilation is also vital, as a buildup of carbon dioxide can cause distress in both the mother duck and her young. Ensure that your incubation area has adequate airflow by installing vents or using fans to circulate air. Keep in mind that you don’t want drafts, which can be detrimental to the development of the eggs.
Remember, a safe hatching environment is not just about the physical space – it’s also about maintaining a clean and hygienic area to prevent the spread of disease. Regularly disinfect all surfaces and keep an eye out for any signs of illness or stress in your ducks.
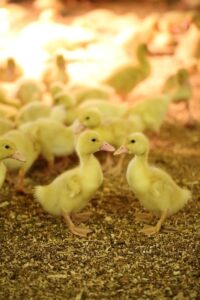
Monitoring Duckling Development
Monitoring duckling development is crucial to ensure a successful hatch. As you wait for your eggs to incubate, keep an eye out for signs of readiness to hatch. Around 24-26 days into incubation, you may notice the eggs starting to pip – a small hole will appear on one end of the egg as the duckling begins to break through.
If you observe the eggs regularly, you’ll start to see the ducklings’ beaks and heads emerging from the eggs. This is usually accompanied by loud chirping and restlessness. As the hatch day approaches, make sure your brooder or hatching area is ready for the new arrivals. A well-ventilated space with adequate heat sources will help keep the ducklings comfortable.
Potential issues may arise during this critical period. Softened or broken eggs can be a sign of bacterial contamination, while irregular temperature fluctuations can affect embryo development. Regular checks on egg temperature (98-100°F) and humidity levels will help you identify any problems early on.
The First Few Weeks: Critical Care and Nutrition
As you eagerly await the arrival of your ducklings, it’s essential to be prepared for their critical care and nutrition needs during the first few weeks. Immediately after hatching, ducklings are completely dependent on their mother for warmth, hydration, and nourishment. However, when incubation is handled externally or a duckling has been separated from its mother at birth, you’ll need to take over these responsibilities.
Initially, provide your ducklings with a heat source, such as a heat lamp or brooder, to maintain the ideal temperature of 90-95°F (32-35°C) for the first week. Ensure adequate ventilation and keep an eye on humidity levels to prevent respiratory issues. For nutrition, offer a starter feed specifically formulated for ducklings, containing around 20% protein content. This will support their rapid growth and development.
Monitor your ducklings’ weight daily and adjust feeding quantities accordingly. A general rule of thumb is to provide 5-10% of the total body weight in feed per day. It’s also crucial to ensure access to clean water at all times, changing it frequently to prevent bacterial contamination. Be prepared for potential health issues, such as Marek’s disease or hypovitaminosis, and research preventative measures ahead of time to guarantee your ducklings receive the best start in life.
Frequently Asked Questions
How do I know if my duck eggs are fertile?
A fertile egg will have a dark spot, called the “bloom,” on its surface, indicating that it has been successfully fertilized. However, this is not always a guarantee of fertility. It’s essential to use multiple methods to determine fertility, such as candling and weighing eggs.
Can I store duck eggs for later incubation?
Yes, you can store duck eggs in a controlled environment with consistent temperature (around 60-65°F) and humidity levels for up to 7 days before incubation. However, it’s crucial to check the eggs regularly for any signs of spoilage or damage.
How often should I turn the eggs during incubation?
Turning the eggs is essential for even development and preventing the ducklings from sticking to the shell. Aim to turn the eggs 2-3 times a day, making sure to rotate them 90 degrees each time to prevent the embryo’s air sac from becoming stuck.
What are some common issues that can affect duckling development?
Common issues include temperature fluctuations, poor egg quality, and inadequate humidity levels. Regularly monitoring the incubation environment and checking for signs of trouble can help you address these problems promptly.
Can I use a DIY incubator or should I invest in a commercial one?
A well-designed DIY incubator can be an excellent option if you’re short on budget. However, a commercial incubator offers consistent temperature control and other features that can improve hatch rates and reduce stress on the ducklings. It’s essential to research and choose the right equipment for your needs.