
If you’re looking for ways to boost your chicken’s nutrition, you’ve likely considered adding more protein-rich foods to their diet. One simple and healthy option is sprouting lentils for chickens, but did you know it can be a game-changer for their overall well-being? By sprouting lentils, you’ll increase the nutritional value of this superfood, making it easier for your flock to digest and absorb the essential vitamins and minerals they need. In this article, we’ll walk you through the step-by-step process of how to sprout lentils for chickens, including tips on preparation, growth cycles, and benefits. Whether you’re a seasoned chicken owner or just starting out, adding this easy-to-make addition to their diet is sure to make a noticeable difference in their health and vitality.
Benefits of Sprouting Lentils for Your Flock
Now that you’ve learned how to sprout lentils, let’s explore the benefits they can bring to your flock, from improved egg quality to enhanced feather health.
Understanding the Nutritional Value of Sprouted Lentils
Sprouting lentils is not only beneficial for humans but also provides numerous advantages for your feathered friends. When it comes to nutritional value, sprouted lentils are a powerhouse of goodness, especially when compared to their non-sprouted counterparts. One of the most significant benefits is an increase in protein content – with some varieties showing up to 25% more protein than their raw state. This boost in protein makes sprouted lentils an excellent addition to your flock’s diet.
Improved digestibility is another key advantage of sprouting lentils. By breaking down some of the phytic acid and other complex compounds, sprouting enhances nutrient absorption, allowing your chickens to reap the most benefits from this nutritious legume. As a result, you may notice improved overall health and reduced stress levels in your flock.
When choosing lentil varieties for sprouting, look for ones that are high in protein content. For example, green or brown lentils tend to have higher protein levels than red or yellow varieties. Consider mixing sprouted lentils with other nutrient-rich foods, such as leafy greens or fruits, to create a balanced and healthy diet for your flock.
Introduction to Chicken Nutrition and Health
When it comes to maintaining the health and well-being of your flock, providing a balanced diet is essential. A nutritious meal plan helps support overall chicken health, boosts immune systems, and promotes optimal egg production. However, many commercial chicken feeds may not offer the best quality or variety of nutrients.
A well-balanced diet should include protein sources, fiber-rich foods, vitamins, minerals, and other essential nutrients. Adequate vitamin A levels are crucial for healthy vision, skin, and mucous membranes. Vitamin D helps regulate calcium absorption, which is vital for strong bone growth and density. Phosphorus is another key nutrient that supports bone health and overall bodily functions.
To ensure your flock receives a balanced diet, consider adding diverse food sources to their meal plan. Fresh fruits and vegetables, like leafy greens and berries, are excellent additions. You can also supplement with high-quality commercial feeds or specialty grains. Additionally, consider the age, breed, and health conditions of your chickens when selecting foods to incorporate into their diets.
Remember that every flock is unique, so observe and adjust accordingly. With attention to detail and a commitment to providing optimal nutrition, you’ll be well on your way to maintaining a happy and healthy flock.
Preparing for Lentil Sprouting
Before you start sprouting lentils for your chickens, make sure you have a clean and well-ventilated area to set up your operation. Here’s what you need to prepare!
Choosing the Right Type of Lentils
When it comes to sprouting lentils for your flock, not all types are created equal. The right variety can make a big difference in the nutritional value and digestibility of your chicken’s feed. Here are some popular types of lentils suitable for sprouting:
Green lentils are a popular choice due to their high protein content (25-30%) and relatively fast germination rate, making them ideal for small farms or backyard flocks. Red lentils, on the other hand, have a slightly lower protein content but are still rich in fiber and minerals like iron and potassium.
Beluga lentils, also known as black lentils, have the highest nutritional value of all, with a whopping 30-35% protein content. However, they can be more challenging to germinate due to their dense texture. If you’re new to sprouting lentils, it’s best to start with green or red varieties and gradually move on to Beluga for maximum nutritional benefits.
In terms of availability, most grocery stores carry green or red lentils, making them easily accessible for beginners. When selecting a type, consider the climate, region, and intended use (fresh or dried feed) to ensure you choose the best variety for your needs.
Equipment and Supplies Needed for Sprouting
To successfully sprout lentils for your chickens, you’ll need some essential equipment and supplies. Start by acquiring a few clean glass jars or containers with lids that are specifically designed for fermentation or sprouting. You can find these at most health food stores or online. Make sure the jars are large enough to hold about 1-2 cups of lentils, as they will expand during the sprouting process.
Next, you’ll need a fine-mesh strainer or cheesecloth to rinse and drain the lentils after soaking. A rubber band can be used to secure the cloth over the jar’s mouth. You may also want to have some wooden skewers on hand for gently stirring the lentils during the sprouting process.
In terms of supplies, you’ll need to source a type of lentil that is suitable for sprouting. Brown or green lentils work well, as they are easier to sprout than red or yellow varieties. You can also find lentils specifically labeled as “sprouting” at health food stores or online. Finally, be sure to have a clean and sanitized workspace when preparing the lentils and equipment to avoid contamination.
To give you a better idea of what to expect, consider that it’s best to use glass containers over plastic ones, as they won’t transfer any chemicals into the sprouted lentils.
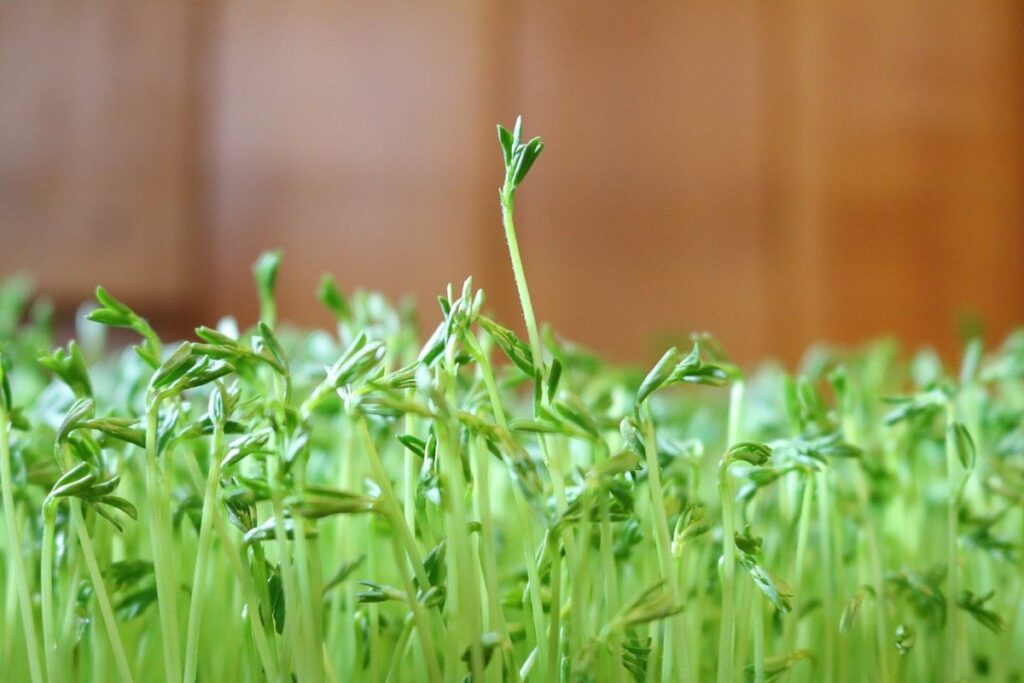
The Sprouting Process
To get started, let’s dive into the sprouting process and learn how to successfully grow lentils for your flock. This is where things can get a bit tricky, but don’t worry, we’ll guide you through it step by step!
Step-by-Step Instructions for Soaking and Rinsing Lentils
Soaking and rinsing lentils is an essential step to initiate germination. To do this effectively, follow these steps:
Begin by rinsing the lentils under cold running water, removing any debris or impurities. Next, soak them in a bowl of lukewarm water (about 90°F) for 8-12 hours or overnight. The ideal ratio is 1 cup of lentils to 2 cups of water.
After soaking, drain and rinse the lentils again under cold running water to remove any excess moisture. This step helps prevent mold growth during germination. If you’re using a sprouting tray or jar, now’s the time to transfer the soaked lentils into their designated container.
For every cup of lentils, add 1-2 tablespoons of unchlorinated water and stir gently. Place the tray or jar in a warm location, away from direct sunlight, but not too cold (around 70°F to 75°F). This temperature range promotes optimal germination. Check on your sprouts daily for signs of growth, and rinse them once more before transferring them to the next stage of the sprouting process.
Monitoring and Maintaining Optimal Conditions for Germination
Maintaining optimal conditions for germination is crucial to ensure successful sprouting of lentils for your chickens. Temperature plays a significant role in this process; it should be between 70°F and 80°F (21°C to 27°C) during the first few days, with slight adjustments as the seeds start to sprout.
Humidity levels also need attention. A relative humidity of around 50% is ideal for lentil sprouting. You can cover your sprouting container with a lid or plastic wrap to maintain this level. However, make sure it’s not too tight, allowing for some air circulation.
Lighting conditions should be minimal during the germination phase. Direct sunlight can cause the seeds to dry out and slow down the process. If possible, place the sprouting container near an east- or west-facing window with filtered natural light. Alternatively, you can use grow lights specifically designed for seedlings, providing gentle illumination.
Monitoring temperature, humidity, and light conditions will help prevent common issues like mold growth or slowed germination rates. By paying close attention to these factors, you’ll be able to provide your lentils with the optimal environment they need to sprout successfully, ultimately benefiting your chickens’ health and well-being. Regular checks on temperature and humidity levels can also prevent unwanted pests from developing in the sprouting container.
Tips for Success and Common Issues
Now that you’ve successfully sprouted your lentils, it’s time to troubleshoot any issues that may arise and learn from our experts’ top tips for success. We’ll walk you through common problems and expert advice.
Troubleshooting Common Problems with Lentil Sprouting
When it comes to sprouting lentils for your chickens, you may encounter some common issues that can hinder the process. One of the most frustrating problems is mold or fermentation. This usually occurs when the environment is too warm, humid, or dirty.
To prevent mold and fermentation, make sure to rinse the lentils thoroughly before soaking them in water. Change the water daily to keep it fresh and aerate the sprouts by gently shaking the jar every 24 hours. Keep the container away from direct sunlight and heat sources.
If you notice any visible signs of mold or fermentation, discard the affected lentils immediately. To avoid this issue altogether, soak the lentils in a mixture of water and vinegar (1 tablespoon per quart) for 30 minutes before starting the sprouting process. This will help inhibit bacterial growth and keep the environment clean.
Regularly inspect your sprouts for any signs of mold or fermentation, and take prompt action if you notice anything unusual. By following these tips, you can enjoy healthy and successful lentil sprouts for your chickens.
Ensuring Consistent Quality and Quantity of Sprouted Lentils
When it comes to providing sprouted lentils for your flock, consistency is key. You want to ensure that your chickens are receiving a steady supply of nutrient-rich food to maintain their health and well-being. To achieve this, you need to focus on maintaining the quality and quantity of your sprouted lentils.
One way to do this is by creating a routine for soaking and rinsing your lentils. Allocate a specific time slot each day for these tasks, so you can maintain consistency in the process. For instance, soak your lentil supply for 8-10 hours every morning, followed by a thorough rinse before allowing them to sprout.
Another aspect to consider is storage. Keep your sprouted lentils in an airtight container, protected from direct sunlight and moisture, to prevent spoilage and maintain their quality. By following these simple steps, you can ensure that your chickens are receiving a consistent supply of healthy, nutrient-rich food throughout the day.
Incorporating Sprouted Lentils into Your Chicken’s Diet
To incorporate sprouted lentils into your chicken’s diet, you’ll need to learn how to add them in moderation and which types of chickens benefit from this nutritious food source.
Gradual Introduction of Sprouted Lentils
When introducing sprouted lentils to your flock’s diet, it’s essential to do so gradually. This helps prevent digestive upset and ensures a smooth transition. Start by substituting 10-15% of their regular feed with sprouted lentils for 3-4 days. Monitor their behavior, droppings, and overall health during this period.
If everything seems normal, you can increase the proportion to 20-25%. Continue to observe your chickens’ response and adjust accordingly. Some birds might take longer to adapt than others, so be patient and don’t rush the process.
To make it even easier, consider mixing sprouted lentils with other nutritious ingredients like chopped veggies or fruits. This will not only provide a varied diet but also help mask any unfamiliar flavors. Keep in mind that every flock is unique, so pay attention to individual preferences and adjust your approach as needed. By introducing sprouted lentils gradually, you’ll be able to ensure a seamless integration into their regular feed, promoting overall well-being and optimal nutrition.
Benefits for Different Types of Chickens (e.g., Layers, Broilers)
Sprouted lentils can be a game-changer for chickens of all ages and breeds. For layer hens, sprouted lentils are an excellent source of protein and fiber, which helps maintain their egg-laying abilities. A study showed that layer hens fed with sprouted lentils had improved egg production and quality compared to those fed with unsprouted lentils.
Broiler chickens also benefit from the high nutritional value of sprouted lentils. Broilers require a diet rich in protein to support rapid growth, and sprouted lentils provide just that. Additionally, sprouting increases the bioavailability of nutrients like iron, zinc, and potassium, which are essential for broilers’ overall health.
Incorporating sprouted lentils into your layer hens or broiler chickens’ diets can be as simple as adding them to their feed or mixing them with other grains. You can also soak sprouted lentils in water overnight and serve them fresh the next day. This not only provides a nutritious meal but also helps support their digestive health.
For all types of chickens, sprouted lentils offer a nutrient-dense alternative to traditional grain-based feeds. They are especially beneficial for chicken flocks that require specialized diets or have specific nutritional needs. By incorporating sprouted lentils into your flock’s diet, you can promote overall health and well-being while minimizing the risk of disease and illness.
Health Considerations and Safety Precautions
Before you start sprouting lentils for your flock, let’s go over some essential health considerations and safety precautions to keep both your chickens and yourself safe. This section covers key guidelines to follow.
Potential Allergies or Intolerances to Sprouted Lentils
If you’re planning to introduce sprouted lentils into your flock’s diet, it’s essential to consider potential allergies or intolerances. While lentils are a nutrient-rich and healthy choice for chickens, some birds may develop sensitivities to them.
Lentil allergy symptoms can range from mild skin issues to more severe respiratory problems. If you notice any unusual behavior in your flock, such as excessive scratching, sneezing, or lethargy after consuming sprouted lentils, it’s crucial to investigate further. Monitor your birds’ health closely and adjust their diet accordingly.
To minimize the risk of allergies, start by introducing small amounts of sprouted lentils into their regular feed. Gradually increase the quantity over a few days to gauge their reaction. Keep in mind that individual tolerance may vary greatly among flock members. If you notice any adverse reactions or suspect an allergy, discontinue use immediately and consult with your veterinarian for guidance.
Additionally, be aware of cross-reactivity between lentils and other legumes like beans, peas, or soybeans. Some chickens may exhibit intolerance to these foods due to their similarity in protein structure. Always prioritize your flock’s health and adjust their diet based on individual needs and sensitivities.
Proper Handling and Storage of Sprouted Lentils
When handling and storing sprouted lentils for your chickens, it’s essential to maintain their nutritional value. To prevent spoilage and contamination, make sure to wash the lentils thoroughly after they’ve finished sprouting. Use a fine-mesh strainer or cheesecloth to remove any debris or excess water.
For short-term storage (up to 5 days), keep the sprouted lentils in an airtight container in the refrigerator at a temperature of 40°F (4°C) or below. You can also store them in the freezer for up to 3 months. To freeze, simply spread the lentils out on a baking sheet and place it in the freezer until they’re frozen solid. Then transfer them to an airtight container or freezer bag.
When storing sprouted lentils, keep them away from direct sunlight and heat sources. It’s also crucial to check the lentils regularly for any signs of mold or spoilage. Always use your best judgment when evaluating their quality and discard any that appear off or slimy.
To ensure you’re getting the most nutritional benefits from your sprouted lentils, try to consume them within a week of sprouting. This will help maintain their high protein and fiber content.
Conclusion: Making the Most of Sprouting Lentils for Your Chickens
Now that you’ve mastered the art of sprouting lentils for your chickens, let’s recap how to make the most of this nutritious treat and incorporate it into their daily diet.
Recap of Key Takeaways from the Guide
As you conclude your journey through our comprehensive guide on sprouting lentils for your chickens, let’s take a moment to recap the key takeaways. By now, you should have a solid understanding of why and how to incorporate this nutritious food source into your flock’s diet.
One crucial point to remember is that sprouted lentils offer an unparalleled boost to your chickens’ health and well-being. With their increased bioavailability and higher nutrient content, these tiny superfoods can support everything from vibrant egg yolks to robust immune systems.
Key steps included in the guide include selecting the right type of lentil, properly soaking them for optimal germination, maintaining a consistent temperature, and ensuring adequate air circulation throughout the sprouting process.
Remember, incorporating sprouted lentils into your flock’s diet is not just about providing a tasty treat; it also fosters better digestive health, promotes eggshell quality, and enhances overall vitality. By implementing these simple yet effective steps, you’ll be giving your chickens the gift of optimal nutrition – and that’s something to cluck about!
Encouragement to Try Sprouting Lentils with Your Flock
Don’t be intimidated if you’re new to sprouting lentils for your chickens – it’s easier than you think! In fact, encouraging this practice can have numerous benefits for both you and your flock. Not only will your chickens enjoy a nutrient-rich treat, but you’ll also reduce food waste and create a sustainable feeding solution.
Start by experimenting with small batches of lentils to see how they take to sprouting. You can try soaking them overnight or using a specialized sprouter – the key is to provide consistent moisture and warmth. As the lentils begin to sprout, observe your chickens’ interest and reactions; you might be surprised at their enthusiasm!
To make it a regular part of your flock’s diet, consider incorporating sprouted lentils into their feed mix or offering them as a treat after meals. You can also store dried lentils in bulk for future use, simply soaking them whenever needed. With practice and patience, you’ll find a system that works best for you and your chickens – giving them the gift of healthy, tasty goodness every time!
Frequently Asked Questions
Can I mix sprouted lentils with other grains or supplements for my chickens?
You can, but be cautious not to overdo it. Sprouted lentils are a nutrient-dense superfood, and adding too many other supplements might lead to an imbalance in your flock’s diet. A general rule of thumb is to introduce new foods gradually, starting with small amounts (about 10% of their total intake) and observing for any adverse reactions before increasing the quantity.
How long does it take for lentils to sprout after soaking?
The germination time can vary depending on factors like temperature, humidity, and type of lentil. Typically, you can expect to see sprouts within 24-48 hours after soaking. However, some varieties may take longer – up to 3-5 days. Monitor your lentils closely for signs of sprouting, such as visible roots or green shoots.
What if I notice mold or fungus on my sprouted lentils? Can they still be used?
No, it’s essential to discard any sprouts with visible mold or fungal growth. These can pose health risks to your chickens and compromise the nutritional value of the food. Regularly inspect your sprouts during the germination process, and make sure to store them properly in a clean, dry environment until feeding.
Can I use sprouted lentils as a substitute for commercial layer feed?
While sprouted lentils can be a nutritious addition to your flock’s diet, it’s not recommended to replace their main staple completely. A balanced commercial layer feed should still form the foundation of their nutrition. Use sprouted lentils as an enriching supplement or treat, following the guidelines outlined in this article and considering factors like age, health, and individual nutritional needs.
How often can I harvest sprouts from my lentil crop?
To maintain a consistent supply, you can typically harvest sprouts every 2-3 days. This will depend on your specific conditions and desired yield. It’s crucial to ensure the new growth has enough time to develop before harvesting again, allowing for optimal nutrition and flavor in the final product.