
Are you getting ready to welcome some new feathered friends into your backyard? If so, congratulations on taking the first step towards raising healthy and happy chickens! However, before moving those adorable chicks into their forever home in the coop, it’s essential to give them a safe and nurturing environment to grow. This is where the brooder comes in – a crucial part of your chicken-keeping journey that can make all the difference in your chicks’ early development.
In this article, we’ll take you through the process of setting up and maintaining an ideal brooding space, covering everything from size selection to ventilation and heating. We’ll provide expert tips on creating a warm and comfortable environment for your chicks to thrive before they make the transition to their coop home. By following our guidance, you can ensure your chicks grow strong and healthy, laying delicious eggs in no time!
What is a Brooder and Why Do I Need One?
As you start thinking about setting up your backyard chicken coop, it’s essential to understand what a brooder is and why you need one for healthy chicks. Let’s dive in!
Definition of a Brooder
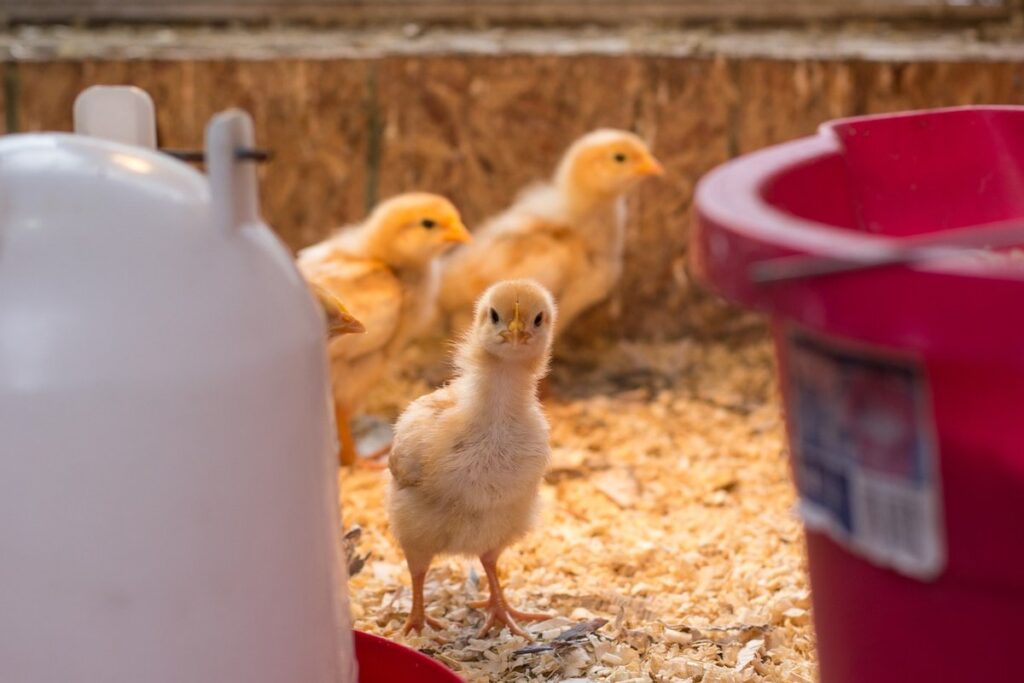
A brooder is a specialized enclosure designed to provide a safe and controlled environment for newly hatched chicks. Its primary purpose is to help young chickens grow and develop until they are ready to move into a coop with the rest of the flock. Unlike a coop, which is typically a permanent structure that houses adult birds, a brooder is often used as a temporary solution for raising baby chicks.
A good brooder should have adequate ventilation, temperature control, and space for the growing chicks to roam freely. A general rule of thumb is to provide at least 1-2 square feet of floor space per chick, depending on their age and breed. You’ll also need a heat source, such as a heat lamp or ceramic heat emitter, to maintain a safe temperature between 90-100°F for the first few weeks.
When selecting a brooder, consider factors like ease of cleaning, durability, and portability. A well-designed brooder can make all the difference in helping your chicks grow into healthy adult birds.
Benefits of Using a Brooder for Chicks
Using a brooder for chicks is one of the best decisions you can make as a backyard chicken keeper. A separate space for them to grow and develop before moving into the main coop has numerous benefits that will set your flock up for success.
First and foremost, a brooder provides a safe and healthy environment for young chicks to thrive. It allows you to control the temperature, humidity, and lighting levels, which is crucial during their first few weeks of life. Without proper ventilation and heat, chicks can quickly succumb to disease or stress-related issues.
In addition to health benefits, a brooder also gives your chicks the space they need to grow and exercise without being overcrowded. This helps prevent behavioral problems that often arise when birds are forced to live in close quarters too soon. For example, pecking orders can establish themselves prematurely, leading to bullying or even injuries.
By using a brooder, you’ll be able to monitor your chicks’ growth more closely and make adjustments as needed. This will help ensure they reach their full potential and arrive at the coop in top health and condition. As a result, they’ll start laying eggs sooner and with greater frequency – which is what every backyard chicken keeper wants!
Choosing the Right Size Brooder
When it comes to choosing the right size brooder for your chicks, there are several factors to consider. First and foremost, you’ll want to determine the number of chicks you plan on raising at one time. A general rule of thumb is to provide at least 1-2 square feet of space per chick in the brooder.
For example, if you’re planning on hatching 12 chicks, a 2×4 foot brooder (8 square feet) would be more than sufficient. However, if you have limited space available, a smaller brooder may be necessary. In this case, consider using a tiered or multi-level brooder to maximize vertical space.
Another important consideration is the amount of room needed for the chicks to move around comfortably. Chicks need space to exercise and stretch their wings, so ensure that your brooder has enough room for them to do so.
Remember, it’s always better to err on the side of caution and choose a larger brooder than you think you’ll need. This will give your chicks plenty of space to grow and develop without feeling cramped or stressed.
Setting Up Your Brooder: Essential Equipment and Supplies
To successfully raise healthy chicks, you’ll need a well-equipped brooder that provides a safe and comfortable environment for them to grow. Here’s what you should have on hand.
Providing Adequate Ventilation and Lighting
When it comes to setting up your brooder, providing adequate ventilation and lighting is crucial for healthy chick growth. Proper ventilation helps remove ammonia from the droppings, which can be toxic to chicks if inhaled in high concentrations. A good rule of thumb is to provide at least 1 square inch of ventilation per chick. You can achieve this by installing windows, vents, or using a brooder with built-in ventilation.
Lighting is also essential for healthy growth and development. Chicks need a photoperiod of around 24 hours to stimulate growth hormones and regulate their circadian rhythms. Use high-intensity LED lights specifically designed for poultry, as they produce minimal heat and are energy-efficient. Place the light at a height that allows chicks to avoid looking directly into it, and turn them off at night to simulate natural day-night cycles.
Temperature control is also vital in a brooder. Chicks need a consistent temperature between 90-100°F (32-38°C) during the first week, gradually decreasing by 5°F (3°C) each week until they reach around 70°F (21°C). Use a thermometer to monitor the temperature and provide adequate bedding material, such as straw or wood shavings, to absorb moisture and maintain a comfortable environment.
Heating and Temperature Control Options
When it comes to keeping your chicks warm and cozy, proper heating and temperature control are crucial. There are several options available, each with its own pros and cons.
Heat lamps are a popular choice for brooders, but they can be hazardous if not used carefully. Make sure to keep them at least 12-18 inches away from the chicks’ bedding to prevent overheating and potential fire hazards. Ceramic heat emitters, on the other hand, provide a more even and safe heat distribution.
A temperature gradient is essential for your brooder, meaning you’ll want to create an area where the chicks can move around and regulate their own body temperature. A good rule of thumb is to maintain a temperature of 90-95°F (32-35°C) for the first week, gradually decreasing it by 5-10°F (3-6°C) each week.
Monitor your brooder’s temperature closely using a thermometer, and make adjustments as needed. Aim to create a zone where the temperature is around 50-70°F (10-21°C), allowing the chicks to move between warm and cool areas at will.
Bedding Materials: What to Use and Why
When it comes to bedding materials for your brooder, you want to choose something that’s comfortable for your chicks, easy to clean, and resistant to moisture. A good rule of thumb is to aim for a depth of at least 2-3 inches of bedding material to keep the floor dry and prevent ammonia buildup.
For the first few weeks after hatching, it’s essential to use a deeper layer of bedding material that will absorb any mess or accidents. Wood shavings are a popular choice as they’re readily available, inexpensive, and do a great job at absorbing moisture. However, some experts recommend using pine-free shavings due to concerns over respiratory issues caused by pine dust.
In addition to wood shavings, you can also use straw, hay, or even newspaper (though this may not provide adequate insulation). Avoid using sand or grit as it can be uncomfortable for your chicks’ feet and potentially cause health problems. Keep in mind that you’ll need to change the bedding material regularly – ideally every 1-2 weeks – depending on the size of your brooder and how quickly it gets soiled.
When choosing a bedding material, consider factors such as ease of cleaning, moisture resistance, and cost. You can also experiment with different combinations of materials to find what works best for you and your chicks.
Keeping Your Brooder Clean and Safe
When it comes to raising healthy chicks, a clean and safe brooder is essential. Here’s how to maintain a spotless environment that protects your birds from disease and predators.
Cleaning and Disinfecting the Brooder
Cleaning and disinfecting your brooder is an essential task to maintain a healthy environment for your chicks. It’s crucial to establish a regular cleaning schedule to prevent disease transmission and ensure the overall well-being of your birds.
Start by setting aside time each week to clean out the droppings from the brooder, ideally every 2-3 days during the first few weeks after hatching. Remove any soiled bedding, disinfect the entire area with a solution of one part white vinegar to nine parts water, and replace it with fresh bedding material.
Disinfect all surfaces regularly using a 10% bleach solution or an equivalent disinfectant specifically designed for poultry. Pay particular attention to areas where chicks come into contact, such as feeding troughs, watering systems, and perches. Allow the disinfectant to air dry before returning your birds to their brooder.
Remember to wash your hands thoroughly after handling any cleaning products and avoid cross-contamination by changing your shoes or using a designated cleaning area. By following these simple steps and maintaining a consistent cleaning schedule, you’ll create a safe and healthy environment for your chicks to grow and thrive.
Predator Protection Measures for a Secure Brooder
When it comes to protecting your brooder from predators, securing the area around it is crucial. Rats and mice can squeeze through tiny openings, while snakes and other animals may try to enter through larger gaps. To prevent this, inspect the brooder’s surroundings regularly for any holes or weaknesses in the fencing.
Check that all gaps are less than 1 inch wide, making it difficult for predators to squeeze through. Install hardware cloth around the perimeter of the brooder to create a secure barrier. This will keep out rats and mice as well as snakes and other smaller animals. Consider adding a 6-inch extension on the roof to prevent birds from landing and potentially harming your chicks.
For more substantial threats like raccoons or larger predators, consider using electric fencing around the coop. This will deter them from approaching the area altogether. Remember that prevention is key; keep your brooder clean and free of debris, as this can attract unwanted visitors.
Health Monitoring: Recognizing Signs of Illness
When it comes to raising healthy chickens, maintaining a clean and safe brooder is crucial. But it’s not just about keeping the coop tidy – you also need to be aware of signs that your chicks may be ill. As a responsible chicken keeper, it’s essential to recognize early warning signs of illness in your flock.
Start by observing your chicks regularly for any changes in behavior or appearance. Check their droppings daily for unusual color, texture, or consistency. Healthy chick droppings are dark brown and firm; if they’re pale or runny, it could be a sign of infection.
Also, keep an eye out for symptoms such as lethargy, loss of appetite, ruffled feathers, or labored breathing. If you notice any of these signs in your chicks, separate them immediately from the rest of the flock and provide a warm, humid environment to help them recover.
Regular monitoring and prompt action can save lives and prevent the spread of disease within your brooder.
Transferring Chicks to the Coop: A Gradual Introduction
When it’s time to transfer your chicks from their brooder to the coop, a gradual introduction is key to preventing stress and promoting healthy growth. Let’s walk through this process together.
Age and Size Guidelines for Moving Chicks
When moving chicks from the brooder to the coop, it’s essential to consider their age and size. A general rule of thumb is to wait until they are at least 4-6 weeks old before introducing them to the coop. At this stage, they’ll have developed enough to withstand changes in temperature and humidity.
However, size also plays a crucial factor in determining when to make the transition. Chicks that are too large for the brooder may feel cramped and stressed, while those that are too small might struggle to navigate the coop’s obstacles.
A good indicator is to check if your chicks can walk comfortably without feeling crowded or tripping over each other. Typically, this occurs around 6-8 weeks old. You can also monitor their growth by measuring them against a ruler or measuring tape. Some breeds grow faster than others, so be sure to research specific growth rates for your flock.
When introducing your chicks to the coop, make sure they have enough space and perches to climb on. Also, ensure that the coop’s temperature is suitable for their age group, around 70-80°F (21-27°C). A gradual transition will help prevent stress and promote a smooth adjustment to their new environment.
Gradual Introduction to Outdoor Environments
When introducing your chicks to outdoor environments, it’s essential to do so gradually to prevent stress and shock. A sudden transition from a controlled brooder to the coop can be overwhelming for them.
Begin by opening the door to the run or enclosure during the day when the chickens are most active. Let them explore the outdoors at their own pace while still having access to the safety of the coop. Start with short periods, around 15-30 minutes, and gradually increase the time as they become more comfortable.
Make sure the outdoor area is secure, free from predators, and has adequate shelter from harsh weather conditions. Provide shade and ventilation to prevent overheating or chilling. You can also place a fence or netting around the run to protect your chickens from flying insects and other potential hazards.
As your chicks become more confident in their outdoor surroundings, you can begin to phase out the brooder’s heat source and allow them to forage and exercise naturally. This will help them adjust to the coop’s climate and environment, reducing stress and promoting overall well-being.
Coop Preparation: Ensuring a Safe and Comfortable Environment
Before bringing the chicks into their new coop, it’s essential to ensure that the environment is safe and comfortable for them. This involves a series of steps to prepare the coop for its new inhabitants.
Firstly, inspect the coop thoroughly for any potential hazards such as sharp edges, loose wires, or gaps in the walls. Remove any debris or dust that may have accumulated during storage, as this can harbor diseases and parasites. Next, disinfect all surfaces with a poultry-safe solution to prevent the spread of bacteria and viruses.
In addition to the physical environment, also consider the chicks’ social needs. Broods should be introduced to each other gradually, in small groups, to prevent stress and aggression. Provide enough space per bird, taking into account their age, size, and breed requirements. Ensure adequate ventilation, lighting, and temperature control within the coop.
Lastly, stock up on essential supplies such as food, water, nesting boxes, and a reliable roosting bar for your chicks’ comfort and safety.
Troubleshooting Common Brooder Issues
Let’s face it, brooder issues can be frustrating. In this section, we’ll tackle some common problems and provide solutions to get your chicks back on track.
Addressing Temperature Fluctuations and Heat Stress
When it comes to raising chicks, maintaining optimal temperatures in the brooder is crucial. Temperature fluctuations can be stressful for young birds and even fatal if not addressed promptly. A common challenge many backyard chicken keepers face is managing heat stress during warm weather.
To maintain a stable temperature, make sure your brooder is well-ventilated and placed away from direct sunlight. You can also use shade cloth or tarps to block direct sunlight, which can raise the temperature inside the brooder by up to 10°F. Monitor the temperature closely using a thermometer and adjust as needed.
Signs of heat stress in chicks include lethargy, panting, and loss of appetite. If you notice any of these symptoms, it’s essential to take action quickly. Move the brooder to a cooler location or use evaporative cooling methods like misting systems or wet towels to bring down the temperature.
Remember, keeping your chicks cool is crucial during hot weather. Aim for a temperature range of 90-100°F (32-38°C) and never let it drop below 80°F (27°C). By following these tips and staying vigilant, you can minimize the risk of heat stress in your brooder and ensure healthy, thriving chicks.
Managing Chick Behavior and Socialization Challenges
As you introduce new chicks to the brooder, it’s not uncommon for some to exhibit aggressive behavior towards each other. This can be due to various reasons such as resource competition, stress from handling, or even genetic predisposition. To foster a harmonious flock, it’s essential to address this issue promptly.
Start by monitoring your chicks’ interactions and separating any obvious bullies from the rest of the group. Provide plenty of space for each chick to roam and engage in activities without feeling crowded. Ensure adequate food, water, and nesting materials are available to prevent resource-based conflicts.
To promote socialization, try placing multiple chicks together under close supervision from an early age. Encourage interaction by providing toys and objects that stimulate exploration and play. Rotate the chicks’ environment regularly to keep things fresh and interesting for them.
For particularly aggressive chicks, consider separating them temporarily or using a divider to create a safe space while still allowing social interaction. By intervening early and implementing strategies like these, you can help your flock develop a peaceful coexistence.
Dealing with Pests and Parasites in the Brooder
Dealing with pests and parasites in the brooder can be a frustrating and costly issue for backyard chicken keepers. These unwanted critters can weaken your chicks’ immune systems, spread disease, and even cause stress that leads to poor growth rates.
Before bringing home your new chicks, make sure their brooder is clean and free of any debris or pests. Disinfect all surfaces with a 1:10 bleach-to-water solution, and let it dry completely before introducing the chicks. Keep in mind that dust mites, a common pest found in most homes, can be especially problematic for young chicks.
Some signs of infestation include droppings on eggs, feather loss or excessive scratching, and a sour or ammonia smell. Regularly inspect your brooder’s surfaces, bedding, and ventilation system for any signs of pests or parasites. For example, mites may leave behind tiny white specks, while bed bugs will show themselves by crawling around in the light.
If you do find an infestation, take action immediately to prevent further damage. Wash all affected materials with a gentle detergent, then dry them thoroughly before reintroducing your chicks. To prevent future infestations, keep your brooder well-ventilated and maintain a clean environment with fresh bedding.
Conclusion: Achieving Success with Your Brooder in Coop
In conclusion, incorporating a brooder into your coop can be a game-changer for raising healthy and thriving chickens. By providing a safe and comfortable environment for your chicks to grow, you’ll set them up for success from the very start. Remember to always prioritize ventilation and temperature control in your brooder, as these factors are crucial for preventing respiratory issues and promoting growth.
To ensure your chicks stay happy and healthy, make sure their waterers and feeders are easy to access and kept clean at all times. Also, don’t be afraid to move your brooder to a larger coop or separate enclosure when the time comes – it’s an exciting milestone that will give your chickens plenty of room to roam and exercise. With these simple tips in mind, you’ll be well on your way to raising happy and healthy chickens.
Frequently Asked Questions
Can I use a brooder in the coop, or do I need to move it outside once the chicks grow up?
Yes, you can keep the brooder inside the coop if it’s designed for multiple ages and sizes of chickens. However, as your birds mature, you may want to consider separating them into different areas within the coop to prevent overcrowding and maintain a healthy environment.
How do I know when my chicks are ready to move from the brooder to the coop?
Monitor your chicks’ behavior, size, and age (typically around 4-6 weeks). When they start showing signs of assertiveness, like pecking at each other or competing for food, it’s a good time to introduce them to the coop. Make sure the coop is well-prepared with adequate ventilation, lighting, and space.
What are some common mistakes people make when setting up their brooder?
Some common mistakes include inadequate ventilation, insufficient heat, and poor cleaning practices. It’s essential to research and understand the specific needs of your chicks’ breed and age group to provide an optimal environment for growth.
Can I use a DIY or homemade brooder solution, or is it better to purchase a pre-made one?
A well-designed, pre-made brooder can save you time and effort in the long run. However, if you’re short on budget or have a small flock, a DIY setup can be an affordable option. Make sure to research and choose materials that provide adequate ventilation, heat, and protection from predators.
How often should I clean and disinfect my brooder, especially during peak chick growth periods?
Clean the brooder at least once a week, removing soiled bedding and disinfecting all surfaces. During peak growth periods (around 2-4 weeks), you may need to clean more frequently, ideally every 3-4 days, to prevent ammonia buildup and maintain a healthy environment for your chicks.