
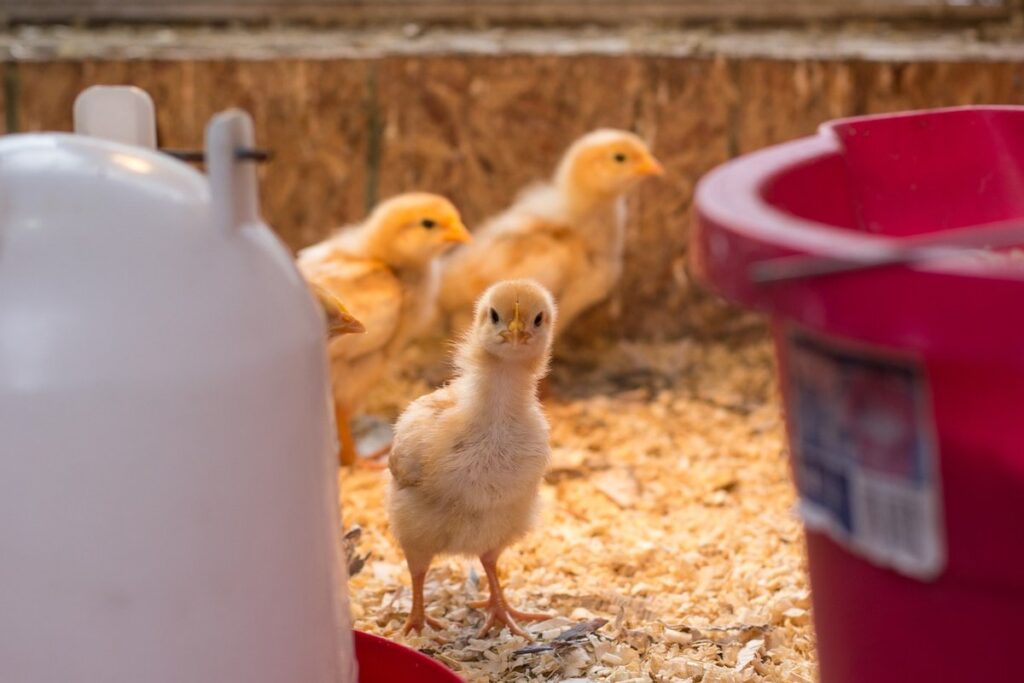
Are you preparing to welcome a batch of adorable chicks into your home? If you’re expecting ten little bundles of fluff, providing a safe and healthy environment is crucial for their development. A brooder is an essential piece of equipment that serves as a nursery for young chicks, shielding them from predators and keeping them warm until they can venture outside. With so many options available, choosing the right brooder for your 10 chicks can be overwhelming. In this article, we’ll guide you through the process of selecting the perfect brooder, exploring different types, key features to look out for, and practical maintenance tips to ensure your chicks thrive in their new home. By the end of it, you’ll have all the knowledge needed to provide a happy and healthy environment for your little flock.
Benefits of Using a Brooder
Using a brooder is not just essential for raising healthy chicks, but it also offers numerous benefits that can make caring for your new additions easier and more enjoyable. Let’s dive into these advantages together.
Importance of a Safe Environment
When you bring home 10 adorable chicks, their safety and well-being become your top priority. A brooder is more than just a container to keep them confined; it’s a safe haven that provides the perfect environment for these little balls of fluff to grow and develop.
One of the most critical aspects of a brooder is its ability to regulate temperature. Chicks need warmth, especially in their first few weeks of life. A brooder helps maintain a consistent temperature between 90-100°F (32-38°C), mimicking the cozy conditions they would have experienced inside an eggshell. This ensures that they don’t get chilled or overheat.
Humidity is another vital factor to consider. Chicks can easily succumb to respiratory problems if the air is too dry. A brooder helps maintain a suitable humidity level, typically between 50-60%. By keeping the air moist, you prevent ammonia buildup from their droppings and reduce the risk of health issues.
A good quality brooder also allows for proper ventilation, which is essential for maintaining air quality. Fresh air circulation prevents stale air from accumulating inside the brooder, reducing the likelihood of respiratory problems or even more severe conditions like cholera. This is especially important when raising a large number of chicks like 10, as they can quickly overwhelm the space and exacerbate any issues.
When selecting a brooder for your 10 chicks, look for one that allows for easy temperature control, humidity regulation, and ventilation. This will give you peace of mind knowing that your feathered friends are safe and healthy in their temporary home.
Preventing Health Issues
When chicks are not kept in a suitable environment, they can be prone to several common health issues. One of the most significant concerns is respiratory problems, which can arise from drafts, cold temperatures, and poor ventilation. Chicks need a warm and draft-free space to grow and develop properly.
A brooder prevents these issues by providing a controlled and comfortable environment for your chicks. It maintains a consistent temperature between 90-100°F (32-38°C), ensuring that the chicks can regulate their body heat efficiently. The enclosed space also protects them from drafts, keeping them safe from respiratory problems.
In addition to respiratory issues, a brooder also helps prevent other health problems such as cannibalism and pecking disorders. By providing a clean and hygienic environment, you can minimize the risk of these behaviors occurring in your flock.
To further enhance the health benefits of using a brooder, make sure to provide adequate ventilation and maintain good hygiene practices within the enclosure. This includes cleaning the area daily and disinfecting all surfaces regularly.
Types of Brooders Suitable for 10 Chicks
When it comes to choosing a brooder for your 10 chicks, you’ve got several options to consider, from small plastic containers to larger wooden coops. Let’s take a closer look at each of these types.
Plastic or Wooden Brooders
When it comes to choosing a brooder for your 10 chicks, one of the most important decisions is selecting a durable and easy-to-clean option. Two popular types of brooders are plastic and wooden, each with its own set of advantages and disadvantages.
Plastic brooders are often less expensive than their wooden counterparts and come in various shapes and sizes to suit different coop layouts. They’re also lightweight and easy to move around, making them ideal for small farms or homesteads. However, plastic brooders can be prone to leaks and may harbor bacteria if not properly cleaned.
Wooden brooders, on the other hand, are more durable and can last longer with proper maintenance. They’re also a popular choice among backyard chicken keepers due to their natural look and feel. However, wooden brooders can be heavier and more expensive than plastic ones, which may make them less suitable for small-scale operations.
When deciding between a plastic or wooden brooder, consider the ventilation needs of your chicks. Wooden brooders tend to provide better airflow, while plastic brooders can become stuffy if not properly ventilated. Ultimately, choose a brooder that fits your budget and meets the specific needs of your flock.
DIY vs. Commercial Brooders
When it comes to brooding 10 chicks, one of the key decisions you’ll need to make is whether to build a DIY brooder or purchase a commercial one. Both options have their advantages and disadvantages.
Building a DIY brooder can be a cost-effective and custom-fit solution for your needs. You can repurpose an old plastic storage bin or create a wooden enclosure, tailoring it to your specific requirements. For instance, if you have limited space, you can design a vertical brooder that maximizes floor area while keeping the chicks safe.
However, DIY brooders may lack the ventilation and insulation of commercial models, which can lead to health issues for the chicks. Moreover, you’ll need to source materials and construct the enclosure yourself, requiring some DIY expertise.
On the other hand, commercial brooders offer superior ventilation, insulation, and safety features that ensure a healthy environment for your chicks. They’re also often more durable and easier to clean than DIY alternatives.
If you do decide to build a DIY brooder, make sure to prioritize ventilation, using mesh or screen to allow for airflow while keeping predators out. Use a heat source specifically designed for brooding, and consider adding a thermometer to monitor temperature levels.
Essential Features of a Brooder for 10 Chicks
When choosing a brooder for your flock, it’s crucial to consider several essential features that will ensure your chicks stay healthy and safe. These features include ventilation, heat control, and ample space to roam.
Space and Comfort
When it comes to housing 10 chicks, providing enough space and comfort is crucial for their healthy development. A general rule of thumb is to allocate at least 2-3 square feet per chick inside the brooder. This may seem like a lot, but trust us, it’s essential to give them room to move around comfortably.
To ensure your chicks have ample space, consider using a brooder with a rectangular shape rather than a square one. This will allow you to maximize the area while keeping the chicks’ movement and comfort in mind. For example, a 2×3 feet brooder would be perfect for 10 chicks. Make sure to leave enough space between the roosting bars and the walls of the brooder so your chicks can easily get on and off the bars without feeling cramped.
Remember, overcrowding can lead to stress, respiratory issues, and even death in young chicks. So, it’s better to err on the side of caution and provide a bit more space than you think they need. With a little planning and creativity, you can create a comfortable and spacious brooder for your 10 chicks to thrive in.
Ventilation and Air Quality
When it comes to raising 10 chicks, providing optimal ventilation and air quality is crucial for their health and development. Proper airflow helps remove ammonia from droppings, which can be toxic to the birds at high concentrations. Imagine a scenario where you’ve neglected ventilation, and the ammonia levels become so high that they start causing respiratory issues in your chicks – it’s not a pretty picture.
To prevent this, ensure that your brooder has adequate ventilation. You can achieve this by installing windows or vents on opposite sides of the enclosure. A good rule of thumb is to provide at least one square foot of ventilation per chick. For 10 chicks, you’ll need about 10-12 square feet of ventilated space.
Maintaining air circulation in your brooder is also essential. Use a gentle breeze by placing a fan near the ventilation area or use a mister to create a humid environment that promotes healthy respiration. Monitor temperature and humidity levels regularly using a thermometer and hygrometer, making adjustments as needed to maintain optimal conditions. By paying attention to ventilation and air quality, you’ll be creating a safe and healthy environment for your chicks to thrive in.
Choosing the Right Location for Your Brooder
When it comes to setting up a brooder for your 10 chicks, selecting a safe and suitable location is crucial. Let’s discuss the key factors to consider when choosing the perfect spot.
Lighting Considerations
When it comes to choosing the right location for your brooder, lighting is often an afterthought. However, it plays a crucial role in the health and well-being of your chicks. Insufficient light can lead to stunted growth, reduced egg production, and increased stress levels.
To maximize natural light, select a location with south-facing windows or skylights. This will provide your chicks with direct sunlight during the day, which is essential for their development. Consider placing the brooder near a window that receives gentle morning sun, as this can be especially beneficial for young chicks.
When evaluating a potential location, observe how much natural light it receives throughout the day. Take note of any shaded areas or nearby obstructions that could block sunlight. Aim to position your brooder in an area with at least four hours of direct sunlight daily.
Remember, artificial lighting is also necessary to supplement natural light during periods of low daylight hours. Install a reliable and adjustable lighting system to ensure your chicks receive the correct spectrum and intensity of light.
Proximity to Heat Sources
When choosing a location for your brooder, it’s essential to consider the proximity of heat sources such as radiators or heating vents. While these sources can provide warmth and comfort for your chicks, they also pose potential risks that you should be aware of.
One major concern is the uneven distribution of heat. Radiators and heating vents can produce intense hot spots that may burn or scald your chicks if they come into direct contact with them. For example, if a chick tries to roost on top of a radiator, it could suffer severe burns or even get stuck in a narrow space.
Additionally, heat sources can dry out the air, leading to respiratory issues for your chicks. If the brooder is located near a heating vent, the circulating warm air may strip away moisture from the environment, causing discomfort and health problems for the birds.
To minimize these risks, it’s crucial to place the brooder at least 3-4 feet away from any heat sources. You can also use barriers or screens to block direct access to radiators or heating vents. By doing so, you’ll create a safer and more comfortable environment for your chicks to grow and thrive.
Maintaining Your Brooder
To keep your chicks safe and healthy, it’s essential to maintain their brooder regularly. In this section, we’ll walk you through a simple cleaning schedule.
Cleaning and Disinfecting
Cleaning and disinfecting your brooder is an essential task to maintain good hygiene and prevent diseases from spreading among your chicks. It’s crucial to establish a regular cleaning schedule to ensure a healthy environment for your birds.
Start by removing the bedding, such as wood shavings or straw, and disposing of it properly. Next, scrub all surfaces with a mild detergent and warm water, paying particular attention to areas around feeders and waterers. Rinse thoroughly and let everything dry completely before replacing the bedding.
Disinfecting is just as important as cleaning. Use a poultry-safe disinfectant and follow the manufacturer’s instructions for application. You can also mix 1 part white vinegar with 9 parts water for an eco-friendly alternative. Spray or wipe down all surfaces, including feeding and watering equipment, to eliminate bacteria and germs.
Remember, cleanliness is key when raising chicks. Make it a habit to clean and disinfect your brooder at least once a week, and more frequently if you notice any signs of illness or mess. By doing so, you’ll create a safe and healthy environment for your feathered friends to grow and thrive.
Monitoring Temperature and Humidity
Monitoring temperature and humidity levels is crucial for the health and development of your 10 chicks. A temperature range of around 90-100°F (32-38°C) is ideal during the first week, gradually decreasing to around 70-80°F (21-27°C) by the end of three weeks. You can use a thermometer specifically designed for poultry or even a digital hygrometer to track these levels.
For humidity, it’s essential to maintain a level between 40-60%. This range helps prevent respiratory issues while allowing your chicks’ skin and feathers to develop properly. You can increase humidity by misting the brooder with water daily or using a humidifier specifically designed for poultry.
Keep in mind that temperature and humidity levels fluctuate throughout the day, so it’s essential to monitor these levels frequently. Check the thermometer and hygrometer multiple times a day, especially during extreme weather conditions.
Troubleshooting Common Issues with Your Brooder
As you’re raising your 10 chicks, it’s inevitable that you’ll encounter some bumps along the way. This section will help you troubleshoot common issues and get back on track with a thriving flock.
Chicks Refusing to Eat or Drink
If you’ve noticed that your chicks are refusing to eat or drink, it’s essential to identify the underlying cause and address it promptly. Chicks may stop eating due to stress, overcrowding, or a sudden change in environment. Ensure their brooder is not too hot or cold, as temperature fluctuations can be unsettling for young birds.
Another reason might be that the feeders or waterers are dirty or clogged, making them unappealing to your chicks. Clean and disinfect these regularly to encourage your chicks to drink and eat. Alternatively, it’s possible that your chicks have simply grown tired of their existing feed and water, so consider switching to a different type.
In some cases, chicks may become picky due to nutritional deficiencies or an imbalance in their diet. Monitor their eating habits closely and consult with a veterinarian if you suspect any underlying health issues. If you’ve ruled out all other possibilities, try placing the feeder or waterer at a lower level or even on the floor to make it more accessible to your chicks.
Temperature Fluctuations
Temperature fluctuations can be particularly concerning when it comes to brooding 10 chicks. A stable temperature is crucial for their growth and development, especially during the first few weeks of life. If the temperature drops too low, chicks may struggle to regulate their body heat, leading to hypothermia or even death. On the other hand, if the temperature rises too high, it can cause stress, dehydration, and increased mortality.
To maintain a stable environment, it’s essential to monitor the temperature closely using a thermometer. Ensure that the brooder is placed in a draft-free area away from windows, doors, and heating vents. A good rule of thumb is to aim for a temperature range between 90-100°F (32-38°C) during the first week, gradually decreasing it by 5°F (3°C) every few days until you reach around 70-80°F (21-27°C).
Remember that chicks can’t regulate their body heat as efficiently as adult birds, so it’s crucial to keep an eye on them and adjust the temperature accordingly. If you notice any signs of distress or discomfort, such as panting, lethargy, or huddling together, take immediate action by adjusting the brooder’s temperature or providing a warm water bottle nearby.
Frequently Asked Questions
What is the ideal brooder size for 10 chicks?
When choosing a brooder, it’s essential to consider its size. A good rule of thumb is to provide at least 2-3 square feet of space per chick inside the brooder. This will give them enough room to move around comfortably and prevent overcrowding.
How often should I clean and disinfect my brooder?
Cleaning and disinfecting your brooder regularly is crucial for maintaining a healthy environment for your chicks. Aim to do this at least once a week, removing soiled bedding and replacing it with fresh material. Disinfect all surfaces thoroughly using a pet-safe cleaner.
Can I use a plastic storage bin as a makeshift brooder?
While a plastic storage bin might seem like an easy solution, it’s not the best option for several reasons. Firstly, they can be prone to temperature fluctuations, which are detrimental to young chicks. Secondly, they often lack proper ventilation and air quality control.
How do I monitor temperature and humidity levels in my brooder?
Accurate monitoring of temperature and humidity is vital in a brooder. You’ll need to invest in a reliable thermometer for both temperature and humidity readings. Place the thermometer inside the brooder at chick level, ensuring it’s not obstructed by any objects.
What happens if I notice my chicks refusing to eat or drink?
If your chicks are showing signs of lethargy and refusing to eat or drink, it could be due to several reasons. Check for temperature fluctuations, adequate ventilation, and proper lighting levels. Make sure their water is fresh and accessible.