
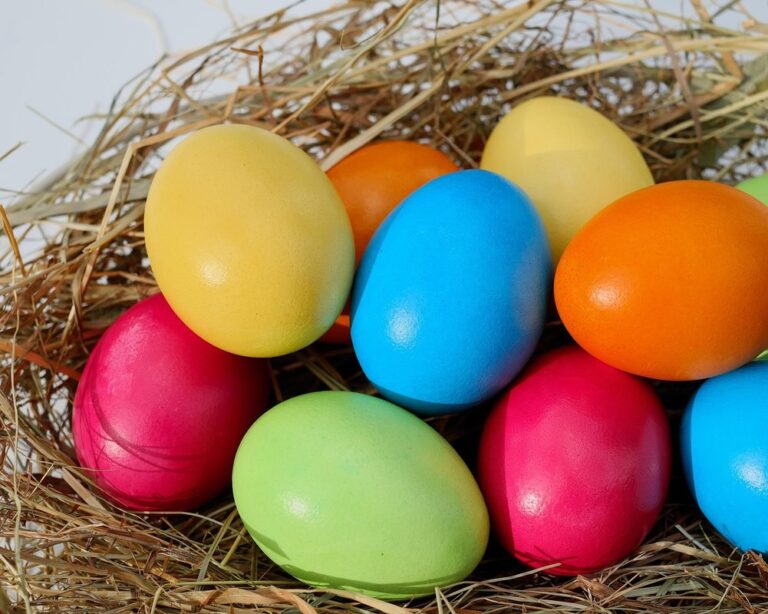
If you’re an art lover or just someone who enjoys getting creative, decorating chicken eggs is a fun activity that can bring out your inner artist. With a few simple materials and some expert tips, you can turn plain white eggs into vibrant works of art that are perfect for Easter, springtime decorations, or even as a unique gift idea. Whether you’re looking to create traditional commercial designs or experiment with natural dyes like beets, turmeric, and spinach, the possibilities are endless when it comes to coloring eggs. In this article, we’ll show you how to choose the right materials, prepare your eggs for dyeing, and achieve stunning effects using both commercial and natural dyes.
What is Egg Dyeing?
Egg dyeing is a fun and creative process that involves applying color to chicken eggs using various techniques. In this section, we’ll explore what makes egg dyeing so special and its rich history.
History of Egg Dyeing
Egg dyeing has a rich history that spans thousands of years, with evidence of colored eggs dating back to ancient civilizations. In many cultures, eggs were considered sacred symbols of fertility and new life, and decorating them was a way to honor these values. The practice of egg dyeing is believed to have originated in Persia (modern-day Iran) around 500 BCE, where artists used natural dyes such as beets, onions, and pomegranates to create vibrant colors.
As cultures and empires rose and fell, the art of egg dyeing spread throughout the world. In medieval Europe, eggs were often dyed red or blue using plant-based dyes, while in ancient Egypt, eggs were decorated with intricate designs using gold and silver leaf. The tradition of Easter egg decorating also has its roots in Eastern European cultures, where eggs were dyed bright colors to celebrate spring’s arrival.
Throughout history, egg dyeing has been influenced by various cultural and social factors, from religious traditions to artistic movements. Today, the art of coloring chicken eggs continues to evolve, with modern techniques and materials offering endless possibilities for creativity and self-expression. Whether you’re a seasoned artist or just starting out, exploring the rich history of egg dyeing can inspire new ideas and approaches to this timeless craft.
Benefits of Decorating Eggs
Decorating eggs is not just a fun activity for Easter; it also offers numerous benefits that extend beyond the holiday season. For one, beautifully decorated eggs can add a touch of elegance to any room, making them an excellent decoration idea for spring and beyond. Imagine filling a vase with intricately painted eggs or creating a stunning centerpiece for your dining table – it’s an easy way to bring some color and personality into your home.
Beyond aesthetics, decorating eggs can also be a valuable educational tool for children. The process of cracking, blowing out the eggshells, and carefully painting each design can help kids develop fine motor skills, hand-eye coordination, and patience. Moreover, it’s an excellent opportunity to teach them about shapes, colors, and patterns in a fun and interactive way.
For adults, decorating eggs can be a therapeutic outlet for creativity and self-expression. It allows you to unwind, relax, and focus on the artistic process without any pressure or deadlines. Plus, with so many techniques and designs to explore, it’s an excellent way to challenge yourself creatively and try new things.
Choosing the Right Materials
When it comes to dyeing chicken eggs, the right materials can make all the difference. You’ll want to have a variety of dyes, brushes, and other supplies on hand to achieve your desired colors.
Types of Egg Dyes
When it comes to coloring chicken eggs, you have several options for dyes. Commercial egg dyes are widely available and often come in a variety of colors. They’re easy to use and produce consistent results, but some people may be concerned about the chemicals used in these products.
Natural dyes offer an alternative to commercial options. These can include ingredients like beets, turmeric, and blueberries, which can create a range of colors from pink to yellow to purple. Natural dyes are generally considered safer than commercial dyes, but they can be more unpredictable in terms of color outcome.
Food-grade dyes fall somewhere in between commercial and natural options. These are typically derived from food ingredients like spices and herbs, and are intended for use on food products. They’re often used by crafters who want to create unique colors without the risk associated with commercial dyes.
When choosing a dye method, consider your specific needs and goals. If you’re short on time or want consistent results, commercial dyes might be the way to go. However, if you prefer a more natural approach or are looking for a unique color, one of the other options may be a better fit.
Egg Size and Shape Considerations
When it comes to dyeing chicken eggs, the size and shape of the egg can greatly impact the final result. A larger surface area means more opportunities for color to adhere, resulting in a more vibrant finish. However, if you’re working with extremely large or irregularly shaped eggs, it may be more challenging to achieve uniform coloring.
For optimal results, choose eggs that are symmetrical and have a moderate size – typically around 50-60 grams. This weight range allows for a good balance between surface area and manageability. Avoid using egg sizes that are too small, as they may not take dye evenly or hold the color as well.
Consider the shape of the egg as well. For example, eggs with more pronounced ridges or bumps can create interesting textures when dyed. If you’re going for a smooth, uniform finish, however, choose eggs with smoother surfaces.
Preparing Eggs for Dyeing
Before you start dyeing, it’s essential to prepare your eggs properly to ensure even and vibrant colors. Here’s how to clean and dry them just right.
Cleaning and Boiling Eggs
Before you can start dyeing those beautiful eggs, it’s essential to prepare them properly. Cleaning and boiling are crucial steps that ensure your eggs turn out vibrant and even. Start by washing the eggs gently with mild soap and warm water to remove any dirt or bacteria from the surface. Rinse them thoroughly under running water to remove any soap residue.
Next, boil a large pot of water and carefully submerge the eggs into it. Bring the water to a rolling boil, then reduce the heat to a simmer for 10-12 minutes. The longer you boil, the easier the dye will penetrate the eggshell. Use a timer to ensure you don’t overcook them.
After boiling, immediately transfer the eggs to an ice bath or run them under cold water to stop the cooking process. This helps the eggs cool quickly and prevents the formation of greenish-gray rings around the yolks – a common mistake many dyeing enthusiasts make.
By following these simple steps, you’ll be well on your way to creating beautifully colored eggs that will impress family and friends alike. Remember to always handle hot eggs with care, using oven mitts or a slotted spoon to prevent accidents.
Egg White and Yolk Separation
Separating egg whites from yolks is an essential step when preparing eggs for dyeing. This process is crucial because different dyeing methods and recipes require either the white or the yolk to achieve the desired color and texture. If you’re planning to use a vinegar-based dye, it’s best to separate the whites first, as they won’t mix well with the acidity. On the other hand, if you’re making a natural dye using ingredients like turmeric or beets, the yolks can add depth and richness to the color.
To separate egg whites from yolks efficiently, crack the eggs gently into a bowl, and let the loose white flow out while keeping the yolk intact. You can use your fingers or a spoon to gently guide the yolk back and forth between the two halves until most of the white has been separated. Be careful not to break the yolk, as this will mix with the whites and make it difficult to achieve the desired color.
To speed up the process, you can also separate eggs ahead of time by cracking them into a separate bowl for the whites and another for the yolks. This way, when you’re ready to dye your eggs, you’ll have the necessary components already separated and ready to use.
Techniques for Dyeing Eggs
Now that you’ve mastered the basics, let’s dive into some creative techniques for dyeing eggs, including multi-colored patterns and unique textures to add an extra layer of artistry.
Shaded and Marbled Effects
Achieving shaded and marbled effects on eggs is an art form that requires patience and practice. To create these unique designs, you’ll want to experiment with layering, swirling, and combining dyes. Start by dyeing the egg a light color first, allowing it to dry completely before adding additional layers or colors.
To achieve a marbled effect, try dripping different colors into a container of white vinegar, then submerge the egg into the mixture. The acid in the vinegar will react with the dye, creating a swirly pattern on the egg’s surface. For a more controlled look, use a dropper to carefully add small amounts of dye directly onto the egg.
Combining dyes is another way to create interesting shades and textures. Mix different colors together before adding them to the egg for a unique, multi-tonal effect. Experiment with different ratios of dye to water or vinegar to achieve your desired result. Remember that practice makes perfect – don’t be discouraged if it takes a few tries to get the look you’re going for!
Natural Dyeing Methods
Natural dyeing methods offer a unique and eco-friendly way to color chicken eggs. These methods utilize plants, spices, and other materials that are readily available, making them an attractive alternative to commercial dyes. One of the main advantages of natural dyeing is its sustainability – most plant-based dyes are biodegradable and free from harsh chemicals.
To get started with natural dyeing, you can experiment with common kitchen ingredients like turmeric, beets, and coffee. For example, boiling turmeric in water creates a vibrant yellow dye that’s perfect for creating Easter eggs or adding a pop of color to your table setting. Beets, on the other hand, produce a range of pink shades when boiled in water.
When using natural dyes, keep in mind that the colors may not be as intense or consistent as those produced by commercial dyes. However, this variability can also add a unique charm to your eggs. To achieve more predictable results, it’s essential to experiment with different dye concentrations and ratios of dye to egg.
Tips for Perfectly Dyed Eggs
Now that you’ve mastered the basic dyeing techniques, it’s time to take your Easter eggs to the next level with these expert tips and tricks for perfectly dyed eggs. From color combinations to texture effects, we’ve got you covered!
Temperature Control
Maintaining consistent temperatures during the dyeing process is crucial for achieving uniform results. Temperature fluctuations can cause the dye to penetrate unevenly, leading to streaks, blotches, and an overall lackluster finish. To ensure a perfectly dyed egg, it’s essential to maintain a consistent temperature between 70°F and 80°F (21°C to 27°C).
When boiling eggs for dyeing, use cold water and bring it to a boil gradually. Once the water is boiling, reduce the heat to a simmer, and carefully add the eggs to the pot. The ideal cooking time for hard-boiled eggs is about 10-12 minutes, depending on the size of the egg.
To further regulate temperature, you can use an ice bath or cold running water to stop the cooking process quickly after removing the eggs from the dye. This helps prevent the eggs from continuing to cook and ensures that the dye adheres evenly to the surface. By controlling temperature, you’ll be able to achieve a more professional-looking finish on your dyed eggs.
Experimentation and Practice
Experimenting with different techniques and recipes is key to achieving perfect dyed eggs. Don’t be afraid to try new things – it’s all part of the creative process! You’ll soon discover that each batch of eggs responds uniquely to various dye combinations, temperatures, and timing.
To get started, begin by experimenting with simple dye recipes like onion skin or coffee-based dyes. These are great starting points as they require minimal ingredients and effort. As you gain confidence, try more complex techniques like layering colors or incorporating natural materials like beets, turmeric, or pomegranate juice.
Remember that practice makes perfect – it’s essential to have patience and not get discouraged if your first attempts don’t yield the desired results. Take note of what works and what doesn’t for you, and adjust accordingly. For example, some eggshells might respond better to hot water while others prefer cold. Keep experimenting and documenting your findings, and soon you’ll develop a keen sense of how different variables interact with each other.
By embracing experimentation and practice, you’ll unlock the full potential of dyeing chicken eggs and discover new techniques that work best for you. Happy experimenting!
Safety Precautions and Considerations
When dyeing chicken eggs, it’s essential to take necessary precautions to avoid any potential hazards. This includes protecting yourself, your children, and your birds from harm.
Handling Dyes and Materials
When handling dyes, materials, and equipment for coloring chicken eggs, it’s essential to prioritize caution and proper hygiene to ensure a safe and successful experience. Always read the instructions on dye packaging carefully before use, as some may require special preparation or have specific application guidelines.
To prevent cross-contamination, wash your hands thoroughly with soap and warm water after handling any materials, including dyes, egg dyes, and equipment. Ensure all surfaces and tools are clean and sanitized before use. When working with food-grade items, it’s crucial to maintain a clean environment to avoid the risk of contamination.
Some colorants can be harsh on skin or cause allergic reactions, so take necessary precautions by wearing protective gloves when handling dyes. Be mindful of ventilation in your workspace to avoid inhaling fumes from strong-smelling dyes.
Keep all materials and equipment out of reach of children and pets to prevent accidents. Properly dispose of any leftover dye or materials according to the manufacturer’s instructions and local regulations.
Egg Storage and Display
When it comes to showcasing your beautifully colored chicken eggs, proper storage and display are crucial to preserve their beauty for years to come. Before we dive into the creative aspects of displaying your eggs, let’s address a few safety considerations.
Firstly, when storing decorated eggs, make sure they’re kept away from direct sunlight and moisture to prevent cracking or discoloration. A cool, dry place with minimal humidity is ideal. You can store them in an airtight container or wrap each egg individually in tissue paper to maintain their freshness.
When it comes to displaying your colored eggs, you have numerous options. Consider using glass-front cabinets or shelves that allow for air circulation while keeping dust and other particles away from the eggs. If you prefer to frame your eggs, use acid-free mats and frames specifically designed for preserving artwork. This will help prevent damage over time.
For a more creative approach, consider displaying your eggs in a decorative bowl or vase filled with materials like sawdust, pebbles, or even small branches. This adds texture and visual interest while keeping the eggs safe from breakage.
Frequently Asked Questions
What if I accidentally add too much dye to my eggs?
Start by rinsing the egg under cold running water to remove excess dye, then gently blot it with a paper towel. If the stain persists, try soaking the egg in cold water for several hours or using a mild soap and warm water solution.
Can I use natural dyes on any type of egg?
Not all eggs are suitable for natural dyeing. Fresh, clean eggs with intact shells work best, while older eggs may have porous shells that can absorb too much dye, resulting in uneven colors. It’s also essential to wash the eggs before dyeing to remove any dirt or debris.
How do I store and preserve my dyed eggs?
Once your eggs are dry, you can display them immediately or store them in an airtight container at room temperature for up to 2 weeks. To extend their lifespan, avoid exposing them to direct sunlight or moisture. Consider adding a layer of wax or varnish for added protection.
What if I want to create intricate designs on my eggs?
For more detailed designs, consider using a brush or even an embroidery hoop to hold the egg in place while you paint or dye it. This will give you more control and precision, especially when working with fine lines or small details.
Can I reuse natural dyes for future egg decorating projects?
Yes, many natural dyes can be reused multiple times by simply straining off any remaining solids and storing them in an airtight container until the next use. Some natural dyes may lose their potency over time, but with proper storage, you can enjoy consistent results from your reusable dye collection.