
Are you interested in raising backyard chickens but don’t have an incubator? Don’t worry, you can still successfully hatch chicks without one. Many chicken keepers rely on their broody hens to do the job for them, and with a little creativity, you can too. But before we dive into the world of natural incubation, it’s essential to understand the basics. This article will guide you through the process of raising healthy hatch chicks without an incubator, covering topics such as egg handling, breeding selection, and post-hatch care using heat mats and hot water bottles. We’ll also explore some expert tips for achieving success in this method. With these techniques, you can join the ranks of backyard chicken enthusiasts who are successfully hatching chicks without breaking the bank on specialized equipment.
Understanding the Basics
To successfully hatch chicks without an incubator, it’s essential to grasp some fundamental concepts that will guide you through the process. Let’s break down these basics together.
The Importance of Egg Handling
Egg handling is a critical aspect of hatching chicks without an incubator. When it comes to natural breeding and hatching, the way you handle eggs can make all the difference between successful hatching and disappointed results.
Proper egg handling begins with collecting eggs from the nesting box daily, usually in the morning or early afternoon. This ensures that eggs are collected before they start developing cracks or other damage caused by the hen’s constant sitting and pecking. It’s essential to collect eggs gently, as rough handling can cause micro-cracks on the shell surface, leading to contamination and reduced hatching chances.
To handle eggs correctly, it’s crucial to follow basic hygiene practices, such as washing your hands before touching the eggs, using a clean container for egg collection, and keeping the nesting box clean. Store collected eggs in a safe place, turning them 2-3 times a day, to prevent the yolk from sticking to one side of the shell.
Remember that every egg is unique, and careful handling will help you avoid accidents and ensure a healthy start for your chicks.
Choosing the Right Eggs
When selecting fertile eggs for hatching chicks without an incubator, it’s essential to choose from a reputable breeder or supplier. This ensures that the eggs are of high quality and have a higher chances of success.
First, consider the breed of chicken you’re interested in raising. Some breeds are easier to hatch than others, so it’s crucial to choose a breed known for its hatchability rates. For example, Leghorns and Rhode Island Reds tend to have higher hatch rates compared to exotic or rare breeds.
Next, look into the age of the eggs. Freshness matters when it comes to fertility, as eggs typically lose their viability after 7-10 days. Opt for eggs that are no more than a week old for optimal results. Also, inspect the storage conditions the eggs were kept in – they should be stored in a cool, dry place away from direct sunlight and drafts.
When purchasing eggs, ask the supplier about the breed, age, and handling procedures to ensure you’re getting top-quality fertile eggs for your hatchlings.
Preparing the Environment
Preparing the environment is crucial for successful hatching without an incubator. First, choose a quiet and draft-free area to set up your hatcher. This could be a cardboard box lined with towels or a specialized brooder. The temperature should be maintained at around 99-100°F (37-38°C) for the first 24 hours.
Next, ensure proper ventilation by providing a small opening for airflow. You can use a mesh screen to allow air circulation while keeping predators out. Keep in mind that direct sunlight is not necessary and may even cause overheating.
Now, let’s talk about humidity control. The ideal relative humidity (RH) is between 50-60%. To achieve this, you can cover the top with a damp cloth or towel. Be cautious not to over-saturate, as this can lead to mold growth. Monitor your setup regularly and make adjustments as needed.
Lastly, consider investing in a heat source that can be adjusted precisely, such as a heat lamp or ceramic heat emitter. This will allow you to maintain a stable temperature even when the room temperature drops.
Creating a Broody Hen
To create a broody hen, you’ll need to encourage her natural instinct to sit on eggs by reducing light and distractions in her coop. This can be achieved through simple coop modifications.
Introduction to Broodiness
Broodiness is a natural behavior in hens where they take on the role of sitting on eggs to incubate them. It’s a fascinating phenomenon that has been observed for centuries, and some backyard chicken keepers even induce broodiness in their hens as a way to hatch chicks without an incubator. So, what exactly is broodiness, and how can you encourage it in your hens?
When a hen becomes broody, she’ll often stop laying eggs and instead focus on sitting on the nesting box, gently covering the eggs with her body. This behavior is usually triggered by a combination of factors, including age, genetics, and experience. Younger hens are more likely to go broody than older ones, and breeds known for their strong broodiness include Orpingtons, Plymouth Rock, and Brahma.
While inducing broodiness can be an effective way to hatch chicks, it’s essential to consider the potential drawbacks. For one, a broody hen will stop laying eggs during this period, which may impact your egg production. Additionally, if she sits for too long, her health may suffer due to lack of movement and exercise. To mitigate these risks, you’ll need to monitor her closely and ensure that she gets regular breaks from sitting.
If you’re considering inducing broodiness in one of your hens, start by introducing her to a nesting box with eggs in it when she’s around 18-20 weeks old. Keep the eggs at room temperature, as cold eggs can delay the onset of broodiness. Be patient, as it may take several attempts for your hen to become successful.
Setting Up a Broody Hen Situation
Creating a safe and suitable environment for your hen to go broody is crucial to ensure she can successfully hatch chicks without an incubator. To set up a broody hen situation, you’ll need to provide her with a spacious area that’s specifically designed for this purpose.
First, consider the space requirements: you’ll want to dedicate at least 2×3 feet of floor space per hen, depending on the breed and size of your birds. This will give them enough room to move around comfortably while they’re broody. Make sure the enclosure is escape-proof, as hens can get quite determined when they’re focused on incubating eggs.
In terms of ventilation, it’s essential to provide adequate airflow to maintain a healthy environment for both your hen and the developing chicks. A well-ventilated area will also help reduce the risk of disease and ammonia buildup from droppings. You can achieve this by installing windows or vents that allow fresh air to circulate freely.
When creating the broody enclosure, you’ll want to line it with bedding material like straw or wood shavings to provide a comfortable surface for your hen to sit on. This will also help with cleaning and maintenance – simply remove soiled bedding and replace with new as needed.
Alternative Methods: Using Heat Sources
When using a heat source is necessary, you’ll want to explore alternative methods for maintaining the right temperature and humidity levels for your chicks. We’ll delve into different heat sources that can help facilitate hatching without an incubator.
Introduction to Heat Matrices
Heat matrices are a popular alternative method for simulating incubation conditions without an actual incubator. These mats use heat to mimic the warmth of a brooder, providing a safe and controlled environment for hatch chicks to develop.
There are two main types of heat matrices available: electric and ceramic. Electric heat matrices are often more affordable and easy to set up, but may not retain heat as well as ceramic ones. Ceramic heat matrices, on the other hand, are more expensive but can maintain consistent temperatures over a longer period.
When using a heat matrix, it’s essential to follow proper usage guidelines. Start by placing the mat in a draft-free area of your home or brooder. Next, adjust the temperature setting according to the specific needs of the hatch chicks – usually between 99-100°F (37-38°C) for the first week.
Some important things to keep in mind: place the heat matrix away from any flammable materials and never leave it unattended while it’s in use. Regularly check the temperature readings using a thermometer, ensuring that it remains within the safe zone for hatch chicks.
Setting Up Heat Mats
Setting up heat mats is a crucial step when hatching chicks without an incubator. To begin with, choose a heat mat that’s specifically designed for poultry and has a thermostatic control to prevent overheating. This will ensure the temperature remains within the safe range of 99-100°F (37-38°C) for optimal hatch rates.
Place the heat mat in the brooder, making sure it covers about half of the space. You can use a thermometer to monitor the temperature, placing it near the chicks’ nesting box or under the heat mat itself. This will give you an accurate reading of the actual temperature experienced by your chicks.
When using a heat mat, it’s essential to create a gradient of temperatures within the brooder. Place one end of the mat closer to the wall and adjust the temperature control accordingly. This allows the chicks to move towards or away from the warmth as needed. Always supervise your chicks when introducing heat mats, ensuring they’re comfortable and not showing signs of distress.
Keep in mind that heat mats are not a substitute for proper ventilation. Ensure good airflow by placing the brooder near an open window or using a fan to circulate air. Regularly inspect your heat mat and thermostat for any issues, and replace them as needed to maintain optimal performance.
Using a Hot Water Bottle Method
You can hatch chicks at home using a hot water bottle method, providing they have a safe and warm environment to develop. This simple setup allows for natural incubation without expensive equipment.
The Concept Behind the Hot Water Bottle Method
The hot water bottle method is a creative alternative to traditional incubators for hatching chicks. This approach leverages the natural heat retention properties of hot water bottles to provide a stable and consistent temperature environment for developing embryos.
One of the primary benefits of using hot water bottles is their affordability, making this method accessible to backyard farmers or small-scale breeders. Additionally, hot water bottles are versatile and can be used in conjunction with other hatching methods, allowing for some flexibility in your setup.
However, there are potential challenges to consider when using hot water bottles. For example, maintaining a consistent temperature is crucial, as sudden drops or spikes can impact embryo development. To mitigate this risk, it’s essential to wrap the hot water bottle in insulation, such as towels or a hot pad, to slow down heat dissipation.
To achieve success with the hot water bottle method, ensure that your setup includes:
• A large enough hot water bottle to accommodate the eggs comfortably
• Adequate insulation to maintain a consistent temperature
• Regular monitoring of the temperature and egg humidity levels
By understanding the concept behind the hot water bottle method and taking necessary precautions, you can effectively use this alternative approach for hatching chicks without an incubator.
Preparing and Using a Hot Water Bottle
Preparing and using a hot water bottle is an essential step in hatching chicks without an incubator. First, ensure you have a high-quality hot water bottle specifically designed for this purpose. These bottles are usually made of durable materials like stainless steel or BPA-free plastic.
To prepare the hot water bottle, fill it with warm (not boiling) water to around 90-95°F (32-35°C). This temperature range is ideal for simulating a hen’s body heat. Next, wrap the bottle in towels or a cloth to maintain the temperature and prevent burns. You can also add a small amount of vegetable oil to the bottle, which helps regulate the temperature and promotes even heating.
When using the hot water bottle, place it under your chicken’s broody box or nesting area. The heat from the bottle will help keep the eggs at a consistent temperature, mimicking the warmth of a mother hen. Monitor the temperature regularly, as you can adjust the amount of water in the bottle to achieve the optimal temperature range. This method may require some trial and error, but with practice, you’ll become proficient in using a hot water bottle for hatching chicks without an incubator.
Monitoring Progress and Identifying Issues
Now that you’ve successfully hatched your chicks, it’s time to monitor their progress and identify any potential issues that may arise. This step is crucial for raising healthy and thriving birds.
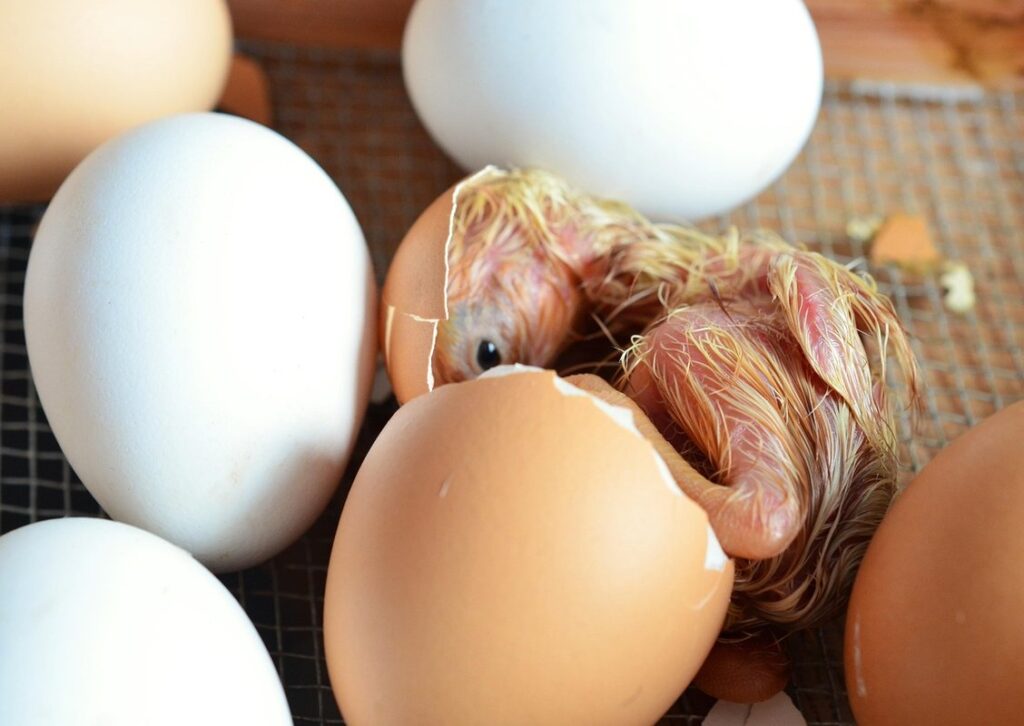
Recognizing Signs of Hatching Success
As you progress with hatching chicks without an incubator, it’s essential to recognize the signs of impending hatching. This will enable you to intervene at the right time and increase the chances of successful hatching. Monitor egg development closely by checking for changes in egg appearance every day.
Look out for the following signs: a slight softening or dimpling of the eggshell around the air pocket, increased egg movement or rocking, and a louder drumming noise from inside the egg. These indicators suggest that the chick is preparing to pip (break out of the shell).
As you observe these signs, be prepared to respond quickly by gently rotating the eggs to prevent the chick’s head from becoming stuck in the shell. Rotate the eggs every 6-8 hours to maintain even development and ensure the chick’s head doesn’t become wedged. Remember that prompt intervention can make all the difference between a successful hatching and a failed attempt.
Troubleshooting Common Issues
If you’re attempting to hatch chicks without an incubator, it’s essential to be aware of common issues that may arise. Temperature fluctuations are a significant concern, as the ideal temperature for hatching eggs is between 99°F and 100°F (37°C-38°C). If the temperature drops or rises too much, it can slow down or even stop the hatching process.
Another issue you might encounter is humidity levels being off. Chicks need a humid environment to hatch successfully, typically around 50-60% relative humidity. If the air is too dry, the membranes may not break properly, causing the chick’s head to be stuck inside the eggshell.
To troubleshoot temperature and humidity issues, make sure your brooder is equipped with a reliable thermometer and hygrometer. Check these readings regularly and adjust the environment as needed to maintain optimal conditions. Additionally, ensure that your chicks are receiving enough ventilation in the brooder to prevent overheating and moisture buildup.
If you notice any of these issues, act promptly to address them. Move the eggs or chicks to a more suitable location if necessary, and make adjustments to the temperature and humidity levels accordingly.
Final Considerations
Now that you’ve successfully hatched chicks without an incubator, let’s review some key takeaways and best practices to keep in mind for future attempts. Reviewing these final considerations will help ensure success on your next try.
Post-Hatch Care for Chicks
When you finally see those little bundles of joy emerge from their shells, it’s essential to provide them with proper care and nutrition. The first few days are crucial for the chicks’ development, and a well-planned brooding setup can make all the difference.
Start by providing a safe and warm environment for your chicks. This means setting up a brooder or a dedicated area in your home where they can grow and develop without any risks of drafts or temperature fluctuations. Aim for a temperature range of 90-100°F (32-38°C) during the first week, gradually reducing it by 5°F (3°C) each week thereafter.
When it comes to lighting, use low-wattage heat lamps or ceramic heat emitters specifically designed for brooding. Place them at least 12 inches away from the chicks’ roosting area to prevent overheating and promote even temperature distribution.
Nutrition is also a top priority during this critical phase. Provide a starter feed that’s formulated specifically for young chickens, usually around 18-20% protein content. Supplement with calcium-rich foods like crushed oyster shells or dark leafy greens to support strong bone growth.
Monitor your chicks’ water intake closely, ensuring they have access to clean and unfrozen water at all times. A general rule of thumb is to provide one gallon of water per six chicks during the first few days.
By following these guidelines, you’ll be well on your way to raising healthy and robust chicks even without an incubator. Remember to observe their behavior, adjust their environment accordingly, and seek advice from local poultry experts if needed.
Frequently Asked Questions
How can I increase my chances of getting a broody hen to hatch eggs naturally?
Increasing the chances of a broody hen hatching eggs naturally involves selecting breeds prone to broodiness, providing a suitable environment with adequate space and nesting materials, and introducing a new egg daily to stimulate her reproductive instincts. It’s also essential to maintain a consistent breeding cycle and ensure proper nutrition for your flock.
What if my broody hen starts to abandon the eggs mid-hatching process?
No
If you notice your broody hen leaving the eggs unattended or showing signs of distress, it may be due to overheating, lack of humidity, or inadequate space. Immediately intervene by providing a heat source, ensuring proper ventilation, and maintaining a safe distance from potential predators.
Can I use multiple heat sources simultaneously to mimic an incubator?
Yes
Using multiple heat sources, such as hot water bottles and heat mats, can be an effective way to replicate the conditions of an incubator. However, it’s crucial to monitor temperature levels closely to avoid overheating or underheating the eggs. A thermometer should always be present near the nesting box to ensure optimal temperatures.
How do I handle a situation where multiple hens become broody at once?
Handling multiple broody hens simultaneously requires careful management of resources and space. Ensure each hen has its own nesting box, monitor their individual reproductive cycles, and prioritize the healthiest eggs for incubation. It’s also essential to maintain open communication with fellow breeders or veterinarians if complications arise.
What are some common mistakes I should avoid when setting up a heat mat or hot water bottle?
Some common pitfalls include improper temperature calibration, inadequate ventilation leading to overheating, and neglecting to regularly clean and disinfect the equipment. Regular monitoring of both equipment performance and hen behavior will help you identify any issues promptly.