
Hatching a duck egg can be a thrilling experience for backyard farmers, hobbyists, and even seasoned bird enthusiasts. Not only is it a fun way to introduce new life to your flock, but it also allows you to learn about the intricacies of incubation and duck development. However, hatching duck eggs requires careful planning and attention to detail to ensure successful results.
If you’re eager to join the ranks of successful duck egg hatchers, this guide is for you! We’ll walk you through the process from selecting fresh eggs to caring for your new ducklings. From setting up an incubator to monitoring progress, we’ve got you covered with our comprehensive guide on how to hatch a duck egg successfully. Whether you’re a seasoned pro or just starting out, get ready to learn the ins and outs of hatching duck eggs like a pro!
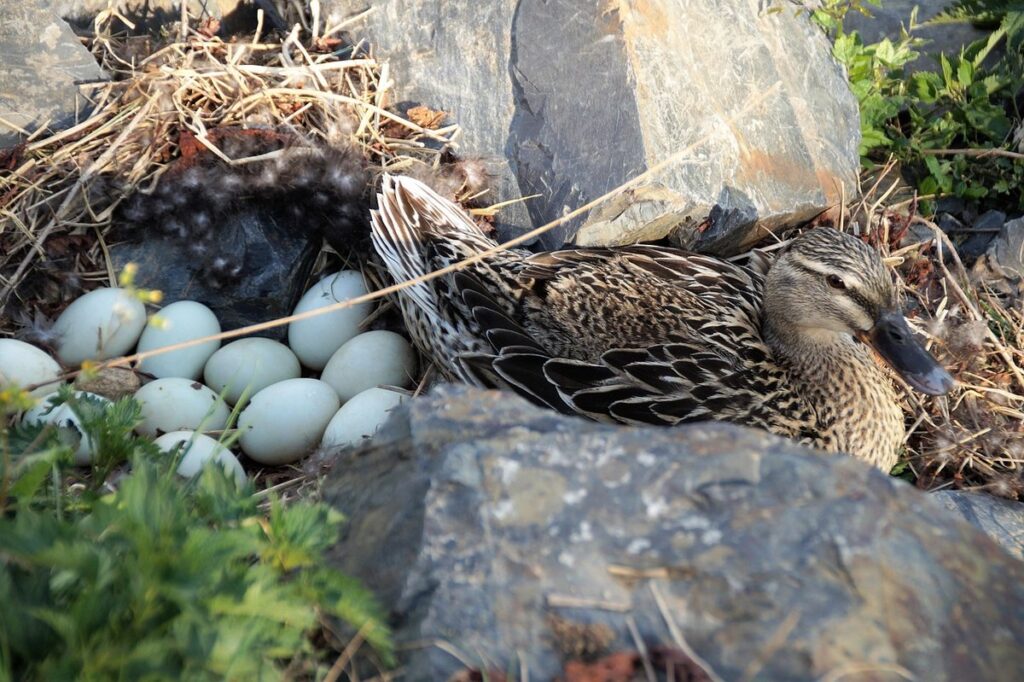
Choosing the Right Duck Eggs for Incubation
When it comes to hatching a duck egg, choosing the right eggs is crucial for success. In this section, we’ll walk you through how to select healthy duck eggs that will hatch successfully.
Selecting Fresh and Healthy Eggs
When it comes to hatching a duck egg, selecting fresh and healthy eggs is crucial for successful incubation. A good quality egg can make all the difference in the world of duck breeding.
First and foremost, inspect the egg’s cleanliness. Look for any visible signs of dirt or debris on the shell. A dirty egg can attract bacteria and other contaminants that can harm the developing embryo. Make sure to handle the eggs gently to avoid damaging the delicate membranes inside.
Another important factor is the thickness of the shell. Thicker shells are generally better as they provide extra protection against breakage during handling and transportation. However, be aware that some duck breeds have naturally thinner shells.
Visible cracks or damage on the egg can also indicate potential problems. Avoid using eggs with significant cracks or soft spots, as these can lead to embryo loss or other complications during incubation.
When selecting fresh eggs, remember that even small imperfections can make a big difference in the health and viability of your ducklings.
Understanding Duck Egg Size and Weight
When it comes to choosing duck eggs for incubation, size and weight play crucial roles in determining their viability. A suitable egg should be within the ideal ranges for both parameters.
Duck eggs typically range from 80-120 grams in weight, with an average of around 90 grams. However, size can vary significantly depending on the breed. For example, Muscovy duck eggs tend to be smaller than those of Pekin ducks. To determine a suitable egg, gently pick it up and weigh it using a kitchen scale or similar device.
In terms of size, duck eggs are generally longer and narrower than chicken eggs. A standard duck egg is around 7-8 cm in length and 5-6 cm in width. Look for eggs with clean, smooth shells, free from any visible cracks or damage. Remember that even if an egg appears to be within the ideal weight range, it may not necessarily be viable. Always check the egg’s size and weight in conjunction with other factors like fertility and embryo development.
When selecting duck eggs, consider purchasing from reputable breeders who can provide you with information on the egg’s origin, breeding history, and incubation results. This will give you a better idea of the egg’s potential for successful hatching.
Setting Up a Safe and Comfortable Incubation Environment
Creating a safe and comfortable incubation environment is crucial for your duck egg’s successful hatching, so let’s get started on setting up its ideal space.
Creating a Humid and Warm Climate
Maintaining a consistent temperature range of around 99-100°F and humidity level of 50-60% is crucial to mimic natural incubation conditions. This environment will help the duck embryo develop properly, just as it would inside the mother’s brood patch. To achieve this, you’ll need to invest in a good quality incubator that can regulate temperature and humidity levels.
As you monitor the incubation process, make sure to check the temperature gauge regularly to ensure it remains within the optimal range. You may also need to adjust the ventilation to prevent over-drying or under-humidification of the air. Aim for a slight drop in temperature at the end of incubation, around 24-48 hours before hatching.
For example, if you’re using an automatic egg turner, ensure it’s set correctly to rotate the eggs gently and prevent them from getting stuck in one position. A stable environment will also help prevent bacterial growth and contamination, which can be detrimental to the developing duckling. Regularly cleaning and disinfecting your incubator will further minimize the risk of infection.
Providing Adequate Ventilation and Space
Providing adequate ventilation and space is crucial for maintaining a healthy atmosphere within the incubation environment. When ducklings are developing inside their eggs, they produce carbon dioxide as a byproduct of metabolism. If this gas builds up, it can lead to respiratory problems and even death.
To prevent this, ensure that your incubator has proper ventilation. This usually involves installing vents or air inlets that allow fresh air to circulate into the incubation chamber. A good rule of thumb is to have at least one inch of space between the top of the egg tray and the lid for optimal airflow.
Aim for a temperature gradient within the incubator, with the warmest spot being about 5°F higher than the cooler area. This allows the ducklings to move towards the heat source as they develop, simulating their natural environment outside the egg. By providing a healthy balance of fresh air and space, you’ll be creating an optimal environment for your duck eggs to hatch successfully.
Preparing the Eggs for Incubation
Before you can start incubating your duck eggs, it’s essential to prepare them properly, including gently cleaning and drying the shells to prevent bacterial contamination. This step is crucial for a successful hatch.
Cleaning and Sanitizing the Eggs
Before placing your duck eggs in the incubator, it’s crucial to clean and sanitize them thoroughly. This step helps remove any dirt, bacteria, or other contaminants that may be present on the eggshell, reducing the risk of infection or disease during incubation.
To clean the eggs, start by gently wiping them with a soft-bristled brush or a clean cloth to remove any visible debris. Next, mix a solution of 1 tablespoon of mild dish soap with 1 quart of warm water. Dip a clean cloth into the solution, wring it out thoroughly to avoid excess moisture, and wipe down each egg carefully. Be sure to cover all surfaces, including the air pocket at the large end of the egg.
After cleaning, rinse each egg under cold running water to remove any soap residue. Then, dry them with a clean towel to prevent bacterial growth. It’s essential to use gentle detergents specifically designed for cleaning eggs, as harsh chemicals can damage the shell or harm the embryo inside. Repeat this process for all your duck eggs, and you’ll be ready to place them in the incubator for hatching.
Drying and Storing the Eggs Before Incubation
Drying and storing duck eggs properly is crucial to prevent bacterial growth before incubation. After collecting the eggs from your ducks, it’s essential to dry them thoroughly to remove excess moisture. This step is often overlooked but can lead to significant losses due to contamination.
To dry the eggs effectively, start by gently wiping them clean with a lint-free cloth or paper towel. You can also use a soft-bristled brush to remove any remaining debris. Next, place the eggs on their sides in a well-ventilated area, such as a drying rack or a tray lined with paper towels. This will allow air to circulate around each egg and help evaporate excess moisture.
Once dry, store the eggs in a cool, dark place such as a refrigerator or a dedicated storage container. Avoid storing them near direct sunlight or heat sources that can cause temperature fluctuations. A consistent temperature between 35°F and 40°F (2°C and 4°C) will slow down bacterial growth significantly. It’s also crucial to keep the eggs away from strong-smelling foods, as their odors can transfer to the eggs and contaminate them.
By following these simple steps, you’ll be able to store your duck eggs safely before incubation and ensure a healthy start for your new additions.
Starting the Incubation Process
Now that you have prepared your duck egg for incubation, it’s time to start the process of simulating a mother duck’s nurturing care in your home. This section will walk you through the initial steps required to begin the incubation process successfully.
Setting the Incubator or Brooder to the Right Temperature
Setting the incubator or brooder to the right temperature is crucial for successful duck egg hatching. A temperature that’s even slightly off can lead to failed hatch rates or weakened chicks.
First, ensure you’ve set up your incubator according to the manufacturer’s guidelines. Typically, a consistent temperature of 99-100°F (37-38°C) is ideal for duck eggs during the first 24 days of incubation. However, it’s essential to note that some breeds may require slightly different temperatures.
To maintain precise control over temperature, use an accurate thermometer to monitor your setup. You can also consider investing in a temperature probe or a high-quality digital thermometer for added peace of mind.
During the final stages of incubation (26-28 days), gradually lower the temperature by 1-2°F (0.5-1°C) to simulate the egg’s natural drop in temperature as it nears hatching. This helps to encourage pipping and reduces the risk of stuck eggs.
Keep in mind that maintaining optimal humidity levels is equally important, but we’ll cover this aspect separately in our guide on creating a suitable incubation environment for duck eggs.
Turning the Eggs Regularly for Even Development
Turning eggs regularly is essential for even development and preventing uneven growth. As duck embryos grow, they need to be turned frequently to prevent the embryo from sticking to the inner surface of the shell. This can cause deformities and affect the chick’s ability to hatch successfully.
To ensure proper turning, you’ll want to rotate your eggs 3-5 times a day. You can use an egg turner or manually turn them by hand. The rotation helps to prevent uneven growth on one side of the embryo and promotes even development of the beak, eyes, and other vital organs.
It’s also crucial to keep track of which direction you’ve turned each egg so that you don’t inadvertently turn it back in the same direction. A simple method is to label each egg with a small piece of tape or marker to indicate the direction it was last turned.
By following this simple yet critical step, you’ll be well on your way to hatching healthy and thriving ducklings. Remember, consistency and regularity are key when turning eggs, so make sure to incorporate it into your daily incubation routine.
Monitoring Progress and Addressing Potential Issues
Now that you’ve successfully hatched your duck egg, it’s essential to regularly monitor its progress and address any potential issues that may arise in the first few weeks of growth. This section will guide you through those critical steps.
Recognizing Signs of Successful Incubation
As you approach the final stages of incubation, it’s essential to recognize the signs that indicate successful hatching. One common sign is pip marks, which are small holes created by the duckling’s beak as it pecks at the shell. You may notice these marks on the eggshell or the interior surface of the egg. Beak holes, also known as beak pipes, can appear anywhere on the egg and are a clear indication that hatching is underway.
Another significant sign is visible duckling movements. As the duckling grows and gains strength, you may start to see its tiny flapping motions inside the egg. This can happen even before the duckling fully emerges from its shell. Keep in mind that these movements might be subtle at first, so make sure to observe your eggs carefully.
When you notice any of these signs, it’s crucial to monitor your eggs closely and ensure they’re receiving proper ventilation. Avoid handling them excessively, as this can disrupt the hatching process. With patience and attention to detail, you’ll know when your ducklings are ready to hatch.
Troubleshooting Common Problems During Incubation
Temperature fluctuations are one of the most common problems you may encounter during incubation. It’s essential to maintain a consistent temperature between 99°F and 100°F (37°C to 38°C) to ensure proper development. If the temperature drops or rises significantly, it can cause the embryo to stop developing, leading to mortality.
Humidity imbalances are another critical issue that may arise during incubation. Duck eggs typically require a humidity level of around 50-60%. However, if the humidity is too low or high, it can lead to dryness, cracking, or mold growth on the eggshell.
Egg breakage is also a significant concern, especially when handling duck eggs. It’s crucial to handle eggs carefully and gently to prevent any damage that could compromise the incubation process.
To troubleshoot these issues, always monitor your incubator’s temperature and humidity levels closely. Make adjustments as needed to ensure optimal conditions for hatching. Regularly inspect your eggs for cracks or signs of mold growth, replacing them promptly if you notice any problems.
Transferring Ducklings to a Brooder or Pond
Now that your ducklings have hatched, it’s time to think about where they’ll grow and thrive – a brooder or pond?
Preparing the Brooder or Pond for Ducklings
Before transferring ducklings from an incubator or brooder to a pond or outdoor enclosure, it’s essential to prepare the area for their arrival. This involves creating a safe and healthy environment that meets their specific needs.
First, ensure the water is clean and free of contaminants. Test the pH level and adjust it if necessary to match the ducklings’ requirements (typically between 6.5 and 8). Also, check the water temperature to ensure it’s not too cold or hot for the ducklings.
Next, set up a suitable feeding area with adequate food and water stations. Ducklings need access to both fresh water and a starter feed specifically formulated for young waterfowl. Consider using a floating feeder or a dish that allows them to wade into the water while eating.
A good rule of thumb is to create a “duck zone” where they can safely swim, play, and exercise without being overwhelmed by larger birds or predators. This can be achieved by partitioning off a section of the pond or enclosure using netting or fencing.
Introducing Ducklings to Water and Food Sources
When introducing ducklings to their new environment, it’s essential to provide them with access to water sources and feeders from the start. This helps prevent stress and ensures they can quack and get accustomed to their surroundings without any hiccups.
Begin by placing a shallow dish or tray filled with fresh water near the brooder or pond area. Make sure the water is at a comfortable temperature for the ducklings, usually around 90-95°F (32-35°C). This will encourage them to drink and become familiar with the taste of clean water. You can also provide a small pool or container specifically designed for ducklings, which should be about 1-2 inches deep.
Introduce the ducklings to their feeders by placing the feed at an easy-to-reach spot. Use a feeding trough or dish that’s specifically designed for ducklings and poultry. This will help prevent overcrowding and ensure each duckling has access to food without competing with others. As they grow, gradually increase the water depth in the pool and introduce new areas of exploration, such as plants, grasses, and trees.
Caring for Ducklings After Hatching
Now that you’ve successfully hatched your duck eggs, it’s time to focus on caring for these adorable new additions to your family. This is crucial for their growth and development into healthy adult ducks.
Feeding and Hydration Needs
Newly hatched ducklings have specific dietary requirements that need to be met for optimal growth and health. A starter feed specifically formulated for ducklings should be introduced within the first 24 hours of hatching, as it provides the necessary nutrients for their rapid development. However, many breeders recommend supplementing with fresh greens such as leafy lettuce or kale to ensure a balanced diet.
It’s essential to provide access to clean water at all times, changing it frequently to prevent bacterial growth. A good rule of thumb is to offer 1/4 inch of water per duckling for the first few days. As they grow, increase the amount accordingly. Fresh greens can be offered in moderation, about 10-15% of their diet, while starter feed should make up the majority.
For example, you could start with a mix of 50:50 starter feed to fresh greens and gradually adjust the ratio as they grow. Remember, it’s crucial to monitor your ducklings’ growth and adjust their feeding schedule accordingly.
Health Checks and Vaccinations
As you care for your newly hatched ducklings, it’s essential to prioritize their health and well-being. Regular health checks are crucial to ensure they’re developing normally and not showing signs of illness. Check their weight daily, looking for any significant changes that may indicate a problem.
Ducklings typically require vaccinations against certain diseases, such as Newcastle disease or duck plague. Consult with a veterinarian experienced in poultry care to determine the best vaccination schedule for your specific region and duck breed. Administering vaccinations at the right age is vital; usually between 3-6 weeks of age.
Monitor your ducklings closely for signs of disease or illness, including labored breathing, lethargy, loss of appetite, or unusual droppings. Keep their enclosure clean and well-maintained to prevent the spread of diseases. Wash your hands thoroughly before handling them, and ensure they have access to a balanced diet and fresh water at all times.
Keep an eye out for common issues like respiratory problems or skin infections. If you notice any unusual behavior or physical changes in your ducklings, consult with a veterinarian promptly to prevent further complications.
Frequently Asked Questions
What should I do if my ducklings don’t hatch after a successful incubation period?
If your ducklings don’t hatch, it’s essential to remain calm and assess the situation carefully. Check the incubator temperature, humidity levels, and egg turning mechanisms. Also, verify that the eggs were handled correctly before incubation. If everything checks out, it may be due to embryo quality or other factors beyond your control.
Can I use a brooder instead of an incubator for hatching duck eggs?
While it’s technically possible to hatch duck eggs in a brooder, using an incubator is recommended for precise temperature and humidity control. A brooder can work in a pinch, but you’ll need to carefully monitor conditions and be prepared for potential issues.
How often should I clean the incubator or brooder during the hatching process?
Regular cleaning is crucial to prevent bacterial growth and ensure healthy ducklings. Aim to clean the incubator or brooder every 2-3 days, removing soiled bedding and sanitizing surfaces with a pet-safe disinfectant. This will help maintain a hygienic environment for your developing ducklings.
What’s the ideal temperature range for a brooder after hatching?
After hatching, it’s essential to gradually transition your ducklings from an incubator or brooder to a pond or outdoor enclosure. A good rule of thumb is to start with a temperature range of 90-100°F (32-38°C) and decrease by 5-10°F (3-6°C) every few days until you reach the desired ambient temperature.
How do I know if my ducklings are getting enough food and water after hatching?
Observe your ducklings’ behavior, looking for signs of hunger or thirst. Ensure they have access to a balanced starter feed and fresh water at all times. Monitor their growth rate and adjust feeding schedules accordingly. Consult with a veterinarian if you notice any health issues related to nutrition or hydration.