
Are you getting ready to bring new life into your backyard, but not sure where to start with raising chicks? Building a safe and healthy environment for your young poultry is crucial for their development and survival. That’s why learning how to make a chick brooder is essential for any aspiring homesteader or chicken enthusiast.
In this comprehensive guide, we’ll walk you through the process of creating a thriving chick brooder from scratch. We’ll cover everything from selecting the right materials and heating systems to ensuring proper ventilation and health management. By following our expert tips and tricks, you’ll be able to create a warm and nurturing space for your chicks to grow and thrive. Whether you’re a seasoned farmer or just starting out, this guide will provide you with the knowledge you need to raise healthy and happy chicks.
Choosing the Right Materials and Size
When it comes to building a chick brooder, selecting the right materials and size is crucial for your chicks’ health and safety. Let’s dive into what you need to consider.
Selecting the Perfect Location for Your Brooder
When selecting the perfect location for your brooder, it’s essential to consider three critical factors: temperature, ventilation, and accessibility. You’ll want a spot that allows you to easily maintain a consistent temperature, provide adequate airflow, and ensure easy cleaning.
Avoid placing your brooder near drafts or cold surfaces, as this can lead to temperature fluctuations that may stress your chicks. Instead, position it near a heat source like a radiator or a cozy corner with a thermostat-controlled heating mat. This will help regulate the temperature and create a warm, draft-free environment for your babies.
Additionally, think about where you’ll place the brooder in relation to your kitchen or cleaning area. A location near a sink or a mop bucket will make it easy to clean up after those inevitable messes. You can also consider using a removable tray or a self-cleaning design to minimize scrubbing and sanitizing.
When possible, choose a spot with natural ventilation, like a window or a screen door. This will allow you to easily regulate airflow and prevent the buildup of ammonia from your chicks’ droppings. Remember, proper location can make all the difference in keeping your brooder running smoothly and giving your chicks the best start in life.
Measuring and Cutting the Wood for Your Brooder Frame
When measuring and cutting wood for your brooder frame, it’s essential to take precise measurements to ensure accuracy. Start by examining your plans and making a cut list of the required pieces. Use a tape measure to double-check each dimension, taking into account any adjustments you need to make for corners or joints.
Before using power tools, always follow basic safety precautions: wear protective eyewear, keep loose clothing tied back, and maintain a firm grip on the tool. For accurate cuts, use a high-quality miter saw or circular saw with a sharp blade. Cut each piece slightly oversized, as you can trim excess material but not add to what’s missing.
Cutting techniques may vary depending on your tool type: for a miter saw, adjust the bevel and angle settings according to the plans; while for a circular saw, use a straight edge guide to ensure straight cuts. When cutting multiple pieces, keep them organized with labels or stickers to avoid confusion during assembly.
Choosing the Right Litter and Bedding for Your Chickens
When it comes to choosing the right litter and bedding for your chicken brooder, there are several options available. One popular choice is wood shavings, which are absorbent and help control odor. However, they can be dusty and may not be suitable for young chickens who are prone to respiratory issues.
Another option is pine or cedar shavings, but it’s essential to note that these can impart a strong scent and potentially harm your birds if ingested. Recycled paper products, such as shredded newspaper or cardboard, are also eco-friendly alternatives that can help reduce dust and odor.
For ease of cleaning, consider using a litter like coop cubes or small pellets made from natural materials like corn or wheat. These are designed to absorb moisture quickly and can be easily scooped out with minimal mess. When selecting litter, keep in mind the size of your brooder, the age and number of chickens, and their individual needs.
It’s also crucial to consider dust control measures, as excess dust can exacerbate respiratory problems in young or sensitive birds. Regularly changing the litter and keeping the brooder clean will help minimize the risk of health issues.
Planning the Brooder’s Heating System
Next, let’s plan out a safe and effective heating system for your brooder. This crucial step ensures your chicks stay cozy without overheating during their first few weeks of life.
Understanding Heat Sources: Propane Heaters, Oil Filled Heaters, and Heat Lamps
When it comes to heating your chick brooder, there are several options available, each with its own set of advantages and disadvantages. Let’s take a closer look at three popular heat sources: propane heaters, oil-filled heaters, and heat lamps.
Propane heaters are a great option for large or communal brooders. They’re efficient, reliable, and easy to install. However, they can be more expensive upfront and require regular maintenance to ensure safe operation. Additionally, you’ll need to consider the cost of propane fuel and the logistics of storing it safely.
Oil-filled heaters, on the other hand, are a popular choice for smaller brooders or those who prefer a low-maintenance option. They’re quiet, energy-efficient, and can be left unattended. However, they may not heat as quickly as propane heaters, and their metal components can get hot to the touch.
Heat lamps are another common choice for chick brooders, especially in small spaces. They’re inexpensive, easy to install, and provide a focused source of heat. However, they can dry out chicks’ air sacs if placed too close, and their bulbs have a limited lifespan.
When choosing a heat source, consider the size of your brooder, the number of chicks you’ll be raising, and your personal preferences for maintenance and cost. It’s essential to select a heat source that meets the needs of your chicks while also ensuring your safety and the health of the birds.
Installing a Temperature Control System
When installing a temperature control system for your chick brooder, you’ll want to ensure it’s set up correctly to provide a safe and consistent environment for your chicks. There are several types of thermostats available, including digital, analog, and smart thermostats.
Digital thermostats are popular among backyard chicken keepers due to their accuracy and ease of use. They can be programmed to maintain a specific temperature range, which is ideal for a chick brooder where temperatures need to be precise. When choosing a digital thermostat, look for one with a wide temperature range (around 40°F to 100°F) and an adjustable deadband (the difference between the desired temperature and the actual temperature at which the heating or cooling element turns on).
When it comes to wiring considerations, make sure you follow proper electrical safety guidelines. This includes using a GFCI-protected circuit and ensuring that all wires are properly insulated and secured. Additionally, consider investing in a thermostat with a built-in sensor, which can detect temperature fluctuations and adjust the heating or cooling element accordingly.
Safety Precautions When Working with Electricity and Heat
When working with electricity and heat to keep your chicks warm, safety should always be your top priority. It’s easy to get complacent around equipment you’re familiar with, but electrical components can be hazardous if not handled correctly.
To minimize risks, make sure the brooder is placed on a level surface away from flammable materials like curtains or bedding. Never leave electrical cords or wiring exposed, as they can cause fires if damaged. Use cable ties to keep them organized and secure.
Regularly inspect your heating elements for signs of wear or damage. Replace any worn-out parts promptly to prevent accidents. Keep the brooder well-ventilated to reduce the risk of carbon monoxide buildup from gas heaters.
Remember that children and pets should never be left unsupervised near electrical equipment. Teach others in the household about electrical safety precautions and ensure they understand the risks involved. This will help you avoid any unnecessary stress or accidents while keeping your chicks warm and healthy.
Building the Brooder’s Ventilation System
Next, let’s dive into building a proper ventilation system for your brooder. This crucial step ensures fresh air circulation and maintains a healthy environment for your chicks to grow.
Understanding Air Circulation and its Importance in Brooding
Air circulation plays a vital role in maintaining a healthy environment for your chicks. Inadequate air circulation can lead to ammonia buildup from droppings, stress, and even disease among the flock. To ensure good ventilation, you need to consider both airflow rate and air exchange.
When designing your ventilation system, think about the temperature range required by your chicks. Typically, chicks thrive in temperatures between 90°F to 100°F (32°C to 38°C) during the first few days after hatching. As they grow, this temperature can be gradually reduced. You’ll need a combination of intake and exhaust vents to maintain airflow.
Aim for about one square inch of vent space per chick to ensure adequate ventilation. Consider installing adjustable vents that allow you to regulate airflow according to your chicks’ needs. Proper air circulation will help reduce the risk of respiratory problems, stress, and heat-related illnesses among your flock.
Installing Ventilation Fans and Windows
Installing fans and windows is crucial to maintaining a healthy environment for your chicks. Proper airflow helps regulate temperature, reducing the risk of respiratory issues and heat stress. To ensure optimal ventilation, start by selecting windows that are specifically designed for brooder use. These usually have adjustable louvers or vents to allow for customizable airflow.
Choose fan sizes that match the space requirements of your brooder. A general rule of thumb is to allocate 2-3 square feet of floor space per fan. Install fans at least 6 inches above the bedding material, ensuring they don’t get clogged with debris. When positioning windows and fans, aim for a balance between ventilation and draft-free zones.
For example, place fans near the top or sides of the brooder to circulate air without creating drafts on the chicks’ backs. Windows can be strategically placed to allow cross-ventilation, allowing fresh air to enter while stale air exits.
Maintaining a Healthy Balance Between Temperature and Humidity
Maintaining a healthy balance between temperature and humidity is crucial for your chicks’ development. When building the brooder’s ventilation system, it’s easy to overlook this aspect, but it can have significant consequences on your flock’s health.
A good rule of thumb is to maintain a temperature range of 90-95°F (32-35°C) during the first week, gradually decreasing by 5°F (3°C) every week. However, humidity levels should remain between 40-60%. You can achieve this balance using a combination of ventilation methods.
For example, you can use a heat lamp or ceramic heat emitters to maintain the desired temperature while also circulating the air with fans. This will help regulate the humidity levels by preventing moisture buildup. Additionally, ensure that your brooder is well-drained and provide adequate ventilation through vents or windows to allow fresh air to enter.
Monitor your chicks’ behavior and adjust the ventilation system accordingly. If you notice them panting excessively or having trouble breathing, it may be a sign of high temperatures or humidity levels. Conversely, if they seem lethargic or have difficulty regulating their body temperature, it could indicate low temperatures or poor ventilation.
Setting Up the Brooder’s Watering and Feeding System
Now that you have your brooder built, it’s time to focus on setting up a reliable system for watering and feeding your chicks. This includes choosing the right containers and considering their placement within the brooder.
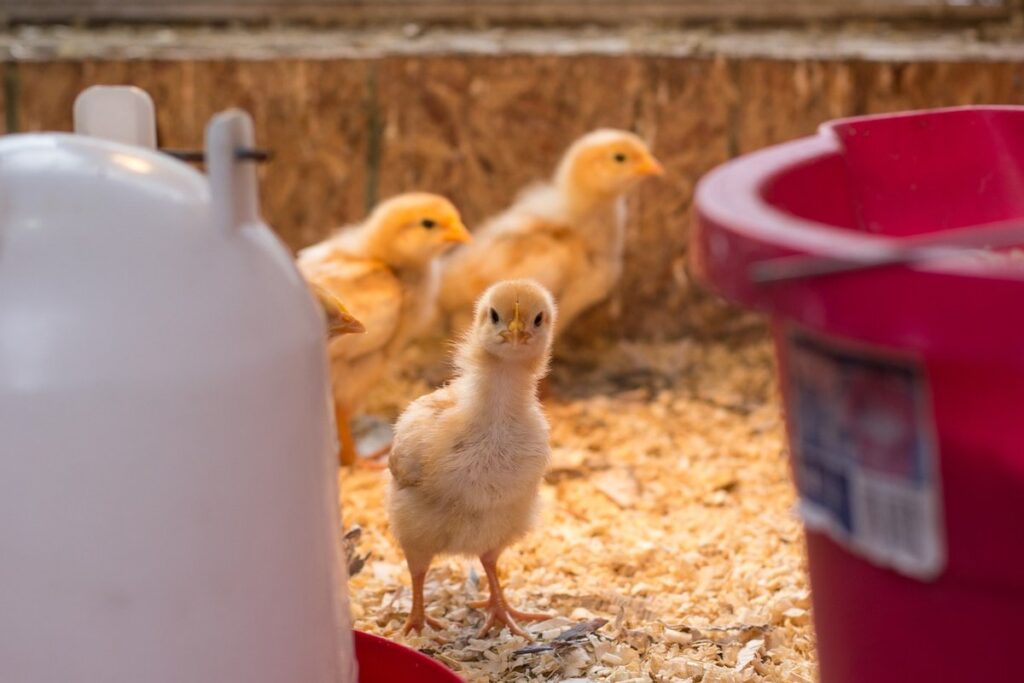
Choosing the Right Waterer for Your Chicks
When it comes to choosing the right waterer for your chicks, there are several options to consider. Automatic waterers can be a convenient and efficient way to keep your flock hydrated, but they also come with their own set of pros and cons.
One popular option is the gravity-fed waterer, which uses a simple design to dispense water as needed. These are often easy to clean and durable, making them a great choice for large flocks. However, they can be prone to spills if not placed carefully, and may require more frequent refilling.
Another option is the float valve waterer, which uses a small float to regulate water flow. These are generally low-maintenance and can minimize waste, but may be more expensive upfront and require occasional adjustment to ensure proper function.
Considerations for durability, ease of cleaning, and minimizing waste should be your top priorities when selecting an automatic waterer. Look for models made from high-quality materials that can withstand heavy use, and choose a design that allows for easy disassembly and sanitizing.
Installing Feeders and Food Storage Containers
When setting up your chick brooder’s feeding system, it’s essential to install feeders and food storage containers that are safe, easy to clean, and prevent spoilage. Start by choosing feeders that are specifically designed for young chicks, as they have small openings that prevent older birds from dominating the feeder.
Install multiple feeders throughout the brooder to ensure that all chicks have access to food at the same time. This is especially crucial during the first few weeks when chicks need to eat frequently to support their rapid growth. Consider using a feeder with a built-in trough or lip to catch spills and prevent messes.
For food storage, select containers that are airtight and easy to clean, such as plastic bins or buckets with lids. Label each container clearly so you can easily identify what type of feed is inside. Store the containers in a well-ventilated area away from direct sunlight and moisture to keep the feed fresh for longer.
Remember to always wash your hands before handling the feeders and food storage containers, and disinfect them regularly to prevent contamination. By following these simple steps, you’ll be able to provide a safe and healthy feeding system for your chicks.
Tips for Managing Brooder Health and Hygiene
Maintaining good brooder health is crucial, so let’s dive into some essential tips on how to keep your chicks healthy and your brooder clean. This will help prevent illnesses and ensure a happy, thriving flock.
Monitoring Temperature, Humidity, and Air Quality
Monitoring temperature, humidity, and air quality is crucial to maintaining healthy conditions in your chick brooder. Temperature fluctuations can be detrimental to the health of your chicks, so it’s essential to ensure a stable environment. A good starting point is to invest in a thermometer that can display both temperature and humidity levels. This will allow you to make necessary adjustments to maintain optimal temperatures between 90-100°F (32-38°C) for the first week.
Humidity levels should be kept around 50-60% to prevent respiratory issues. You can use a hygrometer to monitor these levels, and increase ventilation if needed. Air quality is also vital; a good rule of thumb is to ensure that there’s enough airflow in your brooder to remove ammonia and other gases produced by the chicks’ waste.
For example, you could place a fan near the entrance or install a PVC pipe to improve air circulation. Regularly checking these factors will help prevent health issues in your flock, ensuring they grow strong and healthy.
Cleaning the Brooder Regularly
Cleaning the brooder regularly is crucial to preventing disease and maintaining a healthy environment for your chicks. A dirty brooder can lead to ammonia buildup from droppings, which can be toxic to chicks. To prevent this, make cleaning the brooder a regular task.
Remove all bedding material, such as pine shavings or straw, and dispose of it properly. Disinfect the entire brooder with a mild detergent solution, making sure to scrub all surfaces, including feeding and watering equipment. Rinse thoroughly and let the brooder air out for at least 30 minutes before replacing the bedding.
Change the bedding material completely every week, or more often if necessary. You can also add a layer of absorbent paper on top of the bedding to make cleaning easier. This will help soak up droppings and make it simpler to remove soiled areas.
When changing the bedding, be sure to wear gloves to prevent transferring bacteria from your hands to the chicks. Regular cleaning not only keeps your chicks healthy but also makes maintenance tasks more manageable. By incorporating regular brooder cleaning into your routine, you’ll create a safe and clean environment for your chicks to grow and thrive.
Troubleshooting Common Issues with Your Chick Brooder
As you settle your chicks into their new brooder, it’s inevitable that some issues will arise. This section addresses common problems and offers practical solutions to get your chicks back on track.
Identifying Causes of Temperature Fluctuations
When you notice temperature fluctuations in your chick brooder, it’s essential to identify the root cause before attempting to fix the issue. One common problem is a malfunctioning thermostat, which can be due to faulty calibration or a damaged sensor. Check if the thermostat is set correctly and consider replacing it if necessary.
Inadequate insulation is another common culprit behind temperature fluctuations. Ensure that your brooder is well-insulated with adequate bedding material such as straw or hay. You can also add extra layers of insulation like bubble wrap or foam board to regulate the temperature.
If you’ve checked the thermostat and insulation, it’s possible that heat loss is occurring through gaps or openings in the brooder. Inspect the unit for any cracks or holes and seal them with caulk or weatherstripping. Regularly monitoring the temperature using a digital thermometer will help you catch any issues early on and make adjustments as needed.
Keep an eye out for other potential causes like drafty vents, improper ventilation, or even overcrowding in the brooder.
Fixing Ventilation Problems and Air Quality Issues
When it comes to maintaining optimal conditions for your chicks, proper ventilation is crucial. However, issues can arise that compromise air quality and put your chicks at risk. Clogged vents are a common problem, often caused by debris accumulation or poor design.
To check for clogs, inspect the vents regularly and clean them out with a soft brush or cloth as needed. If you notice reduced airflow or increased humidity, it may be due to a faulty fan. Check that all fans are functioning properly and adjust their settings to ensure adequate air exchange.
Another issue is dust buildup in the brooder. This can lead to respiratory problems in your chicks. To prevent this, use a HEPA filter or an air purifier specifically designed for poultry. Regularly clean the brooder with a mild detergent and water solution to remove any accumulated debris.
Keep an eye out for signs of poor ventilation, such as droopy or lethargic chicks, wet feathers, or unusual odors. Addressing these issues promptly will help maintain a healthy environment for your growing flock.
Caring for Your Chicks in the Brooder
Once you’ve got your chicks settled into their new home, it’s time to learn how to care for them properly, ensuring they stay healthy and thrive under your watch. This is a crucial step in raising happy, healthy chickens.
Understanding Chick Development and Growth Stages
Understanding chick development stages is crucial to ensure you’re providing your chicks with the right care and nutrition at different growth periods. From day-old chicks to mature hens, each stage comes with unique nutritional requirements that support optimal growth.
At one day old, chicks are fragile and rely on their yolk sac for energy. They require a starter feed rich in protein (20-22%) and calories to fuel rapid growth. As they enter the starter phase (1-4 weeks), their energy needs remain high, but the protein content can be gradually reduced to 18-20%. By week four, chicks transition into growers, requiring less protein but more calcium for developing bones.
By knowing these requirements, you can adjust feed accordingly and avoid under or over-supplementing. For instance, providing too much protein early on may lead to leg problems later in life. Similarly, failing to provide sufficient calcium during growth stages can result in weak bones and poor egg production. Monitor your chicks’ growth and adjust their diet accordingly to ensure they reach maturity healthy and strong.
Tips for Handling and Interacting with Baby Chicks
When handling and interacting with baby chicks, it’s essential to consider their fragile nature and unique needs. Before introducing them to new environments, ensure you’ve provided a stress-free transition by maintaining consistent temperatures, humidity levels, and lighting schedules. This will help minimize the risk of disease and promote healthy growth.
When moving your chicks, gently scoop them up from under their wings or backs, taking care not to disturb their delicate feathers. Avoid sudden movements or loud noises, which can cause stress and discomfort. If introducing new chicks to an existing brooder, do so gradually, allowing them to become familiar with each other’s presence and scents.
When interacting with your chicks, keep in mind that they’re naturally curious creatures and may nip at hands or feet if frightened or excited. To prevent injury, let them come to you and handle them carefully, making sure to support their bodies. Wash your hands thoroughly before and after handling the chicks to maintain a clean environment and prevent the transfer of bacteria.
Regular observation and gentle interaction will help establish trust between you and your chicks, ensuring a positive and healthy relationship throughout their development.
Frequently Asked Questions
How often should I check the temperature and humidity levels in my chick brooder?
It’s essential to monitor the temperature and humidity levels at least twice a day, especially during the first week after introducing new chicks. You can use a thermometer and hygrometer to track these readings, ensuring that you maintain a balance between 90-100°F (32-38°C) for temperature and 40-50% relative humidity.
Can I use a single heating source for my entire brooder?
While it’s technically possible, using multiple heat sources can help prevent temperature fluctuations. Consider installing a thermostat to regulate the temperature and ensure even distribution of warmth throughout the brooder.
What if I notice unusual behavior or health issues in my chicks after setting up their brooder? Where do I go for advice?
If you notice any signs of illness or stress, such as lethargy, loss of appetite, or labored breathing, reach out to a veterinarian with experience in poultry care. They can provide guidance on diagnosing and treating potential health issues specific to your region.
How long should I keep my chicks under the brooder heat lamp?
Chicks typically require a warm environment for the first 4-6 weeks after hatching. As they grow, you can gradually reduce the temperature by adjusting the heat source or moving them closer to the ventilation system. Be sure to monitor their behavior and adjust accordingly.
Can I reuse the same materials for future brooder setups, or should I purchase new ones each time?
While some materials like wire mesh and hardware cloth can be reused, it’s generally recommended to replace bedding, litter, and other consumable supplies with fresh material for each new batch of chicks. This ensures optimal health and hygiene conditions.