
Are you ready to attract some beautiful waterfowl to your yard? Building a successful mallard nesting box is easier than you think, and with the right plans, you can provide a safe haven for these magnificent birds. If you’re new to birdwatching or just want to learn how to create a welcoming habitat in your own backyard, this article has got you covered.
We’ll share expert tips and comprehensive plans to help you design, build, and install a mallard nesting box that will attract these stunning waterfowl. From choosing the right materials to ensuring proper placement, we’ve got everything you need to know to create a thriving habitat for mallards in your yard. With our easy-to-follow plans and insider advice, you’ll be well on your way to becoming a proud host of these incredible birds.
Choosing the Right Location
When building a mallard nesting box, choosing the right location is crucial for attracting these beautiful waterfowl and ensuring they feel safe and secure. Consider factors like sunlight, shelter, and proximity to water when selecting your site.
Factors to Consider When Selecting a Site
When selecting a location for your mallard nesting box, there are several key factors to consider to ensure the health and safety of your feathered friends. Sunlight is crucial for incubation and chick development, so choose a spot that receives direct sunlight for at least six hours a day. Avoid areas with overhanging branches or trees that may cast shadows on the nesting box.
Another essential consideration is water accessibility. Mallards need access to water for drinking, bathing, and swimming. Locate your nesting box near a pond, lake, or slow-moving stream to provide your birds with an easy source of water. Consider installing a small birdbath or shallow dish nearby for extra convenience.
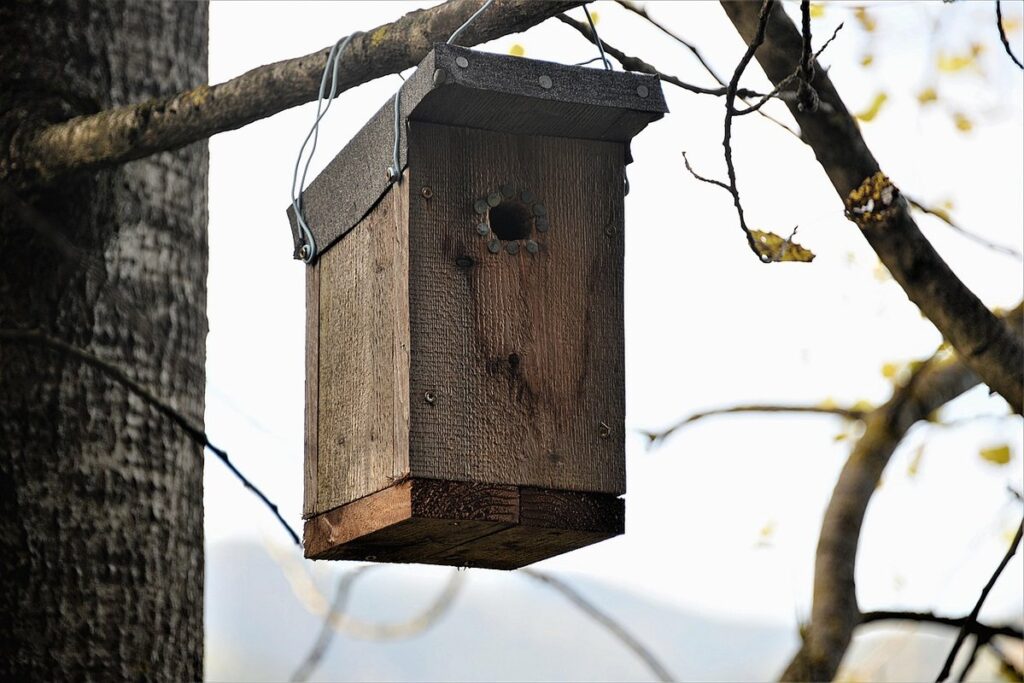
Predator protection is also vital. Position the nesting box in an area that offers some level of security from predators like foxes, coyotes, and hawks. A group of native vegetation or a fence can help deter unwanted visitors. Be sure to install the nesting box at least 10 feet off the ground to reduce the risk of predation.
Landscaping Considerations for the Surrounding Area
When choosing a location for your mallard nesting box, it’s essential to consider the surrounding landscaping. A well-planned landscape can significantly impact the success of your nesting box by attracting pollinators and repelling predators.
For example, planting native flowers like coneflowers, black-eyed Susans, and bee balm will attract beneficial insects like bees and butterflies that can help with pollination. These plants are also low-maintenance and require minimal watering, making them perfect for areas near your nesting box.
On the other hand, certain plant species can repel predators like raccoons and snakes. For instance, planting daffodils, lavender, or mint around the nesting box area can help deter these unwanted visitors. Additionally, incorporating physical barriers like fencing or mesh screens can further protect the nesting box from predators.
When selecting plants for your landscape, consider their mature size and growth habits to ensure they won’t overcrowd or shade the nesting box. By thoughtfully designing your surrounding landscape, you can create a safe and inviting environment that supports the health and well-being of your mallard residents.
Existing Vegetation and Tree Cover
When selecting a location for your mallard nesting box, it’s essential to consider the existing vegetation and tree cover. A mix of open spaces and shaded areas can provide a comfortable environment for your ducks, but overgrown vegetation or dense tree cover can hinder their ability to access the nest.
Trees with low-hanging branches or shrubs that block sunlight can make it difficult for mallards to reach the nesting box safely. Similarly, long grasses or weeds can hide predators, making it challenging for ducks to feel secure. To mitigate these issues, consider pruning back any overgrown vegetation or removing obstacles like dead tree limbs.
When pruning, keep in mind that mallards prefer a clear view of their surroundings, so avoid obstructing windows with dense foliage. A small clearing around the nesting box will provide them with a sense of security and make it easier to monitor their activity. By carefully managing existing vegetation and tree cover, you can create an inviting environment for your mallard ducks to thrive in.
Designing the Nesting Box
When designing the nesting box, you’ll want to consider a few essential elements that will ensure your mallards feel comfortable and secure. A well-designed box can make all the difference in attracting these beautiful birds to your yard.
Understanding Mallard Habitat Preferences
When it comes to designing a nesting box for mallards, understanding their habitat preferences is crucial. Mallards are adaptable birds that thrive in a variety of environments, but they do have specific needs when it comes to their nesting sites.
Mallards prefer to nest near water, typically within 10-20 feet of the shoreline. This proximity to water allows them to easily access food and escape potential predators. When selecting a location for your nesting box, consider placing it near a pond, lake, or slow-moving river. Ensure that the area is relatively flat and free from dense vegetation, which can make it difficult for the female mallard to enter and exit the nest.
In terms of nesting materials, mallards typically prefer twigs, grasses, and other plant fibers. They will often collect these materials in advance of building their nest, so consider providing a nearby source of natural materials within your nesting box design. Avoid using any materials that may be toxic or hazardous to the birds, such as lead paint or pesticides.
Measuring and Calculating the Nesting Box Size
When designing a nesting box for mallards, it’s essential to get the size just right. Too small, and the female may not feel comfortable laying her eggs; too large, and she might be more likely to abandon her nest. So, how do you measure and calculate the perfect size?
To start, consider the following species-specific requirements: mallard nesting boxes typically need to be around 12-18 inches wide, 6-8 inches tall, and 12-18 inches deep. However, these dimensions can vary depending on your location and climate.
A good rule of thumb is to use the “2-foot square” method, where the box’s internal floor area is approximately 2 feet by 2 feet (24 inches by 24 inches). This size allows for a comfortable nesting chamber while keeping the overall structure compact. When calculating the depth, aim for about one-third to one-half of the width.
Remember, these are general guidelines. For more precise measurements, consult with local experts or take note of existing successful designs in your area. By following these steps and adjusting according to your specific situation, you’ll be well on your way to creating a mallard-friendly nesting box that will attract these beautiful birds to your property.
Optional Features and Customization Options
When it comes to designing a mallard nesting box, there are several optional features and customization options that can enhance its functionality and convenience. One of the most innovative ideas is incorporating a camera mount into the design. This allows you to monitor the nesting activity remotely, providing valuable insights into the behavior of your ducks.
Another useful feature is a cleaning port, which enables easy access for maintenance without disturbing the nest or disturbing the female duck. This can be achieved by installing a removable panel on one side of the box or adding a small door with a latch.
You can also consider adding other features such as a roof vent to regulate temperature and humidity inside the nesting box. This is particularly important in areas with extreme weather conditions, where the box’s microclimate needs to be maintained for optimal duck health and fertility.
Building the Nesting Box
Now that you have your nesting box plans, it’s time to bring them to life. This section will guide you through building a safe and comfortable home for your mallard ducks.
Materials Needed for Construction
When it comes to building a mallard nesting box, having the right materials is crucial for its longevity and effectiveness. To get started, you’ll need the following:
* 1″ x 6″ or 1″ x 8″ cedar or pine wood for the exterior walls (choose a durable and rot-resistant species)
* 3/4″ plywood or oriented strand board (OSB) for the floor and back panel
* 2″ x 2″ lumber for the frame and supports
* Hinges and a latch for easy cleaning and maintenance access
* Nails, screws, and wood glue for assembly
* Waterproof roofing material (such as asphalt shingles or corrugated metal)
* A drill press and circular saw for precise cutting
When selecting wood, opt for untreated or naturally rot-resistant species to minimize the risk of pest infestations. Cedar is an excellent choice due to its natural resistance to rot and insects. Additionally, consider using a weather-resistant coating to protect the wood from harsh weather conditions.
Step-by-Step Instructions for Assembly
To assemble the nesting box, start by attaching the front and back panels to the sides using 1-1/4″ wood screws. Make sure the edges are aligned properly and the corners are secure. Next, attach the roof to the top of the box, ensuring it is level and securely fastened with 1-1/4″ wood screws.
Move on to assembling the nesting compartment by attaching the divider to the interior of the box using 1-1/2″ wood screws. This will help keep the eggs dry and protect them from predators. Ensure the divider is securely attached to prevent any movement during use.
Finally, attach the perch to the front of the box using 1-1/4″ wood screws. Position it about 3 inches below the entrance hole for comfortable access. Double-check all connections and make sure everything is securely fastened before moving on to the next step.
Before finishing, inspect the nesting box carefully for any defects or damage. Apply a coat of water-resistant sealant to protect the wood from moisture. This will ensure the longevity of your mallard nesting box and provide a safe haven for these beautiful birds.
Tips for Maintenance and Repair
As you’ve successfully installed your mallard nesting box, it’s essential to maintain and repair it regularly to ensure the health and safety of your feathered friends. Regular maintenance tasks will not only extend the lifespan of the box but also help prevent common issues that might discourage your female mallards from laying eggs or raising their ducklings.
Begin by inspecting the nesting box every week, looking for signs of wear and tear, such as cracks in the wood or loose screws. Clean the interior with a soft brush and mild detergent to remove any debris or droppings. Make sure to replace any worn-out parts, like perches or ventilation systems.
Some common issues you might encounter include pecking at the walls or floor, which could be due to inadequate nesting material or overcrowding. Check for proper drainage by ensuring the box’s slope and drainage system are functioning correctly. If you notice a drop in egg-laying frequency, it may indicate a problem with the box’s temperature or lighting.
Installing and Maintaining the Nesting Box
To ensure a successful nesting box setup, you’ll need to carefully follow these steps for installing and maintaining your mallard nesting box. This includes regular cleaning and inspection tasks.
Mounting Options and Considerations
When it comes to installing your mallard nesting box, choosing the right mounting method is crucial for its longevity and the safety of the birds. There are several options to consider, each with its own set of advantages and disadvantages.
One popular approach is to mount the nesting box on a tree trunk, about 10-15 feet off the ground. This provides protection from predators and harsh weather conditions. However, it’s essential to select trees that are sturdy enough to support the weight of the box and any additional features like rope or chains. For instance, a willow or alder tree with a wide trunk is an excellent choice.
Another option is to use a fence post or a wooden beam as the mounting surface. This method is ideal for areas where trees are scarce. In this case, make sure to secure the nesting box firmly to prevent it from swaying in the wind.
It’s also vital to consider rope durability when choosing your mounting method. A sturdy rope made of natural fibers like cotton or jute can withstand harsh weather conditions and bird activity. However, you may need to replace it periodically to ensure its effectiveness.
Monitoring and Maintenance Schedule
Regular inspections and maintenance tasks are crucial to ensure the nesting box remains functional and safe for the mallards. A monitoring and maintenance schedule will help you identify potential issues early on, preventing costly repairs down the line.
Create a calendar with specific dates for each task, such as cleaning out droppings every 2-3 weeks during breeding season or inspecting for signs of predators. Regularly check for damage, rotting wood, or loose screws that could compromise the box’s integrity.
Consider adding a ‘nesting box log’ to track any observations or concerns you may have, including notes on egg laying success and incubation periods. This record-keeping will help you identify trends and make informed decisions about future adjustments or repairs.
During each inspection, take note of any debris accumulation and clean out the box accordingly. Also, inspect for signs of disease or parasites in the droppings or nesting material. By following this schedule, you’ll be able to provide a safe and healthy environment for your mallard population.
Addressing Common Issues and Troubleshooting Tips
When installing and maintaining a mallard nesting box, you may encounter some common issues that need to be addressed. One of the most frequent problems is eggs being laid on the floor of the nesting box instead of inside it. This can be caused by poor design or installation of the nesting box, as well as inadequate maintenance.
To troubleshoot this issue, check if the nesting box is level and secure. Ensure that the entrance hole is large enough for the mallards to comfortably enter and exit. You can also try adjusting the nesting box’s location to a spot with more natural light and protection from harsh weather conditions.
Another common problem is predation of eggs or ducklings by raccoons, snakes, or other predators. To prevent this, consider adding a roof or canopy over the nesting box to protect it from view and access. You can also try using repellents such as predator-deterrent granules or sprinkling hot pepper spray around the area.
Regular maintenance is key to preventing issues with your mallard nesting box. Make sure to clean out the nesting box at least once a year, removing any debris, old nests, and droppings. Replace any damaged or worn-out components, such as twigs or shingles, to keep the nesting box in good condition.
Safety Precautions and Considerations
When building a mallard nesting box, it’s crucial to prioritize safety for both you and your feathered friends. This includes precautions against bird-borne diseases and structural hazards during construction.
Predator-Proofing Strategies
When it comes to protecting your mallard nesting box from predators, it’s essential to consider the design and placement of the box. One effective way to prevent predators like raccoons, cats, and hawks from accessing the nest is to incorporate a roof or overhang into your nesting box plans.
A sloping roof with a 45-degree angle can help to deter larger predators, as it makes it difficult for them to climb up without being seen. You can also add a metal flashing around the edges of the roof to prevent predators from getting a grip. As for entry points, make sure they are narrow enough (about 2-3 inches) to prevent raccoons and other large animals from entering.
Consider adding a roof extension or overhang that is at least 6 inches deep to provide extra protection. This will also help to keep rain and snow out of the nesting box. Remember to secure all materials used in your nesting box construction, such as wood and wire mesh, to prevent them from being easily removed by predators.
By implementing these predator-proofing strategies, you can create a safe haven for your mallard ducks to nest and raise their young without worrying about predation.
Electrical Wiring and Lighting Installation
When installing electrical wiring and lighting in your mallard nesting box, safety should be your top priority. Improperly installed electrical components can cause a fire hazard, shock, or even electrocution to the birds.
First, ensure that you’re using materials specifically designed for outdoor use, such as water-resistant wire and connectors. Use weather-tight outlets and switches to prevent moisture from entering the nesting box. When choosing lighting options, select low-voltage lighting (12V or 24V) to minimize the risk of electrical shock.
When running wiring, keep it away from heat sources like heaters or lamps, which can cause insulation degradation and increase the risk of a fire. Label each wire clearly, making sure to note its function (e.g., light circuit or ventilation). Use a voltage tester to ensure that there’s no power flowing through the wires during installation.
Additionally, consult local building codes and regulations for specific requirements on electrical installations in outdoor structures like nesting boxes. Proper planning and execution will help you create a safe and welcoming space for your mallard birds.
Additional Resources and Tips
If you’re ready to get started on building your own mallard nesting box, but need a little extra help, we’ve got you covered here. This section provides some valuable additional resources and tips to aid in your project.
Online Communities and Forums
If you’re looking for valuable insights and real-world experiences related to mallard nesting box plans, online communities and forums are an excellent place to start. Look no further than dedicated social media groups, forums, and websites focused on duck or waterfowl keeping.
For instance, the Duck Pond subreddit is a great resource where enthusiasts share their knowledge, ask questions, and provide advice on everything from building custom nesting boxes to dealing with common health issues in mallards. Similarly, online forums like Reddit’s r/waterfowl and Quora have dedicated sections for discussing duck-related topics, including nesting box design and maintenance.
You can also join Facebook groups or online clubs specifically created for waterfowl enthusiasts, where members often share their experiences, ask for advice, and showcase their handiwork. Some popular examples include the Mallard Nesting Box Plans group on Facebook and the Waterfowl Enthusiasts community on Discord. By engaging with these communities, you can gain valuable insights from experienced keepers and learn from their successes and mistakes.
Further Reading and Recommended Literature
If you’re interested in learning more about building and installing nesting boxes for mallards, there are several excellent resources available. For a deeper understanding of duck behavior and habitat requirements, I recommend “Ducks at Dusk” by Dr. Bill Dance, which provides insights into the social dynamics and breeding habits of various waterfowl species.
If you’re specifically interested in designing and building nesting boxes for mallards, “The Mallard Duck” by Paul A. Johnsgard is a comprehensive guide that covers topics such as nest site selection, box design, and installation techniques. This book provides practical advice and detailed plans for creating mallard-friendly habitats.
For online resources, the Cornell Lab of Ornithology’s website has an extensive section on duck conservation and habitat management, including guidelines for building nesting boxes and installing them in suitable locations. Additionally, the Mallard Society’s website offers a wealth of information on breeding and rearing mallards, as well as tips on creating and maintaining successful nesting box programs.
These resources will help you create effective and functional nesting boxes that meet the needs of your local mallard population.
Frequently Asked Questions
Can I use a pre-made nesting box or do I need to build one from scratch?
Yes, you can definitely use a pre-made nesting box if it meets the requirements for mallard nesting boxes, which include having an entrance hole of 5-6 inches in diameter and being at least 6 feet off the ground. However, building one yourself allows you to tailor it to your specific needs and preferences.
How do I ensure my nesting box is predator-proof?
To prevent predators from accessing the nest, consider adding a roof or lid that can be easily opened for cleaning and maintenance. You can also use hardware cloth or chicken wire with openings of 1 inch or smaller to cover any areas where predators could squeeze through.
What if I already have a tree in my yard – should I still build a nesting box on the ground?
Mallards often prefer nesting boxes placed high off the ground, ideally at least 6 feet above the ground. If you have a tree with branches that can support the weight of the nesting box and provide adequate sunlight, consider placing it there instead. However, if your tree has overhanging branches or is too dense with foliage, building on the ground may be a better option.
How often should I clean and maintain my mallard nesting box?
Clean and inspect your nesting box regularly to ensure it remains safe and welcoming for the birds. Remove any debris, droppings, or parasites that could harm the eggs or chicks. You can also consider adding a roof or lid to make cleaning easier and more efficient.
Can I use solar panels to power lights or other features in my mallard nesting box?
Yes, you can definitely incorporate solar panels into your design if you want to provide additional features like lighting or ventilation. Just be sure to follow local building codes and regulations when installing any electrical components.