
Are you ready to crack open the secrets of successful chicken hatching? Incubation temperatures, embryo development, and common issues are just a few of the crucial factors that can make or break your chances of raising healthy, happy chicks. As an aspiring backyard chicken keeper or seasoned breeder, understanding the intricacies of chicken hatch time is essential for achieving those adorable chirping balls of fluff.
In this comprehensive guide, we’ll delve into the world of chicken incubation, covering everything from optimal temperature ranges to spotting potential problems before they become major issues. Whether you’re a beginner or an expert, our troubleshooting tips and insider knowledge will help you pinpoint common mistakes and develop your own hatch time strategies for success. By the end of this article, you’ll be well-equipped to tackle even the most challenging hatching experiences with confidence!
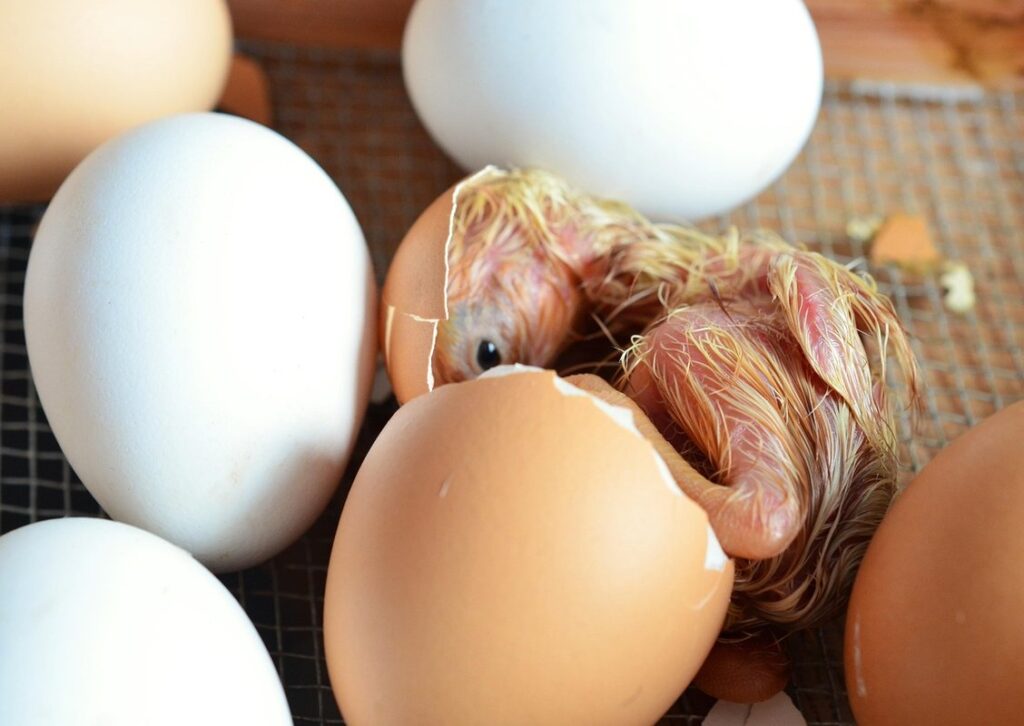
What is Chicken Hatch Time?
When it comes to raising chickens, understanding hatch time is crucial for predicting when your chicks will arrive and planning their care. We’ll explain what chicken hatch time means in this next section.
Definition and Importance
Chicken hatch time refers to the exact period when chicks emerge from their eggs outside the hen’s reproductive system. It’s a critical aspect of poultry farming, as understanding this concept can significantly impact the success of broiler and layer operations. Knowing the hatch time is crucial for farmers, breeders, and industry professionals, as it enables them to determine the optimal incubation period and timing for chick placement in grow-out facilities.
In essence, hatch time marks the beginning of a chick’s life outside its eggshell. This developmental stage is influenced by various factors, including temperature, humidity, and handling during incubation. A precise understanding of these elements helps farmers predict when chicks will pip (break through their shell) and emerge from the egg within 48-72 hours.
Understanding chicken hatch time can also help breeders optimize breeding programs, improve chick quality, and increase productivity. By knowing when eggs are likely to hatch, farmers can plan for adequate staff, facilities, and resources to support a smooth transition of chicks into grow-out units. This strategic approach not only ensures efficient operations but also contributes to better animal welfare and reduced losses due to delayed or unexpected hatching events.
Factors Influencing Chick Hatching Success
When it comes to chick hatching success, several key factors come into play. The breed of chicken is one significant influence – some breeds are more likely to hatch successfully than others due to their genetic predisposition. For example, Leghorns and Plymouth Rock chickens tend to have higher hatch rates.
Another crucial factor is egg quality. Fresh eggs with clean, intact shells and no visible cracks or damage are essential for successful hatching. A dirty or contaminated egg can lead to embryonic death or failed incubation.
Proper incubation temperature and humidity levels also play a vital role in chick development. Ideal temperatures range from 99°F to 100°F (37°C to 38°C), while maintaining optimal humidity between 50% to 60% ensures healthy embryo growth.
Monitoring these factors closely during the incubation period can significantly boost hatch success rates. By paying attention to these critical elements and taking steps to mitigate potential issues, you’ll be well on your way to achieving successful chick hatching outcomes.
The Incubation Period: A Critical Component of Hatch Time
The incubation period is a crucial time for your chicks’ development, and getting it right can make all the difference in successful hatching. Let’s dive into the specifics of this critical component.
Day 1-18: Embryonic Development
On day one after fertilization, the egg begins to undergo a series of remarkable changes. The sperm penetrates the outer layers of the egg and fuses with the yolk, initiating a cascade of cellular divisions that will eventually give rise to an embryo.
As the egg cleaves into 2-4 cells over the next few days, it begins to implant itself within the shell membranes. This process is crucial for the establishment of a stable environment within the egg, allowing the embryo to develop undisturbed. By day 5-6, the number of cells has increased significantly, and gastrulation commences.
During this critical period, the embryonic tissues begin to differentiate into their various components – endoderm (gastrointestinal tract), mesoderm (muscles, bones, and connective tissue), and ectoderm (nervous system, skin, and epithelial cells). The formation of these distinct tissue layers sets the stage for further development and eventually gives rise to a fully formed chick.
Day 19-21: Organogenesis and Sensory System Formation
As you near the end of the incubation period, Day 19-21 are crucial for the formation of organs and sensory systems. On Day 19, the chick’s heart begins to beat, pumping blood through its tiny vessels. This marks a significant milestone as it prepares for life outside the egg. The liver and kidneys also start functioning, producing essential proteins and hormones.
By Day 20, the chick’s nervous system is developing rapidly. Neurons are forming connections, enabling the chick to respond to stimuli. Its eyes, ears, and nose begin to take shape, preparing it to interact with its environment. You may notice a slight movement of the beak or an irregular twitching of the wings, indicating the chick’s growing sensitivity.
On Day 21, the nervous system has matured significantly, allowing the chick to react to external stimuli. Sensory organs like the eyes and ears are now functional, although vision is still limited due to underdeveloped eyelids and corneas. The chick’s auditory system, however, can detect sounds. This period is also critical for establishing the balance between the brain and peripheral nerves.
Note that humidity and temperature fluctuations during this time can impact development. It’s essential to maintain a consistent environment within the incubator. As you count down to hatch day, remember that the chick’s internal systems are refining their functions daily, preparing it for the momentous event of breaking out of its shell.
Temperature Control in Chicken Hatch Time
Maintaining a stable temperature is crucial during chicken hatch time, as even slight variations can impact embryonic development and chick health. In this next part of our guide, we’ll explore how to achieve optimal temperature control.
Optimal Incubation Temperatures for Different Breeds
When it comes to incubating eggs, not all chicken breeds are created equal. Different breeds have unique temperature requirements for optimal development and hatching success. Let’s take a closer look at the ideal incubation temperatures for some popular backyard breeds.
Leghorns, known for their high egg production, thrive in slightly cooler temperatures than other breeds. Aim for 99.5°F to 100.2°F (37.7°C to 37.9°C) during the first 18 days of incubation, then drop the temperature to 98.2°F (36.8°C) until day 24. This allows their eggs to develop properly without overheating.
Orpingtons, on the other hand, prefer a warmer environment. Maintain temperatures between 100.5°F and 101.4°F (38°C to 38.6°C) for the first 18 days of incubation, followed by 99°F (37.2°C) until day 24.
Silkies require even more attention due to their delicate nature. Keep temperatures steady between 98.5°F and 100.3°F (36.9°C to 37.8°C) for the entire incubation period.
By understanding these breed-specific temperature requirements, you’ll significantly improve your chances of successful hatching and healthy chicks. Don’t forget to monitor your incubator’s temperature closely and adjust as needed to ensure optimal conditions for your flock.
The Risks of Temperature Fluctuations
Temperature fluctuations during incubation can have devastating consequences on the health and viability of developing embryos. One of the most significant risks is delayed hatching, which can be caused by even slight temperature deviations from the optimal range. For example, a 2°C drop in temperature can delay hatching by as much as 24 hours. This delay can lead to increased chick mortality, as the longer the embryo remains in the shell, the more susceptible it becomes to infection and disease.
To put this risk into perspective, research has shown that for every degree Celsius above or below the optimal incubation temperature, the hatch rate can drop by up to 20%. Furthermore, repeated temperature fluctuations can have a cumulative effect, leading to a significant increase in chick mortality. To minimize these risks, it’s essential to maintain a stable incubator environment and monitor temperature closely throughout the incubation period. This can be achieved through regular checks of the thermometer, adjusting the temperature as needed, and using temperature control systems specifically designed for incubators.
Monitoring Hatch Time: Techniques and Tools
Now that you’ve learned how to create a conducive environment for hatching eggs, let’s dive into monitoring hatch time effectively with essential techniques and tools.
Checking Egg Candler Use and Inspection Protocols
Regular egg candling inspections are a crucial step in monitoring hatch time and identifying potential issues with embryo development. By shining a light through the egg, you can observe the growth and movement of the embryo, allowing you to detect problems early on.
To perform an effective egg candling inspection, make sure you’re using a good quality egg candler or flashlight to illuminate the egg from behind. Hold the egg at a slight angle to allow for even lighting, then slowly rotate it to get a clear view of the developing embryo.
A normal, healthy embryo will appear as a dark shape with visible veins and a heartbeat. Any unusual shapes, lack of movement, or uneven development can indicate issues such as inadequate nutrition, genetic problems, or bacterial contamination. By conducting regular inspections, you can catch potential problems before they become major issues, improving overall hatch rates and reducing losses.
Typically, the first candling inspection should be done around 7-10 days into incubation, with subsequent checks every few days until hatching is imminent.
Using Humidity and Temperature Monitors for Optimal Conditions
When it comes to monitoring hatch time, ensuring optimal conditions for incubation is crucial. This involves maintaining a stable environment with precise temperature and humidity levels. That’s where specialized equipment like humidity monitors and temperature gauges come into play.
These devices help you monitor the incubator’s conditions in real-time, allowing you to make adjustments as needed. For instance, most chicken embryos thrive between 99°F and 100°F (37°C to 38°C). A digital thermometer ensures that your incubator is within this range. Similarly, humidity levels should be maintained between 50% to 60%. You can use a hygrometer to monitor the humidity levels in your incubator.
Proper temperature and humidity control can significantly impact hatch success rates. It’s essential to calibrate your equipment regularly and keep them away from drafts or extreme temperatures. By investing in quality monitoring devices, you’ll be able to maintain a stable environment for your embryos, ultimately increasing the chances of successful hatching.
Troubleshooting Common Hatch Time Issues
If you’re experiencing issues with your chicken hatch, don’t worry, we’ve got you covered. This section will walk you through common problems and provide solutions to get your chicks hatching successfully.
Delayed Hatching or Failure to Hatch
If you’re experiencing delayed hatching or failure to hatch, it’s essential to identify and address the underlying causes. One common issue is a lack of humidity during incubation. Eggs require a humid environment to develop properly, typically between 50-60% relative humidity. If the humidity levels drop below this range, embryo development can slow down or even stop.
Another potential cause is inadequate temperature control. Most incubators have a recommended temperature range of 99-100°F (37-38°C), but minor variations can impact hatching success. For example, if your incubator’s temperature fluctuates by just 1-2°F (0.5-1°C) daily, it may delay or prevent hatching.
Regular candling and monitoring for signs of stress or infection are also crucial. If you notice any unusual patterns, such as blood vessels or irregularities in the embryo’s development, address these issues promptly. This might involve adjusting the incubator settings, replacing food or water sources, or taking steps to reduce stress factors in your flock.
By staying vigilant and attentive, you can often prevent delayed hatching or failure to hatch.
Causes and Solutions for Embryo Mortality
Embryo mortality is a heartbreaking phenomenon that can occur during incubation, resulting in failed hatches and reduced fertility rates. As an incubator owner, it’s essential to understand the causes of embryo mortality and take proactive steps to minimize this risk.
There are several reasons why embryos may not survive, including incorrect egg handling, inadequate temperature control, humidity issues, and poor sanitation. For instance, if eggs are not handled gently or are exposed to extreme temperatures during transport, the delicate embryo within may be damaged or even killed. Similarly, an incubator’s temperature fluctuations can cause stress, leading to embryonic mortality.
To minimize the risk of embryo mortality, make sure your incubator is calibrated correctly and maintain a consistent temperature range between 99°F and 100°F (37°C and 38°C). Also, ensure that eggs are handled carefully, stored properly, and placed in the incubator gently. Regular cleaning and sanitizing of the incubator and its surroundings will also help prevent contamination and related issues.
Advanced Techniques for Optimizing Chicken Hatch Time
Let’s dive into some advanced techniques to help you fine-tune your chicken hatch time, from breed selection to egg incubation strategies that really pay off.
Using Incubator Automation Systems
Using advanced incubator automation systems can revolutionize the way you manage your hatch time. These cutting-edge systems offer unparalleled precision and control over temperature and humidity levels, two critical factors that significantly impact embryo development.
Automatic temperature control is one of the most valuable features of incubator automation systems. With manual systems, it’s easy to get temperatures off by just a degree or two, which can be disastrous for embryonic development. Advanced systems use sensors to continuously monitor and adjust temperatures within a fraction of a degree, ensuring optimal conditions for every embryo.
Humidity monitoring is another essential feature that helps prevent dehydration and moisture-related problems. Automated systems maintain ideal humidity levels, allowing you to focus on other aspects of incubation. Some high-end systems even integrate advanced algorithms that predict temperature fluctuations and automatically make adjustments before they become an issue.
When choosing an automation system, look for features like data logging and remote monitoring capabilities. These allow you to track performance in real-time and identify areas for improvement. By leveraging the benefits of incubator automation, you’ll see improvements in hatch rates, reduced losses due to environmental stressors, and a more streamlined operation overall.
Breeding Programs for Improved Hatch Rates
When it comes to optimizing chicken hatch time, breeding programs play a crucial role in improving hatch rates. A well-designed breeding program can significantly enhance the quality of eggs and chicks, ultimately leading to better growth rates and reduced mortality rates.
One key aspect of a successful breeding program is selecting for genetic traits that contribute to improved fertility and hatchability. This involves identifying top-performing parents and using them to breed the next generation of hens and roosters. For instance, some farms have reported increases in hatch rates by up to 15% after implementing this type of selection process.
Another important factor is monitoring and managing the health and well-being of breeding birds. Regular veterinary check-ups, proper nutrition, and optimal living conditions can help reduce stress and disease-related issues that can negatively impact fertility and hatchability. By implementing these strategies, breeders can create a more stable and resilient population, leading to improved hatch rates and overall flock performance.
Some farms have seen remarkable results from their breeding initiatives, with one farm reporting an increase in hatch rates from 75% to 92% after just two years of selective breeding.
Conclusion: Unlocking the Secrets of Chicken Hatch Time
Now that we’ve explored the factors influencing chicken hatch time, let’s wrap up our discussion by unlocking the secrets to optimal incubation periods.
Recap Key Takeaways
As you now have a better understanding of the factors that influence chicken hatch time, it’s essential to recap the critical takeaways from our discussion. Let’s review the main points:
When it comes to achieving optimal hatch rates, temperature control is crucial. A consistent incubation temperature between 99°F and 100°F (37°C to 38°C) is vital for healthy embryo development.
Proper humidity levels are also essential, with a relative humidity of 50% to 60% maintaining the ideal environment for hatching. Over- or under-humidification can lead to issues during incubation.
Don’t underestimate the importance of turning and rotation; it’s essential to ensure even temperature distribution within the incubator. A consistent turning schedule helps prevent embryo malpositioning, which can result in mortality.
Lastly, understanding your flock’s breed-specific characteristics will help you fine-tune your incubation techniques. Different breeds may have varying tolerance levels for stress and environmental factors.
By keeping these key points in mind, you’ll be well on your way to optimizing your chicken hatch time and increasing the chances of successful hatching.
Final Tips for Success
As you’ve made it through our comprehensive guide to understanding chicken hatch times, we hope you’re feeling more confident and prepared for successful hatching. Now that you have the knowledge, let’s focus on applying it effectively.
Firstly, remember that consistency is key when it comes to maintaining optimal incubation conditions. Stick to a routine, ensuring that temperature fluctuations are minimal and humidity levels remain consistent. This attention to detail will pay off in the long run, as small variations can significantly impact hatch rates.
Additionally, don’t underestimate the importance of accurate egg handling and storing. Always handle eggs gently, keeping them pointed end up to prevent damage or moisture entry. Store them in a cool, dry place until you’re ready to incubate.
To further optimize your chances of success, consider investing in a reliable incubator with precise temperature control. This investment will save you from the stress of manual temperature adjustments and provide peace of mind as you wait for those precious chicks to hatch.
By following these final tips, you’ll be well on your way to achieving higher hatch rates and successfully raising healthy chickens. Remember to stay vigilant and adapt to any challenges that arise, but with persistence and dedication, you’ll unlock the secrets of chicken hatch time in no time!
Frequently Asked Questions
Can I still hatch eggs if the incubator temperature is slightly off?
Yes, a slight deviation from optimal temperatures (around 99-100°F for chicken hatching) might not necessarily lead to failure, but it’s crucial to correct any discrepancies as soon as possible. Factors like humidity levels and egg quality also play significant roles in determining successful hatch rates.
What are some common mistakes that can delay or prevent successful hatching?
A leading cause of delayed or failed hatchings is the incorrect incubation temperature, which might be too high (99-100°F for chicken hatching) or fluctuate excessively. Other common errors include inadequate humidity levels and poor egg handling practices. It’s essential to monitor these factors closely during the incubation period.
Can I use a homemade setup instead of investing in a commercial incubator?
While it’s possible to create a makeshift incubator, using an authentic incubator specifically designed for chicken hatching is highly recommended. These devices are engineered with precise temperature and humidity control features that can significantly boost your chances of successful hatch rates.
How often should I candle eggs during the incubation period?
Candle inspection should be performed every 7-10 days to monitor embryo development and detect any potential issues early on. Look for clear signs of growth, such as air sac size, blood vessel appearance, and yolk absorption. This will help you pinpoint common problems before they affect hatch success.
What are some indicators that the incubation process is working smoothly?
Some good indications include observing consistent temperature levels within a narrow range (around 99-100°F), maintaining optimal humidity levels, detecting clear signs of embryo growth during candle inspections, and spotting no noticeable delays in development stages.