
Duck egg hatch day is a thrilling experience for any backyard farmer or duck enthusiast. Watching those tiny eggs crack open to reveal adorable, fluffy ducklings can be a real treat. But as exciting as it is, it’s also a crucial stage in the life cycle of your ducks, and getting it right is essential for raising healthy, thriving birds.
If you’re preparing for this special day or want to know what to expect, you’re in the right place. In this article, we’ll walk you through everything you need to know about duck egg hatch day, from breeding preparation and incubation techniques to post-hatch care and beyond. We’ll cover the key factors that determine a successful hatch, including the importance of proper temperature control, humidity levels, and gentle handling. By following our expert tips and advice, you’ll be well on your way to raising happy, healthy ducklings that will bring joy to your farm or backyard for years to come.
Introduction to Duck Egg Hatch Day
So, you’re expecting a batch of duck eggs to hatch and you want to ensure everything goes smoothly – let’s take a closer look at what happens on hatch day.
What is Duck Egg Hatch Day?
So, what is Duck Egg Hatch Day all about? In simple terms, it’s the day when duck eggs incubated for 28 days finally hatch into adorable little ducklings. But that’s not just a random event; it marks a significant milestone in breeding ducks, especially if you’re an avid backyard breeder or a commercial duck farm owner.
Duck Egg Hatch Day is crucial because it’s the culmination of months of planning, care, and dedication. From selecting the right breed, to feeding and caring for the females, to carefully collecting and storing eggs – all these efforts come together on this special day. The excitement is palpable as you watch those tiny beaks start to peck their way out of their shells.
As a breeder, your success isn’t just measured by the number of hatchlings; it’s also about achieving genetic diversity, maintaining healthy flocks, and meeting market demands. A successful Duck Egg Hatch Day can make all the difference in taking your breeding program to the next level. So, let’s dive deeper into the world of duck egg incubation and explore how you can maximize your chances of success on this critical day!
Importance of Timely Hatching
Timely hatching is crucial for ducklings’ health, growth, and development. When duck eggs hatch on schedule, the chances of healthy, robust ducklings increase significantly. Conversely, delayed hatching can lead to a range of issues.
For instance, if ducklings take too long to emerge from their shells, they may suffer from oxygen deprivation, which can cause hypoxia. This condition can lead to stunted growth, weakened immune systems, and increased susceptibility to diseases. Delayed hatching can also disrupt the natural pecking order among siblings, potentially leading to behavioral problems.
To ensure timely hatching, it’s essential to monitor egg incubation closely. Check the eggs regularly for signs of development, such as pip marks or cracks in the shell. Keep the incubator at a consistent temperature between 99°F and 100°F (37°C-38°C) and maintain proper humidity levels. By doing so, you’ll create an optimal environment that promotes healthy growth and allows your ducklings to emerge when they’re supposed to. This attention to detail can make all the difference in achieving breeding success.
Preparing for Duck Egg Hatch Day
As duck egg hatch day approaches, it’s essential to prepare your incubator and nesting box to ensure a smooth and successful hatching process for both you and your ducks. Let’s dive into the details of getting everything ready!
Conditioning Ducks for Breeding Season
Conditioning ducks for breeding season is crucial to ensure successful hatching. As breed day approaches, it’s essential to provide your ducks with a balanced diet that meets their nutritional needs. A high-quality layer feed or breeder feed should be introduced 4-6 weeks prior to breeding season, supplemented with fresh fruits and vegetables daily. Ensure access to clean water at all times.
Regular health checks are also vital during this period. Monitor your ducks’ behavior, appetite, and overall well-being for any signs of illness or stress. Consult a veterinarian if you notice any unusual symptoms. Keep your ducks in a clean, spacious environment with adequate ventilation and protection from extreme weather conditions.
Consider factors like lighting, temperature, and humidity when conditioning your ducks. Provide a balanced photoperiod, ideally 14-16 hours of light and 8-10 hours of darkness, to regulate their reproductive cycles. Maintain a consistent temperature between 40°F and 80°F (4°C and 27°C) and ensure adequate ventilation to prevent respiratory issues.
By following these steps, you’ll be well-prepared for breeding season and increase the chances of successful hatching on duck egg hatch day.
Setting Up a Breeding Program
Setting up a breeding program is a crucial step in preparing for duck egg hatch day. To ensure success, it’s essential to select healthy breeders that will produce high-quality offspring. Look for ducks with good temperament, fertility, and egg-laying abilities. It’s also vital to consider the breed characteristics and compatibility when choosing your breeders.
When selecting breeders, inspect them thoroughly for signs of illness or injury. Check their feathers, beak, and eyes for any abnormalities. Ensure they have a good weight and are active. If you’re new to breeding ducks, it may be helpful to start with a smaller flock and gradually expand as you gain experience.
Maintaining proper facilities is also critical in setting up a successful breeding program. This includes providing clean water, nutritious food, and adequate shelter for your breeders. A well-designed coop or enclosure will help keep your ducks safe from predators and diseases. Regular cleaning and disinfection of the facilities will also prevent the spread of diseases.
When building or renovating your facilities, consider factors like ventilation, lighting, and space per duck. Ensure there are enough nesting boxes to accommodate all the females in your flock. A well-planned breeding program takes time and effort, but with proper planning and execution, you can set yourself up for success on duck egg hatch day.
Managing Egg Incubation for Successful Hatch
Now that you have your fertile eggs, it’s time to focus on creating a perfect incubation environment for successful hatching. Proper temperature and humidity control are crucial during this critical stage of development.
Choosing the Right Incubator
When it comes to choosing the right incubator for duck eggs, there are several factors to consider. Temperature control is one of the most crucial aspects to look out for, as a slight variation can affect hatch rates significantly. Digital incubators with precise temperature control systems tend to perform better than analog ones.
Humidity levels also play a vital role in maintaining a healthy environment for your duck eggs. Look for an incubator that allows for adjustable humidity settings, allowing you to replicate the natural conditions of a broody hen’s nest. Automatic turners and built-in fans are also desirable features, as they ensure consistent rotation and air circulation.
Size is another essential factor to consider, depending on the number of duck eggs you’re hatching at once. Compact incubators suitable for small batches can be just as effective as larger ones for bigger quantities. Researching reviews from other poultry enthusiasts and reading up on expert opinions will help you narrow down your options and choose an incubator that meets your specific needs.
Maintaining Optimal Incubation Conditions
Maintaining optimal incubation conditions is crucial for successful duck egg hatching. The ideal temperature range for duck eggs is between 99°F and 100°F (37°C to 38°C). It’s essential to maintain a consistent temperature, as fluctuations can lead to poor hatch rates or even embryo death.
You’ll need to set the incubator to run at a humidity level of around 50-60%. This will help keep the eggs moist and prevent dehydration. Turning the eggs is also vital; aim for about 3-4 times per day, gently rotating them on their side or end to ensure even development.
Monitoring techniques are just as important as temperature and turning. Check the incubator’s thermometer regularly to ensure it’s within the optimal range. You can also use a hygrometer to monitor humidity levels. Keep an eye out for any unusual odors or mold growth, which can be signs of bacterial contamination.
Remember to maintain a clean environment around the incubator to prevent contamination and maintain a healthy hatch rate. Regularly cleaning and disinfecting the eggs, incubator, and surrounding area will help ensure optimal conditions for hatching.
Recognizing Signs of Healthy Ducklings
As you eagerly await the emergence of your duckling brood, it’s essential to recognize the telltale signs that indicate a healthy and thriving youngling. Learning these signs will give you confidence in their development.
Physical Characteristics
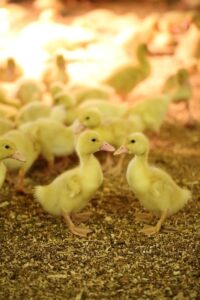
When you open the incubator on duck egg hatch day, it’s exciting to see the first signs of life emerging from the eggs. But how can you tell if those little quackers are healthy? Let’s take a closer look at the physical characteristics of healthy ducklings at various stages of development.
At one day old, newly hatched ducklings will be covered in downy feathers and have their eyes closed. They’ll be wobbly on their legs and may not be able to stand upright yet. Healthy ducklings will have a normal-sized beak, well-formed wings, and no visible signs of deformity.
By three days old, the ducklings’ eyes should be open, and they’ll start to become more mobile. They should be able to stand up and walk short distances without stumbling. Their downy feathers should be replaced with soft, fluffy feathers on their necks and heads.
As you continue to care for your ducklings, look out for any signs of illness or stress, such as labored breathing, lethargy, or loss of appetite. With proper care and attention, healthy ducklings will grow into strong, active birds that thrive in their new environment.
Behavioral Indicators
When checking for behavioral indicators of healthy ducklings on hatch day, it’s essential to observe their activity levels. Healthy ducklings should be moving around and interacting with their surroundings within the first few hours after hatching. They will initially wobble and stumble as they gain strength, but by the end of the first day, they should be able to stand upright and move around confidently.
Keep an eye on their appetite too – healthy ducklings should be actively pecking at food and water from an early age. If you notice a lack of interest in feeding or water, it may indicate that something is amiss.
Another key indicator of healthy duckling behavior is how they interact with their environment. Healthy ducklings will explore their surroundings, investigate new sights and sounds, and show curiosity about the world around them. This can be seen as they start to venture out of the nesting box or brooder, making tentative steps towards the rest of the flock.
Monitor these behavioral cues closely to identify any potential issues early on, allowing for prompt intervention if necessary.
Common Challenges on Duck Egg Hatch Day
As you wait anxiously for your duck eggs to hatch, it’s not uncommon to encounter unexpected obstacles along the way, such as temperature fluctuations and uneven broodiness. Let’s tackle these common challenges together.
Causes of Low Hatch Rates
One of the most pressing concerns for duck breeders on hatch day is low hatch rates. Despite following proper incubation protocols, a significant number of eggs may fail to hatch, leading to disappointment and financial loss. Several common causes contribute to this issue.
Temperature fluctuations are a major culprit when it comes to low hatch rates. If the temperature in the incubator varies by more than 1°C from the optimal range of 37-38°C, embryonic development can be severely impacted. This can result in chicks that fail to pip or hatch successfully.
Humidity levels also play a crucial role in successful hatching. If the humidity is too high or too low, it can cause issues with eggshell membrane formation and chick development. Ideally, the humidity should range between 50-60% during incubation.
Bacterial contamination is another significant concern that can lead to low hatch rates. Bacteria like Salmonella and E. coli can enter the egg through the reproductive tract of the mother duck or during handling. If the bacteria are not killed by the immune system, they can cause a fatal infection in the embryo.
To minimize these risks, it’s essential to maintain proper incubation conditions, handle eggs gently, and monitor temperature and humidity levels closely. Regular cleaning and disinfection of the incubator and equipment can also help prevent bacterial contamination.
Strategies for Troubleshooting Issues
As you count down the final hours until duck egg hatch day, it’s essential to be prepared for any unexpected issues that may arise. Troubleshooting common problems during incubation can mean the difference between a successful hatch and a disappointing outcome.
Firstly, if you notice a sudden drop in humidity or temperature fluctuations, quickly assess your incubator settings. Double-check that the thermostat is working correctly and adjust as necessary to maintain a consistent environment. In some cases, a small change in temperature can be catastrophic for developing ducklings.
Another common issue is inconsistent turning of eggs. This can lead to uneven development and even breakage of delicate embryo shells. To avoid this, invest in an automatic egg turner or set reminders to manually turn the eggs every 8-10 hours.
If you notice any visual abnormalities, such as cracks or blood spots on the eggs, it’s likely that the embryo has died. Don’t panic – simply remove the affected egg and focus on the remaining ones. Remember that a small percentage of duck eggs may not hatch due to inherent fertility issues or other factors beyond your control.
By staying vigilant and addressing any problems promptly, you’ll significantly improve your chances of a successful duck egg hatch day.
Post-Hatch Care and Raising Ducklings
Now that your ducklings have hatched, it’s time to focus on providing them with a safe and nourishing environment. Learn how to care for your newborn ducklings in our guide to post-hatch care.
Initial Care after Hatching
As you await the arrival of your new ducklings, it’s essential to be prepared for their initial care after hatching. The first few hours and days are crucial in setting the stage for a healthy and thriving brood. Ensure that you have a safe and warm space ready for the new arrivals. A heat source is necessary, as newly hatched ducklings can lose body heat quickly.
Provide access to food and water immediately. Ducklings need a starter feed specifically formulated for young waterfowl, which can be introduced within the first 24 hours of life. Water should be readily available, but make sure it’s shallow enough to prevent drowning. A birdbath or shallow dish with fresh water will suffice.
Shelter is also vital during this period. Provide a safe and draft-free enclosure where ducklings can rest and grow without external stressors. A brooder or a warm, well-ventilated area will work perfectly. Maintain proper temperature and humidity levels to ensure the ducklings’ comfort and health.
Nutritional Needs of Growing Ducklings
Providing your growing ducklings with the right nutrition is crucial for their optimal growth and development. A balanced diet will help them build strong immune systems, grow healthy feathers, and develop into thriving adult ducks.
As a general rule, ducklings need a high-protein diet that includes a mix of vitamins and minerals. For the first 4-6 weeks, you can feed your ducklings a starter feed specifically formulated for waterfowl. This type of feed contains around 18-20% protein, which is essential for rapid growth during this critical developmental stage.
Some key nutrients to look out for in a duckling starter feed include:
• Crude protein (at least 18%)
• Lysine (an essential amino acid)
• Calcium
• Phosphorus
A good-quality starter feed will also contain added vitamins and minerals, such as vitamin A, D3, E, K, and B-complex. You can supplement your ducklings’ diet with fresh fruits and vegetables, but make sure to introduce these new foods gradually to prevent digestive upset.
By providing a balanced diet that meets their nutritional needs, you’ll set your growing ducklings up for success and help them thrive in the weeks ahead.
Conclusion: Tips for a Successful Duck Egg Hatch Day
Now that you’ve successfully navigated the hatch day process, here are some valuable tips to ensure a smooth and successful experience next time.
Recap of Essential Steps
As you prepare for Duck Egg Hatch Day, take a moment to recap the essential steps that will set you up for success. Proper planning is key – make sure you have a clean and well-ventilated brooding area with all necessary equipment within arm’s reach.
A reliable incubator or hatcher is crucial; invest in one that has temperature controls and humidity gauges. You’ll also need food, water, and a heat source for the ducklings once they hatch. Consider setting up a separate space for the mother duck to care for her young.
Careful attention to temperature and humidity levels during incubation is vital. Aim for 99-100°F with 50-60% humidity. Monitor your equipment regularly and be prepared to make adjustments as needed. Remember, patience and vigilance are essential on Duck Egg Hatch Day – by following these steps, you’ll be well-prepared to welcome new life into your flock.
Final Thoughts on Breeding Success
Breeding success with ducks is not just about hatching eggs, it’s about creating a new generation of these fascinating waterfowl. It’s a journey that comes with its fair share of rewards and challenges.
As you’ve made it through the challenging process of duck egg hatch day, you’re probably eager to see your hard work pay off. But breeding success is not just about achieving a 100% hatch rate or raising healthy chicks. It’s also about understanding the needs and behaviors of these amazing birds. By providing them with proper care, nutrition, and environment, you’ll be rewarded with loyal companions that bring joy and entertainment to your life.
One of the most significant rewards of breeding ducks is watching them grow into strong, confident birds. With patience, dedication, and a willingness to learn, you can create a thriving flock that will provide years of pleasure and companionship. So, don’t get discouraged if things don’t go as planned at first – every experience is an opportunity to improve and refine your breeding techniques.
As you continue on this journey, remember that breeding success with ducks is not just about the end result; it’s about the process itself. It’s about learning from your mistakes, adapting to new situations, and finding joy in the simple things, like watching your ducklings take their first steps into the world.
Frequently Asked Questions
What if I notice a delay in the hatching process, is it still possible to save the ducklings?
Yes, delayed hatching can be caused by various factors such as temperature fluctuations or improper incubation conditions. Monitor the eggs closely and adjust the incubator settings according to the manufacturer’s instructions. If you’re still concerned, consult with a veterinarian or experienced breeder for guidance.
How do I determine if my ducklings are receiving enough nutrition during their initial growth stage?
Ducklings need a balanced diet that includes starter feed specifically formulated for waterfowl. Ensure they have access to clean water and a nutritious food source at all times. You can also supplement with fresh fruits and vegetables, but consult with an expert to avoid overfeeding.
Can I use the same incubator for both ducks and chickens?
While some incubators are designed to handle multiple species, it’s essential to check compatibility before using the same unit for both ducks and chickens. Different species have unique incubation requirements, so ensure the temperature control, humidity levels, and ventilation meet the specific needs of each breed.
How do I prevent cross-contamination between duck eggs in the incubator?
To minimize cross-contamination, use separate egg trays or cartons for each mother and maintain a clean, well-ventilated area around the incubator. Wash your hands thoroughly before handling the eggs, and avoid touching multiple eggs with the same hand.
What’s the best way to handle ducklings after they hatch, considering their sensitive nature?
Gentle handling is crucial when caring for newborn ducklings. Use a soft-bristled brush or your bare hands to gently guide them into their brooder box. Avoid sudden movements and provide a warm, draft-free environment with adequate ventilation to prevent stress and respiratory issues.