
Are you eager to attract more birds to your backyard and provide them with a safe haven for nesting? Nesting box training is an excellent way to support your local bird population, but it can be intimidating if you’re new to birdwatching. Setting up a nesting box requires careful consideration of several factors, including the type of species you want to attract and the design of the box itself.
In this comprehensive guide on nesting box training, we’ll walk you through every step of the process, from setup and maintenance to choosing the right species-specific design. You’ll learn how to create a welcoming environment that will encourage birds to nest in your backyard, increasing their chances of survival and reproduction. Whether you’re a seasoned bird enthusiast or just starting out, this article will provide you with all the information you need to become a nesting box expert.
Understanding the Importance of Nesting Boxes
Now that you’ve got your birds settled into their new home, let’s dive into why nesting boxes are a crucial part of successful bird-keeping. Properly installed and maintained boxes can make all the difference.
Types of Nesting Boxes and Their Benefits
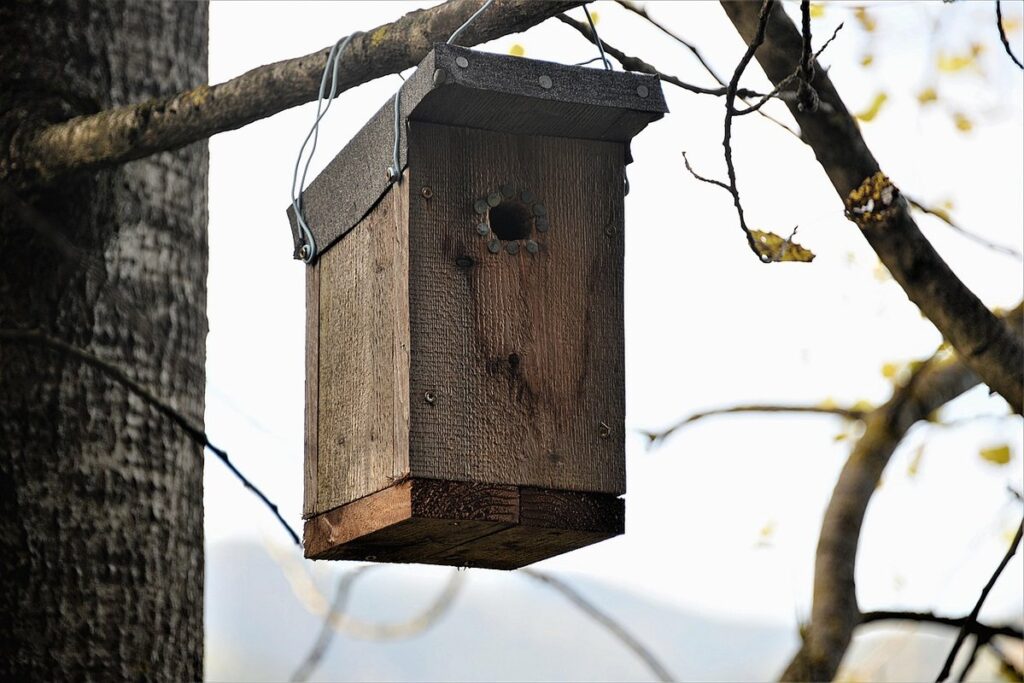
When it comes to providing a safe and welcoming space for nesting birds in your backyard, the type of nesting box you choose can make all the difference. There are several options available, including birdhouse kits, DIY designs, and pre-made boxes.
Birdhouse kits are a great option for beginners, as they come with everything needed to build a basic nesting box. These kits usually include pre-cut wood pieces, screws, and instructions for assembly. They’re also relatively affordable and can be customized to suit your specific needs. For example, you can choose from different sizes, shapes, and materials to create a nesting box that suits the species of bird you want to attract.
DIY designs, on the other hand, allow for greater creativity and customization. You can choose the type of wood, size, and design elements to create a unique nesting box that meets your needs. Many DIY plans are available online, or you can work with a local carpenter to create a custom box.
Pre-made boxes, often purchased from hardware stores or online retailers, offer convenience but may lack customization options. However, they’re still a great choice for those short on time or who want a simple, no-fuss solution.
Regardless of the type of nesting box you choose, the benefits are numerous. Nesting boxes can increase bird populations in your area, providing a safe space for females to lay eggs and raise their young. They also reduce predation by birds, as they offer a secure location for nesting.
Identifying the Best Location for Your Nesting Box
When choosing the perfect location for your nesting box, it’s essential to consider several factors to ensure a safe and welcoming space for your birds. First, think about sunlight: most bird species prefer a spot that receives partial shade to full sun, depending on the breed. For example, some songbirds thrive in areas with direct sunlight, while others, like robins, prefer dappled shade.
Another crucial consideration is predator protection. Place the nesting box in an area that’s not easily accessible to predators like cats, hawks, or snakes. A good rule of thumb is to position it at least 10 feet off the ground and away from any potential hiding spots. You can also consider adding a roof or canopy to create a buffer zone.
Proximity to food sources is another vital factor to consider. Birds often build nests near reliable food sources, so place your nesting box near a bird feeder or a fruit tree that’s in season. However, be mindful of over-feeding, as this can attract unwanted visitors and create competition for resources. By considering these factors, you’ll be well on your way to creating an ideal location for your nesting box.
Setting Up and Maintaining the Nesting Box
Now that you’ve hung your nesting box, it’s time to set it up for success, which means choosing the right location and ensuring it’s easily accessible for your feathered friend. Proper maintenance is also crucial for a happy and healthy bird.
Preparing the Nesting Box for Inhabitation
Before introducing your nesting box to its new feathered inhabitants, it’s essential to prepare the space for occupation. This includes a thorough cleaning, installation of hardware, and addition of nest material.
Start by scrubbing the nesting box with mild detergent and water, making sure to remove any residual scent from previous occupants or storage. Rinse thoroughly and let air dry before moving on to the next step. Install any hardware such as perch rods, tray liners, and camera equipment (if applicable). Ensure all parts are securely fastened and won’t come loose over time.
Add a layer of nest material like wood shavings, straw, or hay, depending on your preference and the bird species’ needs. A general rule of thumb is to fill the nesting box about 2/3 full for optimal comfort. You can also consider adding a few twigs or small branches to create a cozy environment.
For example, some bird species like robins prefer a more minimalistic approach, while bluebirds appreciate a deeper layer of material. Consult with local bird experts or online resources to determine the specific needs of your chosen species.
Regular Maintenance Tasks for Optimal Performance
Regular maintenance tasks are crucial to ensure the nesting box remains safe and functional for your flock. Start by inspecting the box regularly for signs of damage, such as cracks, holes, or loose joints. Check for any wear on the roof, walls, or floor, and repair or replace worn-out components promptly.
Old nests can accumulate in the nesting box, potentially harboring pests and diseases. Remove old nests completely, disinfecting the area with a 1:10 bleach solution to prevent the spread of illness. Clean out debris, droppings, and feathers regularly to maintain hygiene and reduce odors.
Check the nesting box’s ventilation system, making sure air can flow freely and not be obstructed by debris or buildup. Also, inspect the door hinges, ensuring they are functioning smoothly and allowing for easy access.
By performing these maintenance tasks, you’ll keep your flock healthy and ensure the nesting box remains a safe haven for laying eggs. Set aside time each week to perform these checks and make any necessary repairs, so you can enjoy a stress-free and productive egg-laying season.
Attracting the Right Species with Nesting Box Design
When designing your nesting boxes, it’s crucial to consider the specific needs of different bird species to attract the right visitors and ensure successful breeding. By tailoring your design, you can increase the chances of attracting your desired species.
Selecting the Correct Species-Specific Nesting Box Size and Design
When selecting a nesting box for a specific bird species, it’s essential to consider more than just aesthetics. You need to think about the needs of the birds that will be using the nest, and choose a design that caters specifically to their requirements.
To start with, you’ll want to pay attention to the dimensions of the nesting box. Different species have varying sizes of cavity-nesting abilities, which means some are better suited to larger or smaller boxes. For example, bluebirds and swallows typically require small nesting boxes (around 6-8 inches deep) with a narrow entrance hole (1.5-2.5 inches in diameter), while woodpeckers prefer larger boxes (10-12 inches deep) with a slightly wider entrance hole.
The roof style of the nesting box is also crucial, as it provides protection from the elements and predators. Overhanging roofs or eaves are excellent options for birds like robins and sparrows, which need extra shelter from heavy rain or strong winds. On the other hand, birds that prefer open skies like owls and hawks may benefit from a more minimalist roof design.
Ultimately, the key to attracting the right species with your nesting box is to choose one that replicates their natural habitat as closely as possible. Research the specific needs of the bird species you’re trying to attract and select a nesting box accordingly.
Adding Species-Preferred Features to Your Nesting Box
When designing your nesting box, incorporating species-preferred features is crucial to attract the right birds. Different bird species have unique preferences when it comes to nesting boxes. For instance, some birds like robins and wrens prefer a perch length of around 2-3 inches, while larger birds such as bluebirds and swallows require longer perches of about 6-8 inches.
Another crucial design element is the box depth. Birds with longer bodies, like woodpeckers and nuthatches, need deeper nesting boxes to accommodate their size. On the other hand, smaller birds like chickadees and titmice prefer shallower boxes around 6-7 inches deep.
Ventilation features are also essential for maintaining a healthy environment within the nesting box. Some species, such as sparrows and finches, appreciate small openings or vents that allow for airflow and temperature regulation. When designing your nesting box, consider these preferences to attract the desired bird species. You can use different materials, shapes, and sizes to cater to specific needs of various birds.
Keep in mind that not all birds are alike, so research the specific requirements of the target species to create an attractive and safe nesting environment.
Tips for Encouraging Occupancy and Successful Breeding
To successfully breed your chickens, it’s crucial that you create an environment where they feel encouraged to nest and lay eggs. This means paying attention to several key factors in your nesting box setup.
Creating a Welcoming Environment with Nesting Box Placement
When placing nesting boxes, consider the existing bird habitats on your property. Ideally, nest boxes should be situated near water sources, such as ponds or birdbaths, which provide birds with easy access to drinking and bathing facilities.
Positioning nest boxes near sheltered areas, like shrubs or trees, also helps attract birds seeking protection from harsh weather conditions. For example, a bird may prefer to nest in a spot with dense foliage that offers concealment from potential predators.
Place nesting boxes in an east- or southeast-facing location to provide warmth and light for the breeding pair during cold months. Avoid placing them too close to predator-attracting areas, such as bird feeders or compost piles.
Consider installing multiple nest boxes at varying heights and angles to accommodate birds with different preferences. For instance, some species may prefer lower nesting sites, while others require higher perches.
By thoughtfully situating your nesting boxes in relation to existing bird habitats, you’ll create a welcoming environment that encourages occupancy and successful breeding among your feathered friends.
Providing Adequate Food Sources Near the Nesting Box
When it comes to encouraging occupancy and successful breeding in your nesting box, providing adequate food sources near the nesting box is crucial. Birds are creatures of habit and will often choose a nesting site based on the availability of food. Placing bird feeders or seed-bearing plants nearby can attract birds to the area and encourage them to use the nesting box.
Consider installing a feeder that holds a variety of seeds, including sunflower seeds and safflower seeds, which are favorite foods for many bird species. You can also plant native vegetation with berries or seeds, such as shrubs like dogwood or holly. This will provide birds with a consistent food source and increase their chances of using the nesting box.
Remember to keep the feeders and plants clean and well-stocked to maintain the interest of the birds. A general rule of thumb is to place the feeder within 5-10 feet of the nesting box, but experiment with different distances to see what works best for your specific bird species.
Troubleshooting Common Issues with Nesting Boxes
If you’re experiencing issues with your nesting box setup, don’t worry – we’ve got some practical solutions to get you back on track. Let’s troubleshoot common problems together.
Identifying and Addressing Predator Problems
Identifying common predators that target nesting boxes is crucial to protecting your backyard birds. These can range from sly raccoons and clever crows to stealthy snakes and pesky rats.
Some signs of predator activity around your nesting box may include missing eggs, shredded nest material, or even a complete destruction of the box itself. To prevent these problems, take note of the following:
* Install your nesting box in a secure location, such as 10-15 feet off the ground and away from any food sources that might attract predators.
* Use hardware cloth or chicken wire to cover the sides and back of the nesting box for added protection against climbing predators like raccoons and snakes.
* Consider using predator guards specifically designed for nesting boxes, which can be attached over the entrance hole to prevent birds from being pulled out by predators.
Be aware that even with these precautions in place, some predators may still manage to breach your nesting box. In such cases, keep a close eye on the box and take action if you notice any signs of predation.
Resolving Issues with Empty or Abandoned Nesting Boxes
If you notice that a nesting box remains unoccupied or is abandoned by the birds, it’s essential to identify the underlying issue and take corrective measures. Start by checking for cleanliness and maintenance. Ensure that the nesting box is free from debris, parasites, and diseases. A dirty or infested nesting box can be off-putting to birds.
Next, inspect the nesting box for proper installation and orientation. Make sure it’s installed at a safe height of about 5-6 feet off the ground and angled correctly (about 30-40 degrees) to prevent water accumulation. Verify that the entrance hole is large enough for the birds to access comfortably, usually around 2.5-3 inches in diameter.
Another possible reason for abandonment could be competition or predator presence. Consider relocating the nesting box to a more secluded area or using baffles to deter predators. Also, ensure there are no nearby structures that may attract predators or provide an alternate roosting spot for birds. If you’ve tried these steps and still encounter issues, consult with local bird experts or wildlife organizations for guidance on resolving the problem.
Monitoring and Learning from Your Backyard Bird Habitat
As you continue to learn alongside your backyard birds, it’s essential to monitor their progress and adjust your nesting box training strategies accordingly. By doing so, you’ll create a thriving habitat that meets their evolving needs.
Recording Observations and Tracking Species Activity
When it comes to creating a thriving backyard bird habitat, one of the most rewarding aspects is observing and learning from the birds themselves. Recording observations and tracking species activity is an essential part of this process, allowing you to tailor your nesting box training approach to meet the unique needs of your feathered visitors.
To get started, try using a combination of visual observation and written records to track bird behavior around your nesting boxes. Keep a journal or spreadsheet to note the types of birds visiting, their activity levels, and any notable behaviors such as aggression or courtship displays. You can also use binoculars or a camera with a telephoto lens to monitor activity from a distance without disrupting the birds.
Some key metrics to track include species diversity, indicating how many different bird species are using your nesting boxes; frequency of visits, showing how often individual birds return to the same box; and behavior patterns, highlighting any changes in activity levels or social interactions over time. By monitoring these factors, you’ll gain valuable insights into the preferences and needs of your backyard bird community, allowing for more informed decisions when it comes to maintaining and enhancing your nesting box habitat.
Drawing Insights from Your Nesting Box Experience
As you continue to monitor and learn from your backyard bird habitat through nesting box training, it’s essential to draw insights from your experience. This will not only help you refine your setup but also make informed decisions about future installations.
Reflect on the successes and challenges of your current nesting boxes. Which species are using them, and how often? Are there any issues with predator protection or maintenance that could be addressed in a new design? Take note of any patterns or trends you observe, such as which trees or shrubs attract the most birds or where water sources are located.
Consider the specific needs of your target bird species when evaluating the effectiveness of your nesting boxes. For example, if you’re trying to attract bluebirds, make sure their preferred cavity size and entrance hole orientation are being met. If a particular design or placement isn’t working, don’t be afraid to experiment with changes in future installations.
By analyzing your results and making data-driven decisions, you’ll create a more efficient and effective backyard bird habitat that attracts and supports the species you want to see thrive.
Frequently Asked Questions
What are some common mistakes to avoid when setting up a nesting box for the first time?
When installing a new nesting box, it’s essential to ensure proper placement, taking into account factors like sunlight, wind protection, and proximity to food sources. Avoid placing boxes too close to predator-attracting structures, such as bird feeders or suet cakes. Also, keep in mind the specific needs of the species you’re trying to attract, including height, entrance size, and box depth.
How often should I clean and maintain my nesting box to ensure its effectiveness?
Regular maintenance is crucial for a successful nesting box. Clean out the box at least once a year, removing any debris or old nesting material. Check for signs of wear, damage, or pest infestations more frequently during peak breeding seasons. Consider installing a predator guard or other deterrents to protect your birds from potential threats.
Can I use a single nesting box design for multiple species, or do I need separate boxes for each type?
While some nesting box designs are versatile and can accommodate various bird species, others may be specific to particular types of birds. Research the needs and preferences of the species you want to attract before choosing a design or installing a new box. Some popular designs, like those featuring a roof or removable back, can be adaptable for different species.
How do I encourage birds to use my nesting box, especially if it’s empty after installation?
Birds may take time to discover and occupy a new nesting box. Consider adding some attractive features, such as a nearby bird bath or a feeder with sunflower seeds, to draw them in. Keep the area around the box free from predators and debris, creating an inviting environment that makes your birds more likely to choose it for breeding.
Can I install multiple nesting boxes in close proximity, or should they be spaced far apart?
Spacing is crucial when installing multiple nesting boxes to avoid competition and conflict among bird species. Research the specific needs of the birds you’re trying to attract, as some may prefer solitary nesting boxes while others thrive in close proximity. Aim for a balance between providing enough space for individual nests while also fostering social interaction among your feathered friends.