
Raising brooding chicks without a mother hen can be a daunting task, but with the right guidance, you’ll be well on your way to successfully raising healthy and happy chicks. If you’re new to backyard poultry or looking to expand your flock, it’s essential to know that incubation and proper brooder setup are crucial for the survival of your chicks. Without a mother hen, you’ll need to step in and provide a nurturing environment that mimics their natural habitat. In this article, we’ll walk you through everything you need to know about raising brooding chicks without a hen, from setting up a safe and healthy brooder space to identifying potential health concerns that can arise. Whether you’re a seasoned breeder or just starting out, our expert guide will give you the confidence and knowledge to raise thriving chicks on your own.
Understanding Brood Pipping and Incubation
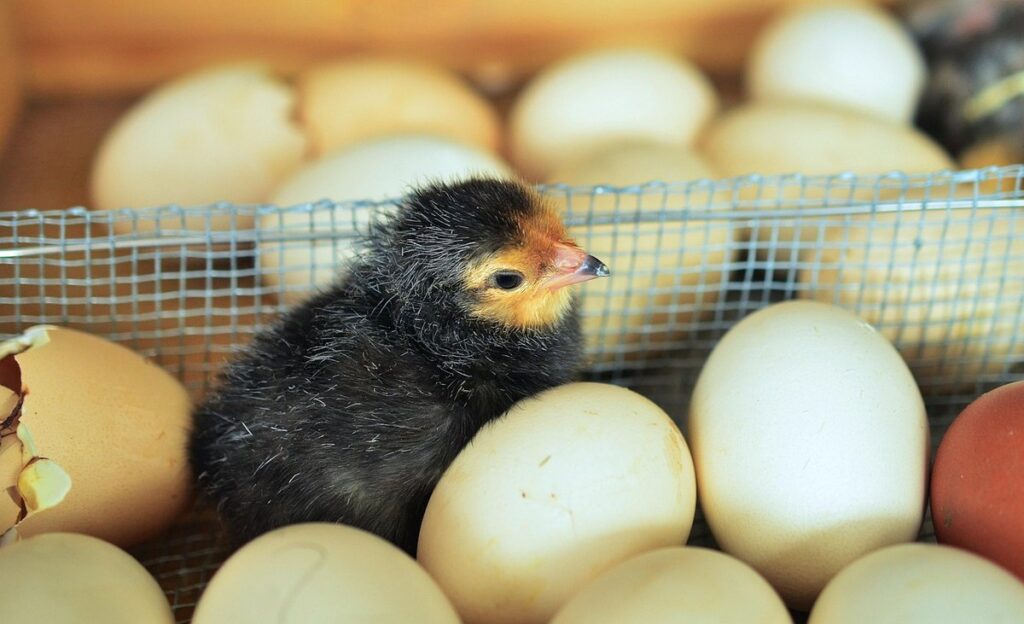
So, you’re taking care of your chicks without a broody hen. Let’s dive into understanding the process of brood pipping and incubation to ensure their safe hatching and development.
The Role of Temperature in Successful Incubation
Maintaining accurate temperatures is crucial for successful brood pipping and incubation. During this critical period, chicks require a precise temperature range to develop properly. The ideal temperature varies depending on the stage of development.
In the first 24 hours after egg candling, maintain a temperature of around 99-100°F (37-38°C). This allows the embryo to absorb moisture from the yolk sac and initiate pipping. Between 24-48 hours, slightly decrease the temperature to 98-99°F (36-37°C) as the chick begins to pip.
From 48 hours to hatching, reduce the temperature further to around 97-98°F (36-37°C). This helps the chick dry its feathers and get ready for emergence. It’s essential to maintain a consistent temperature throughout this period, as fluctuating temperatures can stress the developing chicks.
Monitor your incubator closely and adjust the temperature according to the stage of development. You can use an egg candler or a thermometer gun to check the internal temperature without opening the incubator. With precise temperature control, you’ll be able to support the successful pipping and hatching of your chicks.
Signs of Healthy Chicks During Incubation
As you monitor the incubation process, it’s essential to recognize signs of healthy chicks. This will help you identify potential issues early on and take corrective action if necessary. A healthy chick should display consistent growth and development throughout the incubation period.
Some key indicators of a healthy chick include:
* Consistent weight gain: Monitor the chicks’ weights regularly to ensure they’re growing at an average rate.
* Clear eyes and nostrils: Make sure the eyes are clear, open, and free from any discharge. The nostrils should be pink and slightly moist.
* Active movement: Healthy chicks will exhibit gentle movements within their eggs, such as twitches or flapping.
* Proper positioning: Check that the chick is positioned with its head pointing towards the air cell (the small indentation at one end of the egg) and its body aligned with the long axis of the egg.
Keep in mind that these signs don’t guarantee a hatch, but they can give you confidence in the chick’s development. Regular monitoring will help you detect any potential issues early on, allowing for timely intervention if necessary.
Preparing a Brooder Without a Hen
If you’re brooding chicks without a hen, setting up a safe and comfortable brooder environment is crucial to their health and development. Let’s explore how to prepare an ideal space for your chirping friends.
Creating a Safe and Comfortable Environment
When setting up a brooder for chicks without a hen, it’s essential to create a safe and comfortable environment. Adequate ventilation is crucial to prevent ammonia buildup from droppings. A simple solution is to hang a piece of cardboard or a bungee cord to suspend the bedding off the floor, allowing air to circulate underneath.
Heat is another critical aspect to consider. Chicks need a consistent temperature between 90-100°F (32-38°C) for the first week, gradually reducing by 5-10°F (3-6°C) each week thereafter. A heat lamp or ceramic heat emitter can be used, but ensure it’s at least 18 inches away from the chicks to prevent overheating.
Proper lighting is also vital for chick development. A UVB light source should be provided, ideally with a photoperiod of 14 hours of light and 10 hours of darkness. This mimics natural daylight and promotes healthy growth. Place the light at a height that allows the chicks to move freely under it, but not directly underneath.
Remember, a well-ventilated brooder with adequate heat and light will give your chicks a strong start in life.
Choosing the Right Feed and Water System
Nutrition and hydration are crucial for young chicks during the brooding period. A suitable feed and water system will help ensure they receive adequate nutrients and stay hydrated. Chick starter feed is formulated to meet their specific nutritional needs, typically containing 18-20% protein.
When choosing a feed system, consider a feeder that can be easily cleaned and won’t tip over, such as a plastic or metal trough feeder. A chick feeder with small openings will help prevent food from spilling out and keep it clean. You’ll also need to provide fresh water at all times. Use a waterer that’s designed for chicks, such as an automatic waterer or a shallow dish with a non-tip design.
It’s essential to have both feed and water available within reach of the chicks at all times. Place them in separate locations to prevent competition and ensure each chick gets enough food and water. Monitor their intake and adjust the feeder and waterer accordingly. You may need to refresh the feed and water multiple times a day, especially during hot weather.
Artificial Incubation: A Step-by-Step Guide
Welcome to the world of artificial incubation, where you’ll learn how to successfully brood chicks without a mother hen, step by step. Let’s get started on this journey together!
Setting Up an Incubator or Brooder for Chicks
When setting up an incubator or brooder for chicks, it’s essential to follow proper safety precautions to ensure a healthy and thriving environment. Before starting, make sure the area is clear of any flammable materials and is well-ventilated. Read through the manufacturer’s instructions carefully, as different models may have specific requirements.
First, set up the incubator or brooder in a quiet, draft-free location away from direct sunlight. Next, place the chicks in the recommended temperature zone, which is usually around 99°F to 100°F (37°C to 38°C) for the first 24 hours. Monitor the temperature closely and adjust as needed.
Some commercially available incubators or brooders come with a built-in humidity control system. If yours does, be sure to follow the manufacturer’s guidelines for maintaining optimal humidity levels (usually around 50-60%). You can also use a hygrometer to ensure accurate readings.
Remember, always keep an eye on your chicks during this critical period, and be prepared to intervene if you notice any issues with temperature or humidity. With proper setup and care, your chicks will thrive in their new environment.
Maintaining Optimal Humidity Levels During Incubation
Maintaining optimal humidity levels during incubation is crucial for successful brooding. High or low humidity can lead to issues such as respiratory problems, mold growth, and even failure of the embryo to hatch.
To achieve the right balance, a humidity level between 50-60% should be maintained from day 1 to day 18. After that, it’s essential to increase the humidity to around 70-80%. You can use a hygrometer to monitor the levels accurately.
One effective method for maintaining humidity is by using a misting system. This involves placing a water reservoir near the incubator and setting up a system to release fine droplets of water into the air. You can also use wet sponge or cloth placed in the incubator, which will gradually release moisture as it dries.
Another option is to increase the temperature slightly, which will cause more moisture to evaporate from the incubation trays. This method should be used with caution and monitored closely to avoid overheating. Regardless of the method you choose, regular checks on humidity levels are crucial to ensure a healthy environment for your chicks.
Health Concerns and Monitoring Brooding Chicks Without a Hen
When it comes to raising chicks without a mother hen, health concerns can arise quickly. This is especially true for inexperienced chicken keepers who may not know how to monitor and respond to potential issues.
Common Issues Faced by Chicks Raised Without Hens
Raising chicks without hens can be challenging, and they may face various health concerns that need to be addressed promptly. One common issue is stress-related problems, as young chicks rely heavily on their mother’s presence for comfort and guidance. Without a hen, they might feel anxious or disoriented, leading to decreased appetite and increased susceptibility to illness.
Another critical concern is dehydration, particularly in the first few days after hatching when chicks are still developing their feathers and learning to regulate their body temperature. A brooder with adequate ventilation and a shallow water dish placed just out of reach can help prevent drowning risks while encouraging them to drink regularly.
Respiratory problems are also common among chicks raised without hens, as they may not have the opportunity to observe proper dust bath and feather maintenance techniques. To mitigate this risk, provide a clean brooder with adequate air circulation, maintain optimal temperature ranges (around 90-95°F for the first week), and avoid overstocking. Regular monitoring of your chicks’ health and adjusting their environment accordingly can help minimize these risks and ensure a healthy start in life.
Keeping a Close Eye on Brood Health and Hygiene
Monitoring brood health is crucial when raising chicks without a hen. You’ll need to keep a close eye on their behavior and physical condition to catch any signs of illness or distress early on. Start by checking the chicks’ overall appearance daily, looking for any changes in droppings, urine output, or appetite. Pay particular attention to their respiratory system: labored breathing, wheezing, or discharge from the nostrils can be a sign of infection.
Maintaining cleanliness within the brooder is also vital. Clean food and water dishes regularly, removing any debris or uneaten feed to prevent bacterial growth. Change the bedding material completely every 3-4 days, replacing it with fresh dry material to absorb moisture and odors. Keep an eye out for signs of pests like mites, lice, or flies, which can spread disease among the chicks.
Check your chicks’ droppings regularly to monitor their digestive health: abnormal color, consistency, or frequency can signal a problem. If you notice any unusual behavior, such as lethargy, huddling together, or loss of appetite, consult with a veterinarian or poultry expert for guidance on treating the issue.
Managing Stress and Handling Chicks Without a Hen
When it comes to raising chicks without a mother hen, managing stress is crucial for both you and your new additions. This section will walk you through some essential tips to help keep everyone calm and happy.
Techniques for Reducing Stress in Young Chicks
When it comes to reducing stress in young chicks, it’s essential to handle them gently and create a calm environment. Chicks are fragile and vulnerable during this period, so even the slightest disturbance can cause anxiety. To minimize stress, always support their body weight when handling them, making sure not to pick them up by their legs or tail.
A calm environment is also crucial in reducing stress levels. Provide a warm, draft-free space with adequate ventilation. Ensure the brooder is well-maintained and clean, as chicks are sensitive to odors and ammonia. Keep the lights at a comfortable level, and consider using a UVB light to promote calcium metabolism and overall health.
Avoid loud noises, sudden movements, or other disturbances that might startle them. Chicks can become stressed if they’re exposed to too many new sights and sounds, so introduce them gradually to their surroundings. By handling chicks gently and creating a peaceful environment, you’ll help reduce stress levels and promote healthy growth during this critical period.
Building Trust and Confidence in Chick Rearing
Building trust with your chicks is essential for their overall well-being and development. When you establish a strong bond with your birds, they become more confident and less stressed. One of the most crucial ways to build trust is by being gentle and consistent in your interactions.
When handling your chicks, move slowly and deliberately, giving them plenty of time to adjust to your presence. Avoid sudden movements or loud noises, which can startle them and make them associate you with fear. Instead, speak softly and let your chicks become accustomed to your voice.
Consistency is key when building trust with your chicks. Establish a regular routine for feeding, cleaning, and handling, so they know what to expect from you. For example, if you feed them at the same time every day, they’ll learn to associate that time with food, making mealtime less stressful.
By being gentle and consistent, you’ll help your chicks develop a healthy fear response, which will serve them well throughout their lives. This trust-building process may take some time and effort, but it’s an investment worth making for healthier, more confident birds.
Caring for Brooding Chicks Beyond Hatching
Now that your chicks have hatched, it’s time to focus on their post-hatch care, ensuring they grow strong and healthy under your watchful eye. This section guides you through crucial steps for successful chick rearing.
Transitioning to Grower Feed and Expanding Environments
As your chicks approach 4-5 weeks of age, it’s time to start transitioning them from brooder feed to grower feed. This nutritional upgrade will support their rapid growth and development during this critical period.
When making the switch, it’s essential to do so gradually to prevent digestive upset. Start by mixing a small amount (about 10%) of grower feed into their brooder feed for a few days before increasing the proportion over time. Monitor your chicks’ behavior and adjust the transition pace as needed. A general rule of thumb is to introduce grower feed in increments of 25% every 3-4 days until they’re fully adapted.
As your chicks mature, it’s also crucial to expand their environment to accommodate their growing needs. Provide more space for exercise and exploration by increasing the brooder size or introducing a separate run area. This will not only keep them active but also help prevent boredom and stress-related issues. Consider adding enrichment activities, such as toys or scratching posts, to engage your chicks’ natural behaviors.
Remember, every flock is different, so be prepared to adjust your approach based on individual chick development and performance. By following a gradual transition plan and expanding their environment thoughtfully, you’ll set your chicks up for success in the coming weeks.
Tips on Socialization and Social Structure
Socialization during the brooding period is crucial for the chicks’ emotional and psychological development. Without a mother hen to teach them essential behaviors like pecking order, dominance, and submission, it’s up to you to establish a stable social hierarchy.
Introduce multiple chicks to each other gradually, starting with visual introductions through a barrier, then gradually increasing face-to-face interactions under close supervision. Monitor their behavior closely for signs of aggression or stress, separating them if necessary.
Establish a pecking order by allowing the chicks to interact freely and naturally determine their roles. Be patient; this process can take several days to weeks. To encourage socialization, provide a spacious brooder with adequate nesting areas, perches, and feeding stations. This will help your chicks learn important skills like foraging, eating, and sleeping arrangements.
As they grow, you’ll notice the emergence of alpha birds who tend to be more dominant or assertive. Allow them to lead, but keep an eye out for bullying behaviors. With time and patience, your flock will develop a stable social structure that’s essential for their long-term well-being and happiness.
Frequently Asked Questions
What if I notice some chicks hatching outside of the ideal temperature range?
Maintaining precise temperatures is crucial for successful incubation, but unexpected variations can occur due to various factors such as incubator malfunctions or room temperature fluctuations. If you notice some chicks hatching outside of the ideal temperature range, closely monitor them and take immediate action by adjusting your setup to ensure their safety and well-being.
Can I use a homemade brooder instead of buying one?
While store-bought brooders are designed with specific features for optimal chick development, a well-set up homemade brooder can be just as effective. If you decide to create a DIY brooder, ensure it’s large enough to accommodate your chicks comfortably and meets the necessary ventilation and temperature requirements.
How often should I clean and disinfect the brooder?
Maintaining high hygiene levels is essential for preventing disease outbreaks in your brood. Clean the brooder at least once a week by removing bedding, scrubbing surfaces with a mild detergent, and replacing it with fresh material. Disinfect all equipment and surrounding areas to minimize the risk of contamination.
What if some chicks seem lethargic or show signs of illness?
Monitor your chicks closely for any signs of illness such as labored breathing, loss of appetite, or droopy wings. If you notice these symptoms, isolate affected birds immediately and consult a veterinarian specializing in poultry care for advice on treatment options. Keep all equipment clean and sanitized to prevent the spread of disease.
Can I raise brooding chicks without an incubator?
While using an incubator is recommended for precise temperature control, it’s not strictly necessary if you can maintain consistent temperatures with alternative methods such as a heat lamp or ceramic heat emitter. However, closely monitor your setup to ensure the chicks’ safety and adjust accordingly to avoid any potential health risks.