
Are you getting ready to welcome some new additions to your backyard flock? Raising baby chicks requires attention to detail, and one of the most crucial aspects is setting up a suitable brooding environment. A well-designed brooder can make all the difference in ensuring healthy growth and development for your young birds. But what makes an ideal brooder? With so many factors to consider, from temperature control to lighting and ventilation, it’s easy to feel overwhelmed. In this comprehensive guide, we’ll walk you through everything you need to know about creating a thriving brooding environment for your baby chicks. From setting up the perfect space to maintaining optimal conditions, our expert advice will help you create a haven for your flock to flourish.
Understanding the Importance of a Good Brooder
Understanding the importance of a good brooder is crucial for raising healthy chicks, as it affects their comfort, growth, and overall well-being from day one. Let’s dive into why a quality brooder matters.
Choosing the Right Size and Type of Brooder
When it comes to choosing the right size and type of brooder for your baby chicks, several factors come into play. The space available in your home, climate control requirements, and ease of maintenance are all crucial considerations.
To determine the ideal brooder size, consider the growing needs of your chicks. A general rule of thumb is to provide at least 2-3 square feet of space per chick from hatch to six weeks old. As they grow, this space can be reduced, but it’s essential to ensure they have enough room to move around comfortably.
In terms of brooder type, you’ll find options ranging from simple cardboard boxes to more sophisticated, climate-controlled units. For beginners, a basic brooder made from a sturdy plastic bin or a wooden box can suffice. However, if you live in an area with extreme temperatures or plan to raise chicks year-round, investing in a higher-end brooder that provides precise temperature control may be worth considering.
When selecting a brooder, also think about the ease of maintenance and cleaning. A brooder with easy-to-clean surfaces and adequate ventilation will save you time and effort in the long run. Additionally, consider the noise level – some brooders can be quite loud, which might not be suitable for urban settings or homes with close neighbors.
Designing an Optimal Brooding Space
When designing an optimal brooding space for baby chicks, it’s essential to prioritize their safety and comfort. The ideal temperature range for a brooder is between 90-100°F (32-38°C) during the first week after hatching, gradually decreasing by 5°F each week until it reaches around 70°F (21°C).
Proper ventilation is also crucial to prevent ammonia buildup from droppings and maintain good air quality. Ensure that there’s adequate airflow in the brooder by installing windows or vents, but be cautious not to create drafts that might chill the chicks.
Lighting is another critical aspect to consider. Chicks need a photoperiod of 24 hours of light during their first week, which can be achieved using heat lamps or LED lights. However, after the first week, you can switch to a 14-hour light cycle to promote natural behavior and growth.
Setting Up the Brooder: Essential Equipment and Supplies
Before bringing your baby chicks home, you’ll need to set up a safe and healthy brooder space that meets their needs. This includes essential equipment and supplies for optimal growth and development.
Providing Adequate Heat and Lighting
When it comes to setting up a brooder for baby chicks, providing adequate heat and lighting is crucial for their health and growth. A consistent temperature and sufficient light are essential for the chicks’ development, and using the right equipment can make all the difference.
You’ll need a reliable source of heat, such as heat lamps or ceramic heat emitters, to maintain an optimal brooder temperature between 90-100°F (32-38°C). Heat lamps are popular, but they can be hazardous if not used properly. Ceramic heat emitters, on the other hand, provide a safer alternative and are often preferred by many poultry keepers.
Supplemental lighting is also vital for promoting healthy growth. Chicks need a photoperiod of 14-18 hours to regulate their circadian rhythms, which can be achieved with LED or fluorescent lights. A general rule of thumb is to place the light source at least 12 inches above the brooder bedding and adjust its position as needed to prevent overheating.
Remember to monitor the temperature and lighting levels closely to ensure they remain consistent throughout the day. This will help your chicks grow strong and healthy, setting them up for a successful life in their future flock.
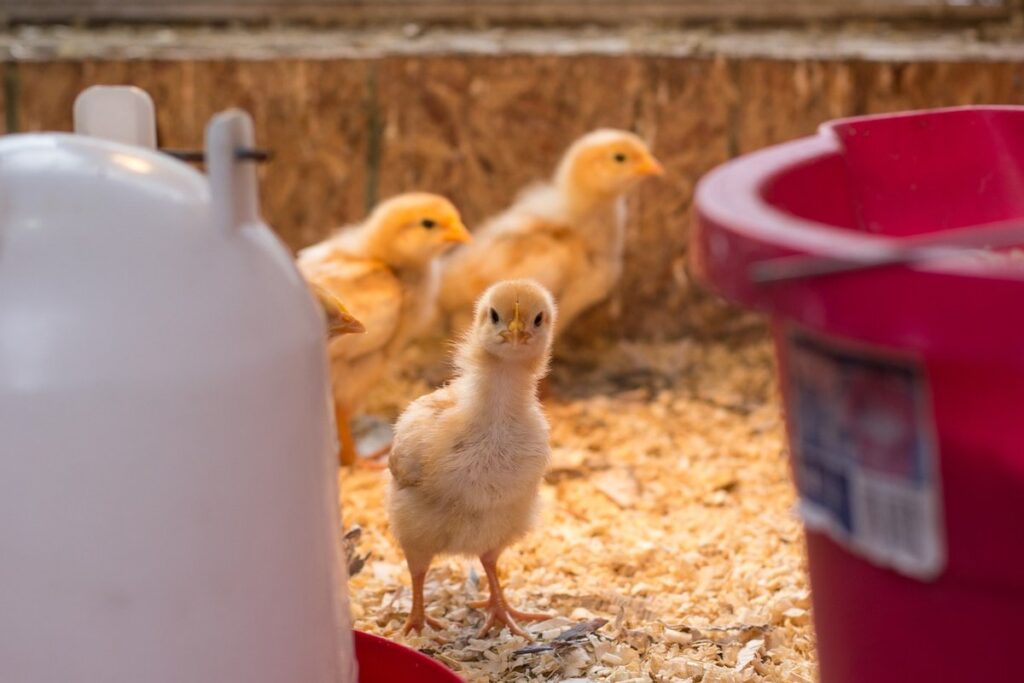
Watering and Feeding Systems for Baby Chicks
When it comes to setting up an effective watering and feeding system for your baby chicks, there are a few essential components you’ll want to have in place. A good starting point is to use nipple waterers instead of traditional founts. Nipple waterers are designed specifically for chicks and allow them to drink without having to splash or spill water everywhere.
Chick feeders also come in different styles, but most work on the same principle as a standard feeder – you pour food into it and the chicks peck at it as they eat. However, some chick feeders have built-in features like adjustable openings that help prevent overeating and spills.
To set up your watering system, attach the nipple waterer to a mason jar or bucket filled with fresh water. Place this near the feeding area so that the chicks can easily access both food and water at all times. Consider using multiple feeders and waterers spaced throughout the brooder to prevent overcrowding around these essential resources.
Some popular options for chick feeders include hanging feeders, elevated feeders, and gravity feeders. When choosing a feeder or waterer, make sure it’s easy to clean and maintain. This will help keep your chicks healthy by reducing the risk of bacterial contamination and disease.
Caring for Baby Chicks: Health and Hygiene Considerations
Maintaining a clean and healthy environment is crucial when raising baby chicks, so let’s dive into essential health and hygiene considerations to ensure their well-being.
Monitoring Temperature and Humidity Levels
Monitoring temperature and humidity levels is crucial for maintaining a healthy environment within the brooder. You can invest in a thermometer to track the temperature inside the brooder. As a general rule of thumb, you should aim for temperatures between 90°F (32°C) and 100°F (38°C) during the first week after hatching. This warmth is essential for helping the chicks absorb heat from their yolk sac.
As your chicks grow older, you’ll need to gradually reduce the temperature by 5-10°F each week until it reaches a comfortable level around 70-80°F. Humidity levels are equally important; aim for a relative humidity of 40-50% in the brooder. You can use a hygrometer to monitor these levels.
To maintain optimal conditions, keep an eye on your thermometer and hygrometer readings regularly. Make adjustments as needed to prevent temperature fluctuations that may stress or harm your chicks. A healthy balance between warmth and ventilation will help ensure a strong start for your flock.
Maintaining Cleanliness and Preventing Disease
Keeping your baby chick brooder clean is crucial for maintaining their health and preventing disease. A dirty brooder can harbor bacteria, viruses, and other pathogens that can quickly spread to the chicks. To keep your brooder spotless, start by disinfecting it thoroughly before adding the chicks. Use a poultry-safe disinfectant and follow the manufacturer’s instructions to ensure you’re using it correctly.
Remove waste daily, or more frequently if necessary. This includes removing droppings, uneaten food, and any debris that accumulates. Make sure to wear gloves when handling waste to prevent cross-contamination. You can also use a dust-free bedding material like paper-based products or aspen shavings to reduce the risk of respiratory issues.
To maintain a dust-free environment, gently stir the bedding daily and replace it completely every 7-10 days. This will help prevent ammonia buildup from the droppings, which can irritate your chicks’ eyes and lungs. Keep in mind that a clean brooder is not just about aesthetics – it’s essential for promoting healthy growth and development in your baby chicks.
Managing Brooder Temperatures: A Step-by-Step Guide
Maintaining a stable temperature is crucial for your chicks’ growth and development, so let’s dive into managing brooder temperatures safely and effectively. We’ll cover all you need to know in this step-by-step guide.
Understanding Chick Developmental Stages and Temperature Needs
As baby chicks develop, their temperature needs change significantly. It’s essential to understand these developmental stages and adjust the brooder temperature accordingly to ensure optimal growth and health.
From hatch to 18 days of age, the ideal temperature is around 90-95°F (32-35°C). At this stage, chicks rely on their stored yolk sac for energy, but they also start to regulate their body temperature. Keeping it warm helps them conserve energy and promotes healthy digestion.
Between 18-24 days, the temperature can be reduced by 5-10°F (3-6°C) to around 80-85°F (27-29°C). Chicks are now starting to feather out and develop their adult coat, which requires less heat. It’s crucial to monitor their behavior and adjust the temperature if they seem uncomfortable or listless.
After 24 days, chicks can be gradually transitioned to a temperature of around 70-75°F (21-24°C), simulating outdoor temperatures. This helps them adapt to changing environmental conditions and prepares them for life outside the brooder. By understanding these temperature needs, you’ll create an optimal environment for your chicks’ growth and development.
Gradually Reducing Heat Sources as Chicks Grow
As your baby chicks grow and develop, it’s essential to gradually reduce heat sources to prevent overheating and promote healthy growth. A common mistake new chicken keepers make is abruptly removing the heat source, which can cause stress to the chicks.
To avoid this, follow a step-by-step plan to gradually reduce heat sources as your chicks grow. Start by monitoring their behavior and adjusting the temperature accordingly. Typically, brooder temperatures should be reduced by 1-2°F (0.5-1°C) every 7-10 days until they reach around 60-70°F (15-21°C).
As you make these adjustments, ensure the chicks have access to adequate ventilation to prevent moisture buildup and ammonia from their droppings. A good rule of thumb is to start reducing heat sources when your chicks are around 4-5 weeks old, gradually decreasing the temperature over the next few weeks.
Keep an eye on your chicks’ behavior and adjust as needed – if they seem cold or lethargic, you may need to increase the temperature temporarily. By following this gradual reduction plan, you’ll help ensure a smooth transition from brooding to rearing and set your chicks up for healthy growth and development.
Introducing Baby Chicks to the Brooder: Tips and Tricks
When it’s time to introduce your new baby chicks to their brooder, it can be an exciting but nerve-wracking experience for many chicken keepers. In this section, we’ll walk you through some essential tips and tricks to make the transition smooth.
Creating a Safe and Stress-Free Introduction Process
When introducing baby chicks to the brooder, it’s essential to minimize stress for both you and your new feathered friends. A smooth transition sets the tone for a happy and healthy flock.
To start, prepare the brooder before bringing home the chicks. This means setting up a comfortable temperature range (usually between 90-95°F), ensuring adequate ventilation, and having food, water, and a heat source in place. Once you bring the chicks to their new environment, place them gently on top of the brooder’s bedding to reduce stress. Allow them time to explore their surroundings before introducing any other birds.
Avoid overcrowding, as this can lead to stress and potentially deadly diseases like Marek’s disease or respiratory issues. Keep an eye out for signs of stress in your chicks, such as huddled together, panting, or making unusual noises. Monitor temperature fluctuations closely to prevent heat shock, which can be fatal within a few hours.
Remember that babies adapt faster than adults when introduced to their new environment, but this doesn’t mean they won’t get stressed. To mitigate this, maintain a consistent routine and ensure all chicks have enough space to move around freely without feeling confined or threatened.
Ensuring a Smooth Transition from Hatcher to Grown Chick
As you transition your baby chicks from the hatcher to the grow-out phase, it’s essential to create an optimal environment that supports their healthy growth and development. A smooth transition is crucial for minimizing stress and ensuring your flock grows into strong, healthy birds.
To achieve this, ensure the brooder remains clean and well-ventilated. Remove any soiled bedding, disinfect all surfaces, and replace with fresh, dry material to prevent ammonia buildup. Proper ventilation also helps control moisture levels, reducing the risk of respiratory issues.
Increase the size of the enclosure as the chicks grow, providing enough space for them to move around comfortably. Aim for at least 2-3 square feet per bird by week 4. This allows for natural behavior, exercise, and socialization among flock members.
Monitor temperature carefully during this phase. Gradually decrease heat sources as the chicks mature, aiming for a brooder temperature between 60°F and 70°F (15°C and 21°C) by week 6. A well-planned transition will help your baby chicks thrive and develop into robust birds, setting them up for success in their future flock role.
Troubleshooting Common Brooder Issues
We’ve all been there: a chirping chick stops peeping, or a brooder’s temperature gauge spikes unexpectedly. Let’s tackle these common problems together in this troubleshooting guide.
Identifying and Resolving Temperature-Related Problems
As you care for your baby chicks, one of the most critical factors to monitor is temperature. A brooder that’s too hot can lead to heat stress, while a brooder that’s too cold can result in chilled or hypothermic chicks. To identify temperature-related problems, check your chicks frequently and look out for signs such as panting, lethargy, or loss of appetite.
Inadequate ventilation is another common issue that can cause temperature-related problems. Chicks need fresh air to regulate their body temperature, so ensure proper airflow in the brooder by installing windows, vents, or fans. A simple rule of thumb is to provide at least 1 square foot of ventilation per chick. For example, if you have a 10-chick flock, make sure there are 10 square feet of open space for air circulation.
If you suspect heat stress or inadequate ventilation, take immediate action by adjusting the brooder temperature and adding more ventilation. This may involve using shades or blocks to block direct sunlight, moving the brooder to a cooler location, or upgrading your ventilation system. By staying vigilant and making adjustments as needed, you can keep your chicks healthy and thriving.
Managing Pests and Diseases in the Brooder
Managing pests and diseases in the brooder is crucial for raising healthy chicks. Pests can cause stress, discomfort, and even death to your baby chicks. Common brooder pests include mites, lice, fleas, and flies. To prevent infestations, keep the brooder clean by removing soiled bedding and cleaning feeding and watering equipment regularly. Use a deep litter system with wood shavings or straw, which can help absorb moisture and reduce odor.
Monitor your chicks daily for signs of pests, such as excessive pecking, scratching, or restlessness. Check for mites and lice by gently parting the feathers on your chicks’ necks and looking for tiny bugs or eggs. Use a flea comb to remove lice and mites from your chicks’ feathers.
Some diseases that can affect baby chicks in the brooder include coccidiosis, Marek’s disease, and respiratory infections. To prevent these diseases, ensure good ventilation in the brooder, keep the temperature between 90-100°F (32-38°C), and maintain a clean environment by removing soiled bedding and disinfecting equipment regularly.
Frequently Asked Questions
How do I ensure my brooder is well-ventilated to prevent moisture buildup?
Proper ventilation is crucial for maintaining a healthy environment. Ensure your brooder has adequate airflow by providing at least one square foot of ventilation space per chick. You can achieve this with windows, vents, or a fan. Keep in mind that too much ventilation can be just as problematic; aim for a balance between air circulation and temperature control.
What is the ideal temperature range for baby chicks during their first week of life?
During the first week, it’s essential to maintain a consistent temperature between 90-100°F (32-38°C). Use a reliable thermometer to monitor temperatures and adjust as necessary. A heat lamp or ceramic heat emitter can be used, but ensure they’re at least 12-18 inches above the bedding material.
How often should I clean the brooder to prevent disease?
Maintaining cleanliness is vital for preventing disease in your chicks. Aim to clean the brooder at least twice a week, removing soiled bedding and replacing it with fresh material. Disinfect all surfaces and equipment thoroughly after each cleaning session.
Can I use a pre-made brooder or should I build one from scratch?
Both options are viable; consider what suits your needs best. Pre-made brooders offer convenience and ease of assembly but might not be customizable to meet specific requirements. Building a brooder from scratch allows for greater control over design and materials, but requires more time and effort.
How do I know if my chicks need more or less heat as they grow?
Monitor temperature levels regularly, taking into account changes in the environment. As your chicks mature (around 3-4 weeks), you can gradually reduce the heat by 5°F (3°C) every few days. Be cautious not to shock them with sudden changes; a gradual adjustment will help prevent stress and ensure their well-being.