
Raising new hatch chicks can be an exhilarating experience for backyard chicken enthusiasts. However, it also comes with its own set of challenges that can make or break the success of your flock. One misstep in care and development can lead to stunted growth, weakened immunity, or even loss of precious chicks. This is why understanding chick development, breed selection, and creating a suitable brooder environment is crucial for healthy growth.
In this comprehensive guide, we’ll walk you through the essential steps of raising new hatch chicks, covering everything from selecting the right breed to post-hatch care. We’ll delve into the intricacies of nutrition, health monitoring, and what to expect during the first few weeks of your chicks’ lives. By the end of this article, you’ll be equipped with the knowledge and confidence to raise robust and thriving new hatch chicks that will become an integral part of your backyard flock.
Understanding the Basics of Chick Development
Let’s start by understanding how chicks develop from egg to chick, and what factors influence their growth during those first few weeks. It’s a fascinating process that sets the stage for their healthy development as young chickens.
Stages of Embryonic Development
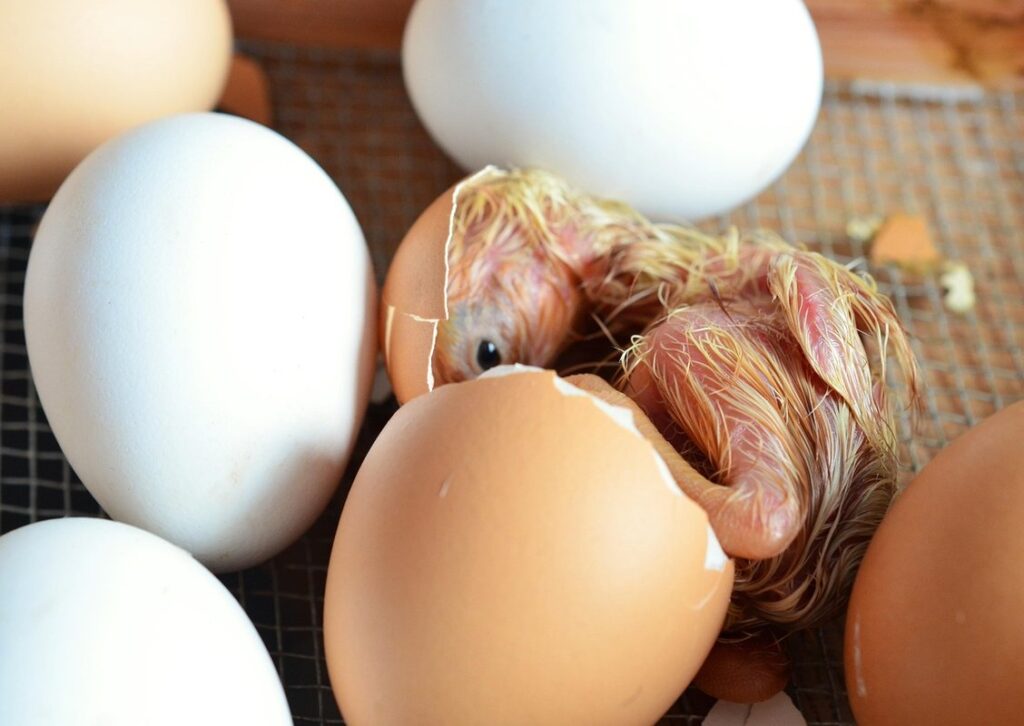
As new hatch chicks make their way into the world, it’s essential to understand the incredible journey they took before emerging from their shells. The stages of embryonic development are a complex and fascinating process that transforms a tiny fertilized egg into a fully formed chick.
It all begins with fertilization, where a sperm meets an egg in the hen’s reproductive tract. This event triggers a series of cell divisions that eventually form a blastoderm – a cluster of cells that will eventually become the embryo. The critical period, spanning around 18-24 hours after fertilization, is crucial for development as it sets the stage for future growth.
Incubation then takes over, with careful temperature and humidity control allowing the embryo to develop further. During this phase, the chick’s major organs, such as its heart, lungs, and liver, begin to form and function. By day 21, most chicks have developed feathers, beaks, and claws, and are ready to hatch.
As you incubate your eggs, understanding these developmental stages can help you anticipate what’s happening inside the egg. Keep in mind that temperature fluctuations during this period can significantly impact development, so ensure a consistent environment for optimal results.
Factors Influencing Embryo Growth
As you carefully monitor the incubation process, it’s essential to understand that embryo growth is influenced by several factors beyond your control. The quality of the egg plays a significant role in determining the success of hatching chicks. A healthy egg with strong cell structure and adequate nutrient reserves will provide a solid foundation for embryonic development.
Temperature and humidity levels are also crucial during incubation. Most chicken breeds require an optimal temperature range between 99°F to 100°F (37°C to 38°C) during the first 18 days of incubation, followed by a slight decrease in the final stages. Similarly, maintaining precise humidity levels – usually around 50-60% relative humidity – will help prevent drying out of the egg contents.
Proper handling is another vital aspect that should not be overlooked. Avoid touching or rotating eggs excessively during incubation, as this can cause damage to the embryo. Gently clean and disinfect the incubator regularly to prevent bacterial growth, which may lead to embryo mortality. By paying attention to these factors, you’ll create a nurturing environment for your embryos to grow strong and healthy.
Importance of Proper Incubation Techniques
When setting out to hatch chicks, it’s essential to understand that proper incubation techniques play a significant role in their development. A well-set-up incubator is the first step towards successful hatching.
First and foremost, ensure your incubator is calibrated correctly. This involves checking the temperature gauge for accuracy and making sure the thermostat is functioning properly. The ideal temperature for most poultry species is between 99°F (37°C) and 100°F (38°C). Keep in mind that it’s better to err on the side of caution – if you’re unsure, start with a lower temperature and gradually increase as needed.
Maintaining proper humidity levels is also crucial. Aim for a relative humidity level of around 50-60%. You can achieve this by adding water to the incubator or using a humidifier specifically designed for incubation purposes.
Monitoring embryo progress is just as important. Regularly check for movement, and keep an eye out for any signs of distress such as slow development or unusual positioning. By doing so, you’ll be able to catch any potential issues early on and take corrective action if necessary.
Choosing the Right Breed for Your Needs
When selecting a new breed of hatch chicks, consider your lifestyle and what you’re looking to get out of raising chickens. This section will help guide you in choosing the perfect fit.
Factors to Consider When Selecting a Breed
When selecting a breed for your new hatch chicks, there are several factors to consider. First and foremost, you should think about the purpose of raising these birds. Will they be providing meat, eggs, or entertainment through showing? Different breeds excel in different areas, so it’s essential to choose one that aligns with your goals.
For example, if you’re looking for a breed that produces plenty of eggs, consider a Leghorn or Rhode Island Red. These birds are prolific layers and can produce hundreds of eggs per year. On the other hand, if you’re interested in raising meat birds, a Cornish Cross or Plymouth Rock might be a better fit.
Climate is also an important consideration when selecting a breed. Some breeds, such as Silkies, have thicker feathers that help protect them from cold temperatures. Others, like Orpingtons, are more tolerant of heat and humidity. Make sure to choose a breed that can thrive in your local climate.
Lastly, think about your personal preferences. Do you want birds with distinctive feather patterns or colors? Are you interested in raising a specific type of chicken, such as a Brahma or Cochin? By considering these factors, you’ll be well on your way to selecting the perfect breed for your needs.
Popular Breeds for Backyard Flocks
When it comes to choosing a breed for your backyard flock, you’ll want to consider birds that are known for their hardiness, egg-laying abilities, and temperament. Some popular breeds suitable for small-scale backyard flocks include Leghorns, Rhode Island Reds, and Barred Rocks.
Leghorns are a top choice for many backyard chicken keepers due to their high egg production (280-300 eggs per year) and relatively low maintenance care requirements. They’re also known for being friendly and social birds that can thrive in small spaces. However, they do require regular dust bathing and may become flighty if not provided with adequate space.
Rhode Island Reds are another popular breed for backyard flocks, prized for their rich brown eggs (200-220 per year) and gentle nature. They’re relatively easy to care for and can adapt well to small enclosures. However, they do have a reputation for being heavier birds that require more space to move around.
Barred Rocks are also a great choice for backyard chicken keepers, offering high egg production (200-220 eggs per year) and friendly, outgoing personalities. They’re relatively low-maintenance birds that can thrive in small spaces with adequate food, water, and care.
Tips for Introducing New Breeds into Your Flock
When introducing new breeds to your existing flock, it’s essential to take things slowly and carefully. Acclimation procedures are crucial to prevent stress on both the new birds and the established ones. Start by keeping the new chicks separate from the rest of the flock for at least a week. This allows them time to adjust to their new surroundings and reduces the risk of disease transmission.
As you prepare to integrate the new breeds, make sure to provide plenty of space and resources for all birds. Ensure your coop is clean and well-ventilated, and that there’s enough room for each bird to stretch its wings and exercise comfortably. Introduce the new breeds gradually, starting with visual introductions through a divider or gate.
Monitor both groups closely for signs of stress or aggression, such as excessive pecking or squawking. If you notice any issues, it may be best to slow down the introduction process or seek advice from an experienced poultry keeper. Keep in mind that some breeds can carry specific health risks, so research these beforehand and take necessary precautions.
Preparing the Brooder Environment
To ensure a healthy start for your new hatch chicks, it’s crucial to prepare their environment carefully. This includes setting up a safe and comfortable brooder space.
Essential Equipment for a Healthy Brooder
When setting up a brooder for your new hatch chicks, having the right equipment is crucial to provide them with a safe and healthy environment. First and foremost, you’ll need a reliable heat source. Heat lamps are an excellent option, as they allow for precise temperature control and can be easily adjusted to suit the needs of your chicks.
However, it’s essential to choose the right type of lamp. Ceramic heat emitters or infrared heat mats are also great alternatives, as they provide consistent warmth without the risk of burns associated with traditional heat lamps. Always ensure that your chosen heat source is securely positioned and out of reach of your curious chicks.
You’ll also need a temperature gauge to monitor the brooder’s temperature accurately. These gauges usually come in digital or analog formats and can be wall-mounted for easy viewing. This will allow you to make adjustments to the heat source as needed to maintain an optimal temperature range between 90-100°F (32-38°C) during the first week.
Don’t forget about ventilation – a well-functioning ventilation system is vital to remove ammonia from the brooder and prevent moisture buildup. A simple vent fan or a more advanced ventilation system with filters can make all the difference in keeping your chicks healthy and happy.
Creating a Safe and Comfortable Environment
Creating a safe and comfortable environment for your new hatch chicks is crucial for their health and well-being. When it comes to space, make sure you’ve provided at least 1-2 square feet of floor space per chick. This will allow them room to move around comfortably without feeling cramped or competing for resources.
Lighting is also essential, but be mindful not to overdo it – chicks can easily become stressed by bright lights. Consider using a low-wattage red light or LED bulbs specifically designed for brooder use. These will provide sufficient light for the chicks to see their surroundings without causing discomfort.
Designate separate areas for feeding and watering to prevent contamination and mess. Use a shallow dish for food and a waterer with a narrow lip to prevent spills. Place these areas within easy reach of your chicks, but not so close that they can easily knock them over.
Aim for temperatures between 90-95°F (32-35°C) on the first day and gradually reduce it by 5°F (3°C) every day thereafter until you reach a stable temperature around 70-75°F (21-24°C).
Biosecurity Measures to Prevent Disease Spread
When introducing new hatch chicks to your brooder environment, it’s crucial to implement effective biosecurity measures to prevent disease spread within the flock. This may seem like a daunting task, but with a few simple protocols in place, you can significantly reduce the risk of illness.
First and foremost, maintain strict sanitation practices within the brooder area. This includes regular cleaning and disinfecting of feeding and watering equipment, as well as thorough disposal of soiled bedding materials. Change the bedding frequently to prevent ammonia buildup and bacterial growth. When handling chicks or their living environment, be sure to wash your hands thoroughly with soap and warm water.
Another critical aspect of biosecurity is limiting visitor access to the brooder area. Establish clear guidelines for visitors, such as requiring them to wear clean clothing and foot coverings, and encourage them to avoid touching chicks or equipment whenever possible. This will help prevent the introduction of external pathogens that can quickly spread throughout the flock. By being mindful of these simple precautions, you’ll be well on your way to creating a healthy and thriving environment for your new hatchlings.
Caring for New Hatch Chicks
Now that your new hatch chicks have arrived, it’s essential to provide them with proper care and attention to ensure they thrive. This section will walk you through the crucial steps of caring for your new baby chickens.
Nutritional Requirements for Growing Chicks
As you begin to care for your new hatch chicks, it’s essential to provide them with a nutrient-rich diet that meets their growing needs. Chicks require a balanced mix of proteins, carbohydrates, fats, vitamins, and minerals to support their rapid growth and development.
A good quality starter feed is the foundation of a healthy chick’s diet. Look for a feed specifically formulated for young chicks (0-6 weeks old) with around 20% protein content. As they grow, you can gradually switch them to a broiler finisher feed (18-20% protein) between 4-8 weeks. Don’t be tempted to overfeed – chicks need adequate space and exercise to stay healthy.
In addition to starter feed, consider supplementing with calcium and phosphorus-rich foods like crushed oyster shells or dark leafy greens like kale and spinach. Fresh water should always be available, and a grit supplement can help support their digestive system as they develop their grinding teeth.
Hydration and Water Quality Management
When it comes to caring for new hatch chicks, providing them with clean drinking water is just as crucial as feeding and housing. Proper hydration is essential for their growth and development, while contaminated water can lead to health issues and even death.
Make sure to provide multiple water sources throughout the coop or brooder area, especially if you have a large flock. Chicks will naturally gravitate towards fresh water over stagnant or dirty water. Change the water frequently, ideally every 2-3 hours, to prevent bacterial growth. Use a clean scoop or cup when refilling and avoid cross-contamination from other areas of the coop.
Water quality can be affected by factors such as temperature, humidity, and even nearby pets. Monitor your chicks’ behavior and appearance for signs of dehydration or waterborne illness. Keep an eye out for cloudy or discolored water, which can indicate bacterial contamination.
To ensure top-notch water quality, consider using a waterer with built-in features like antimicrobial properties or self-filling capabilities. Regularly clean and disinfect these waterers to maintain their effectiveness. Always prioritize your chicks’ health by providing them with access to fresh, clean drinking water at all times.
Health Monitoring and First Aid Procedures
As a new hatch chick owner, it’s essential to keep a close eye on your chicks’ health and know what to do in case of an emergency. Health monitoring is crucial during the first few weeks after hatching when your chicks are most vulnerable.
Check for signs of illness or injury daily, looking for symptoms such as labored breathing, lethargy, loss of appetite, or visible wounds. Some common issues you may encounter include respiratory problems due to drafts, dust, or viral infections. If you notice any of these symptoms, isolate the affected chick immediately and provide a separate brooder with good ventilation.
For brooder burn, keep an eye out for areas where the chicks congregate under heat lamps. You can prevent this by providing multiple heat sources or adjusting the temperature to ensure even warmth distribution. In case of an emergency, a simple first aid kit containing supplies like antibiotic ointment, gauze, and tweezers can help stabilize your chick until you can get professional advice.
Some essential items to keep on hand include:
* A thermometer to monitor brooder temperatures
* A heat lamp timer to prevent over-heating
* A small first aid kit with essentials for treating minor injuries
By staying vigilant and knowing what to do in case of an emergency, you’ll be better equipped to provide the best possible care for your new hatch chicks.
Managing Chicks During the Critical Period
Caring for newly hatched chicks during their first few weeks of life is crucial, and we’ll walk you through the steps to ensure they thrive during this critical period. This section will cover essential tips and best practices to keep your chicks healthy and happy.
Recognizing Signs of Stress or Distress
Recognizing signs of stress or distress is crucial during the critical period, as it can impact chick development and overall health. New hatch chicks are especially vulnerable to environmental changes, handling, and nutrition.
Changes in behavior can be an early warning sign of stress or distress. Look for unusual activities like pacing, vocalization, or lethargy. A healthy chick should be active, eating, and interacting with its peers. If you notice a chick consistently hiding, avoiding food, or having difficulty standing, it may be experiencing stress.
Appetite is another key indicator. Monitor feeding patterns closely, as decreased or increased consumption can signal underlying issues. A stressed chick might exhibit anorexia, while others may overeat in response to anxiety. Be aware of any changes in droppings, which can indicate nutritional deficiencies or other health problems.
Monitor physical condition regularly, inspecting for signs of labored breathing, huddled posture, or difficulty walking. If you notice a chick struggling with its balance or appears weak, it’s essential to intervene promptly. Consult your veterinarian if you’re unsure about any behavior or symptoms exhibited by your chicks.
Strategies for Minimizing Chick Mortality Rates
Maintaining proper temperature and humidity levels is crucial for minimizing chick mortality rates during the critical period. Most breeds require a temperature of around 99-100°F (37-38°C) during the first 24 hours, decreasing by about 1-2 degrees each day until it reaches ambient temperature by the end of week one.
Adequate ventilation is also essential to prevent ammonia buildup from droppings and keep the air fresh. Install a reliable ventilation system that can exchange at least 10% of the coop’s volume per minute. Ensure adequate space for chicks, providing about 0.1 square feet (9.1 cm²) per chick.
Monitor temperature and humidity levels closely, adjusting as needed to ensure optimal conditions. Aim for a relative humidity level between 50-60%. Keep an eye out for signs of heat stress or cold stress in your chicks, such as huddled together, panting, or lethargy.
Regularly inspect the coop’s ventilation system to prevent clogging and maintain airflow. You can also use a hygrometer and thermometer to monitor temperature and humidity levels accurately. By following these simple steps, you can significantly reduce chick mortality rates during this critical period.
Importance of Proper Chilling Procedures
When those little balls of fluff start peeping their way into the world, it’s essential to remember that they’ve just undergone a significant shock. The hatching process can be traumatic for chicks, so it’s crucial to help them transition smoothly to their new environment. Proper chilling procedures are key here.
Chilling helps to calm down the chick and regulate its body temperature, which is usually around 99°F (37°C) right after hatching. If not chilled properly, this high temperature can lead to stress, lethargy, and even respiratory problems later on. To chill your chicks, simply place them in a well-ventilated area at room temperature (around 65-70°F or 18-21°C) for about an hour. You can also use a shallow pan of cool water or a damp towel to help lower their body temperature more quickly.
The goal is not to make the chick cold, but rather to slow down its metabolism and allow it to relax after the ordeal of hatching. Once chilled, your chicks should be able to get on with growing strong and healthy.
Post-Hatch Care and Integration
Now that your new hatch chicks have arrived, it’s time to focus on their care and integration into your flock. This next step is crucial for their health and happiness.
Transitioning Chicks from Brooder to Coop
When it’s time to move your chicks from their brooder to the coop, it’s essential to do it gradually and safely. This transition period can be a stressful time for both you and your birds.
First, introduce new surroundings by placing the brooder adjacent to the coop or creating a tunnel system between the two. This allows the chicks to become familiar with the new sights, sounds, and smells of their future home. Spend some time in the coop with your chickens to help them get used to your presence and movement.
When it comes to feeding systems, start by introducing fresh feeders and waterers to the coop before transferring the chicks. This will prevent any competition for resources between the new arrivals and established birds. To ease flock dynamics, integrate a small group of chicks into an existing flock or introduce them in batches if you’re starting from scratch.
Keep a close eye on your birds during this transition period, watching for signs of stress or aggression. With patience and careful planning, your chickens will adjust to their new surroundings and thrive in their coop.
Tips for Integrating New Chicks into Your Flock
When introducing new chicks to your existing flock, it’s essential to follow a careful acclimation process to ensure a smooth transition. Start by keeping the new arrivals separate from the rest of the flock for at least 24 hours, allowing them to get accustomed to their new surroundings without any stress or potential bullying.
During this time, provide the new chicks with a similar environment and amenities as your existing flock, such as food, water, and shelter. This will help them become familiar with the setup before being introduced to the rest of the flock.
When integrating the new chicks into the main group, do it gradually. Begin by allowing them to see and interact with each other through a barrier, such as a fence or screen door, for short periods. Monitor their behavior and body language closely, intervening if you notice any signs of stress or aggression.
Gradually increase face-to-face interactions over time, always supervising the introduction process. Be prepared to separate the birds again if needed to prevent conflicts. By following this step-by-step approach, you’ll minimize socialization challenges and ensure a harmonious integration into your flock.
Long-Term Health and Well-being Strategies
As you’ve successfully integrated your new hatch chicks into their surroundings, it’s essential to think about long-term health and well-being strategies to maintain a healthy and thriving flock. A balanced diet is crucial for maintaining optimal health, so ensure you’re providing a nutrient-rich feed that meets the specific needs of your chickens at different stages of growth.
Regular vaccinations can also help protect your flock against common diseases, but it’s vital to discuss vaccination protocols with a veterinarian beforehand to avoid over-vaccination and potential adverse reactions. Additionally, consider implementing a parasite control program to prevent internal parasites, such as worms and coccidiosis, which can lead to serious health issues if left untreated.
Another critical aspect of long-term health is providing adequate space for exercise and mental stimulation. Ensure your coop and run provide sufficient room for your chickens to roam freely and engage in natural behaviors like pecking, scratching, and foraging.
Frequently Asked Questions
What is the ideal temperature for a brooder, especially during the first few weeks of chick development?
The ideal temperature for a brooder depends on the age of the chicks. For the first week, it’s essential to maintain a temperature range of 90-95°F (32-35°C). As they grow, you can gradually reduce the temperature by 5°F (3°C) each week until it reaches around 70-75°F (21-24°C).
How often should I provide fresh water and food for my new hatch chicks?
Fresh water and food should be available at all times. Change the water at least twice a day to ensure cleanliness, and feed chicks 2-3% of their body weight in feed per day. It’s also crucial to maintain proper brooder hygiene by cleaning the area frequently.
Can I raise different breeds together, or is it better to keep them separate?
While it’s possible to raise multiple breeds together, it’s essential to introduce them slowly and under close supervision to prevent stress and potential fighting. Make sure to research their temperaments and compatibility before integrating new breeds into your flock.
How can I minimize the risk of disease transmission in my backyard flock?
Implementing biosecurity measures is crucial to preventing disease spread. Ensure proper sanitation, disinfect equipment regularly, and maintain a clean environment around the brooder and coop. Also, consider implementing a vaccination program and regular health checks for your birds.
What are some common signs of stress or distress in new hatch chicks, and how can I address them?
Monitor your chicks closely for signs of stress or distress, such as excessive pecking, lethargy, or changes in droppings. Address these issues promptly by providing a safe environment, maintaining proper nutrition and hydration, and seeking professional advice if necessary.